How To Change An Outdoor Light Fixture
Replacing an outdoor light fixture can significantly enhance a home's curb appeal and improve safety by ensuring adequate illumination around the property. While it might seem daunting, with careful planning and execution, this is a manageable DIY project for homeowners with basic electrical knowledge. This article provides a comprehensive guide to safely and effectively changing an outdoor light fixture.
Before commencing any electrical work, safety is paramount. It is crucial to understand the risks involved and take necessary precautions to prevent accidents. This includes properly disconnecting the power supply, using appropriate tools, and adhering to local electrical codes.
Preparation and Safety Precautions
The first and most critical step is to de-energize the circuit that powers the outdoor light fixture. Locate the corresponding circuit breaker in the home's electrical panel. Typically, this panel is situated in the basement, garage, or utility room. Identify the breaker labeled "Outdoor Lights," "Porch Lights," or something similar reflecting the circuit's function. Flip the breaker to the "OFF" position. To ensure complete safety, it's advisable to double-check that the power is indeed off using a non-contact voltage tester. Hold the tester near the wires within the light fixture's junction box; if it indicates voltage, the correct breaker has not been deactivated or there may be an issue with the wiring. If any doubt exists, it's best to consult a qualified electrician.
Gather all necessary tools and materials before starting the project. Essential tools include a screwdriver set (both flathead and Phillips head), wire strippers, wire connectors (such as wire nuts), electrical tape, a voltage tester, and safety glasses. A ladder or step stool may be needed to reach the fixture. In addition to the new light fixture, ensure there are sufficient wire connectors and electrical tape for a secure and safe connection. Have a helper nearby to assist with holding the new fixture during installation, particularly if it's heavy.
Personal Protective Equipment (PPE) is an indispensable part of any electrical project. Wear safety glasses to protect the eyes from falling debris or sparks. Rubber-soled shoes provide insulation and reduce the risk of electric shock. Work gloves can offer a better grip and protect hands from cuts and abrasions.
Understanding local electrical codes is crucial for ensuring the installation complies with regulations. Research the specific requirements for outdoor lighting in your area, including permissible wiring methods, grounding requirements, and fixture placement. Consult with a local building inspector or a qualified electrician if there are any uncertainties.
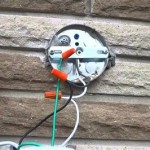
Before removing the existing fixture, take a photograph of the wiring connections. This visual reference will prove invaluable when connecting the new fixture, ensuring that the wires are correctly matched. Note the color of each wire (typically black, white, and green or bare copper) and their corresponding connections within the junction box.
Removing the Old Fixture
With the power safely disconnected and all preparations complete, the next step is to remove the existing outdoor light fixture. Begin by carefully loosening the screws or nuts that secure the fixture to the mounting bracket or junction box. These fasteners may be corroded or painted over, requiring some effort to loosen. Use penetrating oil if necessary to ease the removal process.
Once the fixture is detached from the mounting surface, gently lower it to expose the wiring connections. Be careful not to strain the wires or pull them out of the junction box. If the fixture is heavy, ask a helper to support it while disconnecting the wires.
Disconnect the wires one at a time, using the screwdriver to loosen the wire connectors. If the connectors are damaged or corroded, discard them and replace them with new ones. As each wire is disconnected, carefully separate it from the fixture and place it aside. Take note of which wire in the junction box corresponded to which wire on the old fixture. This is crucial for correctly wiring the new fixture.
After disconnecting all the wires, remove the mounting bracket or hardware that was attached to the junction box. This may involve unscrewing additional screws or nuts. Inspect the junction box for any signs of damage, such as cracks or corrosion. If the junction box is damaged, replace it before installing the new light fixture.
Clean the mounting surface around the junction box to remove any dirt, debris, or old sealant. This will ensure a clean and secure installation of the new fixture. Use a scraper or wire brush to remove stubborn residue.
Installing the New Fixture
After removing the old fixture, the installation of the new outdoor light fixture can proceed. Begin by carefully reviewing the manufacturer's instructions that accompany the new fixture. These instructions provide specific details about the installation process, wiring requirements, and any unique features of the fixture.
Attach the mounting bracket or hardware that came with the new fixture to the junction box. Ensure it is securely fastened and aligned properly. The mounting bracket provides a stable base for the fixture and must be installed correctly to prevent the fixture from wobbling or falling.
Carefully connect the wires from the new fixture to the corresponding wires in the junction box. Match the colors of the wires, connecting black to black (hot), white to white (neutral), and green or bare copper to green or bare copper (ground). Use wire connectors to create secure and insulated connections. Twist the wires together tightly and screw on the wire connectors until they are snug.
After connecting the wires, gently tuck them back into the junction box, ensuring they are not pinched or strained. Arrange the wires neatly to allow the fixture to sit flush against the mounting surface. If there is excess wire, carefully trim it to a manageable length using wire strippers.
Carefully attach the new light fixture to the mounting bracket, aligning the screw holes or attachment points. Secure the fixture with the screws or nuts provided, tightening them firmly but not overtightening. Ensure the fixture is level and stable.
Apply a bead of weatherproof sealant around the perimeter of the fixture where it meets the wall. This will prevent moisture from entering the junction box and causing corrosion or electrical problems. Choose a sealant that is specifically designed for outdoor use and follow the manufacturer's instructions for application.
Install the light bulb or bulbs specified for the new fixture. Check the manufacturer's instructions for the correct wattage and type of bulb. Ensure the bulb is securely screwed into the socket.
Restore power to the circuit by flipping the circuit breaker back to the "ON" position. Test the new light fixture by turning it on and off. Verify that it operates correctly and that there are no flickering or other issues. If the fixture does not work, double-check the wiring connections and ensure the bulb is properly installed.
Inspect the surrounding area for any potential hazards, such as loose wires or exposed connections. Address any issues immediately to ensure safety.
Proper disposal of the old light fixture and any associated materials is essential for environmental responsibility. Check local regulations for the proper disposal of electronic waste and recycle whenever possible. Some municipalities offer recycling programs for light fixtures and bulbs.

How To Replace An Outside Light

How To Replace An Outside Light

How To Replace An Outdoor Light Fixture

Replacing An Outdoor Light Fixture Concord Carpenter

6 Steps To Change An Outdoor Light Fixture Do It Best

How To Replace An Outdoor Light

Replacing Outdated Porch Lights Megan Plus Five

How To Replace An Outside Light

How To Install Replace Outdoor Light Easy Simple

Preparing To Paint Removing The Porch Lights