Timex Indoor Outdoor Thermometer Clock: A Comprehensive Overview
The Timex Indoor Outdoor Thermometer Clock is a versatile device designed to provide users with accurate temperature readings for both indoor and outdoor environments, while also functioning as a reliable timekeeping instrument. This type of clock is popular for its combination of functionalities, ease of use, and ability to display crucial environmental information at a glance. It's suitable for a wide range of applications, from residential homes to greenhouses and even light commercial settings where monitoring temperature is essential.
This article aims to provide a comprehensive overview of the Timex Indoor Outdoor Thermometer Clock. We will delve into its key features, functionality, installation process, troubleshooting tips, and maintenance advice. By understanding these aspects, users can maximize the benefits of this device and ensure its longevity.
Key Features and Functionality
The Timex Indoor Outdoor Thermometer Clock boasts a multitude of features that contribute to its utility. Firstly, its primary function is to accurately measure and display both indoor and outdoor temperatures. Typically, the device utilizes two separate sensors: one integrated within the clock unit for indoor temperature readings, and a wireless remote sensor for outdoor measurements. The wireless sensor transmits data to the main unit, enabling real-time monitoring of external conditions.
The temperature range varies depending on the specific model, but most Timex Indoor Outdoor Thermometer Clocks can measure temperatures from below freezing (around -4°F or -20°C) to well above typical ambient temperatures (around 158°F or 70°C). The accuracy of the readings is also crucial, and these devices are generally calibrated to provide temperature measurements within a reasonable margin of error, typically ±2°F or ±1°C.
Beyond temperature readings, the clock component is a fundamental feature. The clock displays the time in either 12-hour or 24-hour format, catering to different user preferences. Many models also include an alarm function, adding to their practical utility. Furthermore, many Timex Thermometer Clocks feature a calendar display, showing the date, day of the week, and sometimes even the year. This integrated timekeeping functionality enhances the device's overall convenience.
Display technology is another key consideration. Most Timex models employ Liquid Crystal Display (LCD) screens for clear and easy readability. The LCD allows for the display of all the information - indoor and outdoor temperature, time, date, and other relevant data - in a concise and organized manner. Some models may also incorporate backlighting, enhancing visibility in low-light conditions. The size of the display is also important, influencing how easily the information can be read from a distance.
The wireless communication between the main unit and the remote sensor is essential. The remote sensor transmits temperature data via a radio frequency (RF) signal to the clock unit. The effective range of this wireless connection is typically specified by the manufacturer, and it's crucial to consider this range when positioning the outdoor sensor. Obstructions, such as thick walls or metal structures, can interfere with the RF signal and reduce the effective range. The sensor and clock unit need to be within the specified range to maintain accurate readings.
Installation and Setup
Proper installation and setup are crucial for ensuring the accurate and reliable operation of the Timex Indoor Outdoor Thermometer Clock. Before starting, it's essential to read the instruction manual provided with the device. This manual contains specific instructions and recommendations for the particular model you have purchased.
The first step typically involves inserting batteries into both the main clock unit and the remote sensor. Most models require alkaline batteries (usually AA or AAA) for optimal performance. Ensure that the batteries are inserted correctly, observing the polarity markings (+ and -). After inserting the batteries, the clock unit may require an initial setup process, such as setting the time, date, and desired temperature units (Fahrenheit or Celsius).
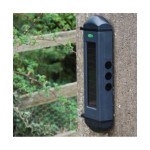
Positioning the remote sensor is a critical aspect of the installation process. The sensor should be placed in a location where it is shielded from direct sunlight, rain, and other harsh weather conditions. Direct sunlight can cause inaccurate temperature readings, while rain and snow can damage the sensor if it is not properly weatherproofed. A shaded area, such as under an eave or on a north-facing wall, is generally recommended.
The distance between the remote sensor and the main clock unit should be within the specified wireless range. As mentioned earlier, obstructions can interfere with the RF signal, so it's best to avoid placing the sensor behind thick walls or near metal objects. Experiment with different locations to find the optimal placement for the sensor that ensures reliable communication with the clock unit. Some models may have a signal strength indicator on the display, which can help you assess the quality of the wireless connection.
Mounting the clock unit and the remote sensor is another important consideration. The clock unit can typically be placed on a tabletop or mounted on a wall. If wall mounting, ensure that you use appropriate hardware and follow the manufacturer's instructions. The remote sensor may also have mounting options, such as a mounting bracket or adhesive pads. Choose a mounting method that is secure and appropriate for the chosen location.
Once the installation is complete, allow the device to stabilize for a few hours. This allows the sensors to acclimatize to their environment and provide more accurate readings. Compare the indoor and outdoor temperature readings to other sources, such as a calibrated thermometer, to verify the accuracy of the device. If the readings are significantly different, review the installation steps and ensure that the remote sensor is properly positioned and within range.
Troubleshooting and Maintenance
Even with proper installation and setup, occasional issues may arise with the Timex Indoor Outdoor Thermometer Clock. Understanding common problems and troubleshooting techniques can help you resolve these issues quickly and efficiently.
One common problem is inaccurate temperature readings. This can be caused by several factors, including direct sunlight exposure on the remote sensor, low battery power in either the clock unit or the remote sensor, or interference with the wireless signal. Check the placement of the remote sensor, replace the batteries if they are low, and ensure that there are no obstructions interfering with the wireless signal. If the problem persists, try resetting the device by removing the batteries for a few minutes and then reinserting them.
Another common issue is loss of communication between the main clock unit and the remote sensor. This can manifest as a blank display or an error message indicating that the sensor signal is lost. Ensure that the remote sensor is within range of the clock unit and that there are no obstructions interfering with the wireless signal. Try relocating the sensor to a closer location. Also, check the batteries in both the unit and the sensor. Some devices have a "reset" or "re-sync" function that allows you to re-establish the connection between the two. Refer to the instruction manual for specific instructions on how to use this function.
Display problems can also occur, such as dim or faded characters, or a completely blank display. This is often caused by low battery power. Replace the batteries in the clock unit to see if this resolves the issue. If the problem persists, the LCD screen may be damaged. Contact the manufacturer or a qualified repair technician for assistance.
Proper maintenance is essential for ensuring the longevity of the Timex Indoor Outdoor Thermometer Clock. Regularly clean the clock unit and the remote sensor with a soft, damp cloth. Avoid using harsh chemicals or abrasive cleaners, as these can damage the surfaces. Replace the batteries in both the unit and the sensor at regular intervals, even if they are not completely depleted. This can help prevent battery leakage, which can cause corrosion and damage to the device.
When not in use for extended periods, remove the batteries from both the clock unit and the remote sensor. This can help prevent battery leakage and corrosion. Store the device in a cool, dry place, away from direct sunlight and extreme temperatures. Following these maintenance tips can help ensure that your Timex Indoor Outdoor Thermometer Clock continues to provide accurate temperature readings and reliable timekeeping for many years to come.

Timex Indooroutdoor Thermometer With Indoor Hygrometer And Clock Weather Proof For Office Depot

Timex Digital Electronic Indoor Outdoor Thermometer

Timex Wireless Weather Atomic Digital Wall Clock

Timex Indoor Outdoor Digital Thermometer Kirch Industrial Battery Included 3 X4

Timex 75331t Atomic Digital Clock With Temperature Moon Phase Calendar 11 5 Com

Timex Decorative Outdoor Thermometers

Relógio Digital Atômico Umexus Com Temperatura Interna Externa 9

9 Inch Timex Digital Atomic Clock With Temperature And Date Com

Timex 75328t Atomic Digital Clock User Guide

Timex Alarm Clock With 0 7 Red Display T121bxc Ca
Related Posts