Outdoor Wall Wash Lighting Placement: A Comprehensive Guide
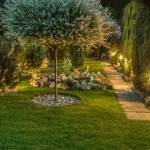
Outdoor wall wash lighting is a versatile and effective technique for enhancing the aesthetics and security of any outdoor space. This type of lighting utilizes fixtures that project a wide beam of light onto a vertical surface, illuminating its texture and details while creating a dramatic and inviting ambiance. Achieving optimal results with outdoor wall wash lighting requires careful consideration of fixture placement, light distribution, and overall design principles. This article provides a comprehensive guide to help you navigate the intricacies of outdoor wall wash lighting placement.
1. Determining the Purpose and Desired Effect
Before embarking on the placement process, it is essential to define the intended purpose of the outdoor wall wash lighting. Are you aiming to illuminate architectural features, enhance security, highlight landscaping, or create a specific mood? For instance, if the goal is to accentuate a stone wall's texture, a warm white light with a narrow beam angle will be appropriate. Conversely, illuminating a pathway for safety might necessitate a broader beam angle and a cooler white light.
The desired effect also plays a crucial role in fixture placement. If you are seeking a dramatic and modern look, consider using a single, powerful fixture positioned at a low angle, casting long shadows. Conversely, a softer and more diffused effect can be achieved with multiple fixtures placed at different heights and angles. Identifying the purpose and desired effect will guide you in selecting the right fixtures and determining their optimal placement.
2. Selecting the Right Fixtures for Your Needs
The choice of lighting fixtures is paramount for achieving the desired effect and functionality of outdoor wall wash lighting. Consider the following factors when selecting fixtures:
•
Light Output:
The lumen output of a fixture determines the overall brightness of the light. Choose fixtures with sufficient lumen output to adequately illuminate the desired area while avoiding glare or excessive brightness.•
Color Temperature:
The color temperature of the light is measured in Kelvin (K) and determines the appearance of the light. Warmer white lights (2700-3000K) offer a cozy and inviting ambiance, while cooler white lights (4000-6000K) provide a brighter and more modern feel.•
Beam Angle:
The beam angle determines the spread of the light. Narrow beam angles (10-30 degrees) are excellent for highlighting specific details, while wider beam angles (45-60 degrees) are more suitable for illuminating larger areas.•
IP Rating:
The IP rating indicates the fixture's resistance to water and dust. Choose fixtures with a high IP rating for outdoor applications, ensuring their durability in various weather conditions.3. Choosing the Optimal Placement for Wall Wash Fixtures
Once the fixtures are selected, the next step is to determine the optimal placement for achieving the desired effect. Here are some general guidelines:
•
Height:
Place the fixtures high enough to avoid glare and achieve a balanced wash of light. The height should be determined based on the size of the wall and the desired coverage area. Aim for a fixture placement between 1.5 and 3 meters above ground level.•
Angle:
The angle of the fixtures can significantly impact the light distribution and the resulting shadow patterns. Experiment with different angles to achieve the desired effect, keeping in mind the direction of the light source and the intended illumination area.•
Distance:
The distance between the fixtures and the wall influences the intensity of the light. Closer distances create a more intense wash of light, while farther distances result in a softer illumination. Experiment with different distances to find the optimal balance for your application.•
Symmetry and Aesthetics:
Consider the overall aesthetic of the space and how the fixtures will integrate into the existing design. Aim for a symmetrical layout to create a balanced and visually appealing effect.4. Tips for Achieving the Perfect Wall Wash Lighting Effect
Here are some additional tips to help you achieve the perfect wall wash lighting effect:
•
Pre-visualization:
Before installing the fixtures, it is helpful to use a lighting design software or create a physical mock-up to visualize the light distribution and the overall aesthetic. This will help you make informed decisions regarding fixture placement and ensure that the final effect meets your expectations.•
Consider the Background:
The color and texture of the wall should be considered when selecting the light color and intensity. Darker walls require more light for effective illumination, while lighter walls require less.•
Adjust for Variations:
The surrounding environment can affect the effectiveness of outdoor wall wash lighting. Factors such as trees, buildings, and ambient light can influence the light distribution and the overall effect. Adjust fixture placement and light intensity accordingly to compensate for these variations.•
Maintenance:
Regularly check the fixtures and bulbs for damage or malfunction. Clean the lenses to ensure optimal light output. Proper maintenance will extend the lifespan of the fixtures and ensure their continued effectiveness.By following these guidelines and considering the specific requirements of your outdoor space, you can effectively implement outdoor wall wash lighting and create a beautiful and functional illuminated environment.

How To Use Wall Wash Led Lights Superlightingled Com Blog

Accent Lighting Wall Washing Vs Grazing 1000bulbs Blog

How To Use Landscape Lighting Techniques

Where To Place Landscape Lighting Tips

Where To Place Landscape Lighting Drost

How To Use Landscape Lighting Techniques

Landscape Lighting Techniques And Types

Outdoor Landscape Lighting Design Tips Ideas Environmental Designs

Illuminate Your Space Wallwashing And Wall Grazing

Fashion Outdoor Wall Wash Lighting Placement Spot Light China Led Flood Made In Com
Related Posts