Outdoor Recycle Bin Storage Ideas: DIY Solutions for a Tidy Environment
Maintaining an organized outdoor space often requires attention to the less glamorous aspects of waste management, particularly the storage of recycle bins. These bins, while essential for environmental sustainability, can be visually unappealing and cumbersome if not properly contained. Fortunately, numerous DIY solutions exist to address this issue, allowing homeowners to conceal or integrate recycle bins into their landscaping or outdoor structure in a way that is both functional and aesthetically pleasing. Creating a designated and attractive storage solution for recycle bins can enhance curb appeal, prevent bins from being knocked over by wind or animals, and streamline the recycling process.
Assessing Needs and Available Space
Before embarking on a DIY recycle bin storage project, a thorough assessment of individual needs and available space is crucial. Consider the number of recycle bins needing accommodation. Single-stream recycling often requires only one bin, while multi-stream systems necessitate separate containers for paper, plastic, and glass. The dimensions of these bins must be accurately measured to ensure the storage solution provides adequate space. Additionally, evaluating the physical space available is essential. A small courtyard will necessitate a more compact and vertically-oriented design compared to a sprawling backyard.
Analyzing the existing landscape is also critical. Are there existing structures, such as fences or sheds, that can be incorporated into the design? Does the area receive direct sunlight, potentially affecting the materials used for construction? Understanding these spatial and environmental factors will inform the design choices and ensure the final product is both functional and durable. The level of DIY skill and available tools should also be considered. A complex woodworking project requires a different skill set and tool inventory compared to a simple assembly of pre-fabricated materials.
DIY Recycle Bin Storage Project Options
The realm of DIY recycle bin storage offers a diverse range of options, each catering to different skill levels, budgets, and aesthetic preferences. Some popular choices include constructing wooden enclosures, repurposing existing materials, and creating integrated landscaping features. Each approach presents its own set of advantages and challenges.
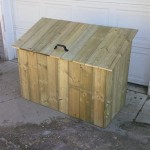
Wooden Enclosures: Building a wooden enclosure provides a versatile and customizable solution. The design can be tailored to match the existing architectural style of the house or to complement the surrounding landscape. These enclosures can range from simple boxes with hinged lids to more elaborate structures with decorative elements. The choice of wood will influence the overall aesthetic and durability. Cedar and redwood are naturally resistant to rot and insect infestation, making them ideal choices for outdoor applications. Pressure-treated lumber offers a more affordable alternative but requires careful handling due to the chemicals used in the treatment process. A well-constructed wooden enclosure can effectively conceal recycle bins while providing easy access for waste disposal and collection. Features such as ventilation holes can help prevent the build-up of odors.
Repurposed Materials: Embracing the principles of sustainable design, repurposing existing materials offers an environmentally friendly and cost-effective approach to recycle bin storage. Old pallets, discarded fencing, and reclaimed lumber can be transformed into functional and aesthetically pleasing enclosures. Pallets, in particular, are readily available and can be easily disassembled and reassembled to create custom-sized structures. However, care should be taken when using pallets, ensuring they are free from chemical treatments that could leach into the environment. Repurposed materials often possess a unique character and patina that can add visual interest to the outdoor space. The use of salvaged materials aligns with the core principles of recycling and promotes a circular economy.
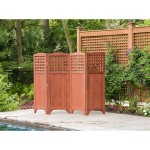
Integrated Landscaping Features: Integrating recycle bin storage into the existing landscape is a more advanced DIY project but offers a seamless and visually appealing solution. This approach involves incorporating the storage structure into a garden bed, rockery, or other landscaping element. For instance, a low retaining wall can be built to create a concealed alcove for the recycle bins. Climbing plants can then be trained to grow over the wall, further obscuring the bins from view. Alternatively, a series of strategically placed shrubs and trees can be used to create a natural screen around the bins. This approach requires careful planning and consideration of plant growth habits and maintenance requirements. The use of native plants is recommended to ensure the landscaping is both aesthetically pleasing and ecologically sustainable. Integrating recycle bin storage into the landscape not only conceals the bins but also enhances the overall beauty and functionality of the outdoor space.
Step-by-Step Instructions for a Basic Wooden Recycle Bin Enclosure
This section outlines the steps involved in constructing a basic wooden recycle bin enclosure, providing a practical guide for homeowners seeking a simple and effective DIY solution.
Materials Required:
- Lumber (cedar, redwood, or pressure-treated lumber recommended)
- Exterior wood screws
- Hinges
- Latch
- Exterior wood stain or paint
- Measuring tape
- Saw (circular saw or hand saw)
- Drill
- Screwdriver
- Sandpaper
Step 1: Planning and Measuring: Begin by measuring the recycle bins to be stored. Add a few inches to each dimension to ensure ample clearance. Determine the desired overall dimensions of the enclosure, including the height, width, and depth. Create a detailed sketch or blueprint outlining the construction process. This step is critical for accurate material calculations and efficient construction.
Step 2: Cutting the Lumber: Using the measurements from the plan, cut the lumber into the required pieces for the frame, sides, top, and door(s). Ensure the cuts are straight and accurate for a professional finish. Use a circular saw or hand saw, depending on preference and available tools. Sand the cut edges to remove any splinters or rough spots.
Step 3: Assembling the Frame: Assemble the frame of the enclosure using wood screws. Ensure the frame is square and sturdy. Pre-drilling pilot holes will prevent the wood from splitting. The frame should be the foundation of the enclosure, providing structural integrity.
Step 4: Attaching the Sides: Attach the side panels to the frame using wood screws. Ensure the panels are flush with the frame and securely fastened. Consider adding ventilation holes to the sides to prevent odor build-up. The sides should provide complete coverage, concealing the recycle bins from view.
Step 5: Constructing the Lid: Construct a lid for the enclosure using lumber cut to the appropriate size. Attach the lid to the frame using hinges, allowing it to open and close easily. Ensure the hinges are robust enough to support the weight of the lid. The lid should provide easy access to the recycle bins for waste disposal.
Step 6: Adding the Door (Optional): If desired, add a door to the front of the enclosure for easier access. Construct a door using lumber cut to the appropriate size. Attach the door to the frame using hinges and install a latch to keep it securely closed. The door should provide convenient access for emptying and cleaning the recycle bins.
Step 7: Finishing: Sand the entire enclosure to remove any rough edges or imperfections. Apply exterior wood stain or paint to protect the wood from the elements and enhance its aesthetic appeal. Allow the stain or paint to dry completely before placing the recycle bins inside. Consider adding decorative elements, such as trim or hardware, to further customize the enclosure.
Step 8: Installation: Position the enclosure in the desired location. Ensure the ground is level and stable. Secure the enclosure to the ground or a nearby structure if necessary, particularly in windy areas. Place the recycle bins inside the enclosure and test the functionality of the lid and door (if applicable).
This basic wooden enclosure provides a functional and aesthetically pleasing solution for storing recycle bins. The design can be modified and customized to suit individual needs and preferences. More complex designs may incorporate multiple compartments, adjustable shelving, or integrated planters.
Key Considerations: Materials, Durability, and Aesthetics
Selecting the right materials, ensuring durability, and considering aesthetics are crucial aspects of any DIY recycle bin storage project. These factors will significantly impact the longevity, functionality, and visual appeal of the final product.
Material Selection: The choice of materials will determine the overall durability and aesthetic of the storage solution. Wood is a popular choice due to its versatility and natural appearance. However, different types of wood offer varying levels of resistance to rot, insects, and the elements. Cedar and redwood are naturally resistant to decay and insect infestation, making them ideal choices for outdoor applications. Pressure-treated lumber provides a more affordable alternative but requires careful handling due to the chemicals used in the treatment process. Composite materials, such as plastic lumber, offer excellent durability and resistance to moisture, but may not be as aesthetically pleasing as natural wood. Metal provides a robust and long-lasting option, but can be prone to rust if not properly treated. The selection of materials should be based on a balance of cost, durability, and aesthetic considerations.
Durability and Weather Resistance: Outdoor storage solutions are constantly exposed to the elements, including sun, rain, snow, and wind. Durability and weather resistance are therefore paramount. The materials used should be able to withstand these conditions without deterioration. Proper construction techniques, such as using exterior-grade screws and adhesives, are essential for ensuring structural integrity. Applying a protective finish, such as paint or stain, can further enhance weather resistance. Regular maintenance, such as cleaning and re-finishing, will help prolong the lifespan of the storage solution. Consider the local climate when selecting materials and construction techniques. Areas with high humidity or extreme temperatures will require more durable and weather-resistant solutions.
Aesthetic Integration: The storage solution should seamlessly integrate into the existing landscape and architectural style of the house. Consider the color, texture, and design of the surrounding elements. The storage solution should complement, rather than clash with, the overall aesthetic. Integrating the storage solution into a garden bed, rockery, or other landscaping feature can create a visually appealing and harmonious design. The use of climbing plants, decorative hardware, or custom trim can further enhance the aesthetic integration. A well-designed storage solution will not only conceal the recycle bins but also enhance the overall beauty and functionality of the outdoor space. The goal is to create a storage solution that is both practical and aesthetically pleasing, adding value to the property.

Diy Recycling Bin Project Addis Housewares Ltd

How To Make A Storage Shed For Garbage Cans Or Lawn Equipment Trash Idea

Diy Recycling Bin Project Addis Housewares Ltd

20 Diy Home Recycling Bins That Help You Organize Your Recyclables

10 Stylish Diy Recycling Bin Ideas Projects Ohmeohmy Blog

Diy Recycling Bin Project Addis Housewares Ltd

Outdoor Garbage Can Storage I Should Be Mopping The Floor

How To Build A Wheelie Bin Claire Douglas Styling

Diy Bin Storage Build A Garbage Can Enclosure Shed Creating Artwithjanineliza

7 Ways To Hide Wheelie Bins Easy Storage Ideas Try