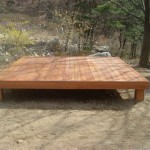
Building Your Own Outdoor Bench Table: A DIY Guide
Creating functional and aesthetically pleasing outdoor furniture can be a rewarding and cost-effective endeavor. A combination bench and table provides a versatile space for dining, relaxing, or working outdoors. This article provides a comprehensive guide to constructing a DIY outdoor bench table, covering material selection, design considerations, and step-by-step construction instructions.
Key Considerations Before Starting Your Project
Before commencing the construction process, meticulous planning and preparation are vital. Several factors influence the design, material choice, and overall durability of the finished product. These considerations include the intended use, available space, desired aesthetic, and anticipated weather conditions.
Intended Use:
Determine how the bench table will be primarily used. Will it serve as a dining area, a workspace, or a relaxation spot? The intended use dictates the required dimensions, weight-bearing capacity, and overall design. A dining table, for instance, requires a larger surface area and a comfortable seating height. A workspace might necessitate a more robust and stable structure.Available Space:
Carefully measure the intended location for the bench table. Consider the surrounding landscape and potential obstructions. The dimensions of the bench table must be proportionate to the available space, ensuring comfortable movement and preventing overcrowding. A scale drawing or digital rendering can help visualize the final product in its intended environment.Desired Aesthetic:
The bench table should complement the existing outdoor décor. Consider the style of your home, garden, and other outdoor furniture. Explore different design styles, such as rustic, modern, or traditional, and select materials and finishes that align with your aesthetic preferences. Gathering inspiration from online resources and magazines can aid in defining the desired look.Weather Conditions:
The choice of materials must be appropriate for the local climate. Consider factors such as rainfall, humidity, sunlight, and temperature fluctuations. Using weather-resistant materials, such as treated lumber, cedar, or redwood, is crucial for ensuring the longevity of the bench table. Applying a protective sealant or stain can further enhance its resistance to weathering.Material Selection and Preparation
The selection of appropriate materials is paramount to the structural integrity and aesthetic appeal of the bench table. Pressure-treated lumber is a common choice due to its resistance to rot, decay, and insect infestation. However, other options, such as cedar and redwood, offer natural resistance to weathering and a more aesthetically pleasing appearance. The specific materials required depend on the chosen design and dimensions.
Lumber:
Pressure-treated lumber is typically used for the frame and support structure, while cedar or redwood can be used for the seating and tabletop surfaces. The dimensions of the lumber will vary depending on the design. Common sizes include 2x4s, 4x4s, and 1x6s. Ensure that all lumber is free from knots, cracks, and warping.Fasteners:
Weather-resistant screws and bolts are essential for securely connecting the various components of the bench table. Stainless steel or galvanized fasteners are recommended to prevent rust and corrosion. The length and type of fasteners will depend on the thickness of the lumber and the specific joint being used.Sealant/Stain:
Applying a sealant or stain protects the lumber from moisture, UV radiation, and other environmental factors. Choose a product specifically designed for outdoor use, and follow the manufacturer's instructions for application. A sealant will provide a clear protective coating, while a stain will add color and enhance the natural grain of the wood.Tools:
A variety of tools are required for constructing the bench table, including a measuring tape, saw (circular saw and/or hand saw), drill, screwdriver, level, and safety glasses. A miter saw can be helpful for making precise cuts, while a sander can be used to smooth rough edges and surfaces. Safety glasses are crucial for protecting your eyes from debris.Before commencing construction, carefully inspect all lumber for defects. Sand any rough edges or surfaces to create a smooth and comfortable finish. Pre-drilling pilot holes for screws and bolts will prevent the wood from splitting and ensure a stronger connection. Applying a wood preservative to the cut ends of the lumber can further enhance its resistance to decay.
Step-by-Step Construction Guide
This section provides a detailed guide to constructing a basic outdoor bench table. The specific steps may vary depending on the chosen design. This example uses a simple A-frame design for the legs and support structure.
Step 1: Cut the Lumber:
Using a measuring tape and saw, cut the lumber to the required dimensions. The dimensions will depend on the desired size of the bench table. This example includes cuts for the legs, support beams, seat slats, and tabletop planks. Accurate and precise cuts are crucial for ensuring a stable and well-proportioned structure.Step 2: Assemble the Legs:
Construct the A-frame legs by connecting two pieces of lumber at an angle. Use screws or bolts to securely fasten the legs together. Ensure that the legs are level and stable. Add a horizontal support beam between the legs to provide additional stability. The angle of the A-frame will determine the height and stability of the bench table.Step 3: Attach the Support Beams:
Connect the legs with horizontal support beams. These beams will support the seat slats and tabletop planks. Use screws or bolts to securely fasten the support beams to the legs. Ensure that the support beams are level and evenly spaced. The spacing of the support beams will depend on the thickness of the seat slats and tabletop planks.Step 4: Install the Seat Slats:
Attach the seat slats to the support beams. Use screws to securely fasten the seat slats to the beams. Ensure that the seat slats are evenly spaced and parallel to each other. The spacing between the seat slats will affect the comfort and appearance of the bench.Step 5: Construct the Tabletop:
Assemble the tabletop by connecting the tabletop planks together. Use screws or bolts to securely fasten the planks together. Ensure that the planks are level and aligned. Add a support frame underneath the tabletop to provide additional stability. The support frame can be constructed from 2x4 lumber.Step 6: Attach the Tabletop to the Frame:
Attach the tabletop to the support frame by screwing it from underneath through the support frame into the tabletop planks. Ensure that the tabletop is centered and securely attached to the frame. Proper attachment ensures stability and prevents wobbling.Step 7: Sand and Finish:
Sand all surfaces of the bench table to remove any rough edges or splinters. Apply a sealant or stain to protect the lumber from weathering. Follow the manufacturer's instructions for application. Multiple coats of sealant or stain may be necessary to achieve the desired level of protection and appearance.Step 8: Final Inspection:
Inspect the bench table for any loose screws or bolts. Tighten any fasteners as needed. Ensure that the bench table is level and stable. Make any necessary adjustments to ensure a comfortable and safe seating and dining experience. The final inspection ensures the longevity and safety of the finished product.Design Variations and Customization
The basic design described above can be customized to suit individual preferences and needs. Numerous design variations can be implemented to enhance the aesthetic appeal and functionality of the bench table.
Backrests:
Adding a backrest to one or both of the benches can enhance comfort and support. The backrest can be constructed from lumber or metal and attached to the bench frame. The angle and height of the backrest can be adjusted to optimize comfort.Tabletop Extensions:
Extending the tabletop beyond the bench seating can provide additional surface area for dining or working. The tabletop extension can be supported by additional legs or brackets. The size and shape of the tabletop extension can be customized to fit the available space.Storage Compartments:
Integrating storage compartments beneath the benches or tabletop can provide a convenient place to store cushions, blankets, or other outdoor accessories. The storage compartments can be accessed through hinged lids or removable panels. The size and configuration of the storage compartments can be customized to meet specific storage needs.Built-in Planters:
Incorporating built-in planters into the bench table design can add a touch of greenery and enhance the aesthetic appeal. The planters can be integrated into the legs or tabletop of the bench table. The size and shape of the planters can be customized to accommodate different types of plants.Unique Materials:
Experimenting with different materials, such as reclaimed wood, metal, or concrete, can create a unique and visually striking bench table. Reclaimed wood adds a rustic and characterful element, while metal provides a modern and industrial aesthetic. Concrete offers durability and a contemporary look. When using alternative materials, ensure they are suitable for outdoor use and properly sealed or treated to withstand the elements.By carefully considering the design variations and customization options, you can create a one-of-a-kind outdoor bench table that perfectly complements your outdoor living space and meets your specific needs.
Building an outdoor bench table is a project that can be adapted to various skill levels and budgets. By carefully planning and executing each step, you can create a functional and aesthetically pleasing piece of furniture that will enhance your outdoor living experience for years to come.

25 Diy Picnic Tables Best For Your Yard

Simple Picnic Table Plans 2x4 Outdoor Furniture Diy Easy To Build

Diy Outdoor Table Instructables

Diy Trestle Base Picnic Table Plans Includes Bench Too

25 Diy Picnic Tables Best For Your Yard

Build A Diy Outdoor Table

How To Build A Picnic Table The Home Depot

Trestle Table And Bench Set Printable Building Plans 8 Step Tutorial

Easy Picnic Table Build With Free Plans

Diy Modern Industrial Picnic Table Plans 6ft Steel And Wood Outdoor Woodworking Furniture Rustic
Related Posts