How to Spray Paint Outdoor Aluminum Furniture
Outdoor aluminum furniture, prized for its durability and resistance to rust, can nonetheless become unsightly over time. Exposure to the elements – sun, rain, and temperature fluctuations – can cause the original finish to fade, chip, or peel. While replacing the furniture is an option, spray painting provides a cost-effective and relatively straightforward method for revitalizing its appearance and extending its lifespan. Achieving a professional-looking finish requires careful preparation, the selection of appropriate materials, and the application of correct techniques. This article provides a detailed guide on how to successfully spray paint outdoor aluminum furniture.
Key Point 1: Preparation is Paramount for a Long-Lasting Finish
The success of any spray painting project hinges on the thoroughness of the preparation phase. Inadequate preparation will inevitably lead to a substandard finish that is prone to chipping, peeling, or bubbling. This involves cleaning, sanding, and priming the aluminum surface to create an optimal base for the paint to adhere to.
Cleaning the Aluminum Surface: Begin by thoroughly cleaning the furniture to remove any dirt, grime, mildew, or loose paint. A mixture of warm water and mild detergent is generally sufficient for this purpose. Use a scrub brush or sponge to agitate the surface and dislodge any stubborn debris. For mildew or mold, a solution of water and bleach (in a ratio of approximately 10:1) can be used, but exercise caution and wear appropriate protective gear, including gloves and eye protection. Rinse the furniture thoroughly with clean water to remove all traces of the cleaning solution. Allow the furniture to dry completely before proceeding to the next step.
Sanding the Aluminum Surface: Sanding is crucial for creating a slightly roughened surface that promotes paint adhesion. Use a medium-grit sandpaper (around 220 grit) to lightly sand the entire surface of the furniture. The goal is not to remove the existing paint entirely (unless it is extensively peeling or damaged), but rather to create a “key” for the primer and paint to grip onto. Pay particular attention to any areas with existing damage or imperfections. After sanding, use a tack cloth to remove all sanding dust. This is a critical step, as any remaining dust will interfere with the paint's adhesion and result in a bumpy or uneven finish.
Priming the Aluminum Surface: Applying a primer specifically designed for aluminum is essential for ensuring long-lasting adhesion and preventing corrosion. Aluminum, unlike steel, does not readily rust, but it can oxidize, creating a surface that is not ideal for paint adhesion. An etching primer chemically bonds to the aluminum, providing a stable base for the topcoat. Choose a high-quality etching primer specifically formulated for use on aluminum. Apply the primer in thin, even coats, following the manufacturer's instructions regarding drying time between coats. Generally, one or two coats of primer are sufficient. Allow the primer to dry completely before proceeding to the painting stage.
Key Point 2: Selecting the Right Materials
The choice of materials, particularly the spray paint and primer, significantly impacts the final outcome and the durability of the painted finish. Using paint that is not suitable for outdoor use or that is incompatible with aluminum will likely result in premature failure of the coating.
Choosing the Right Spray Paint: Select a spray paint specifically formulated for outdoor use and suitable for application on metal surfaces. Acrylic enamel paints are a popular choice due to their durability, weather resistance, and availability in a wide range of colors and finishes. Consider a paint that offers UV protection to prevent fading from prolonged sun exposure. Read the product label carefully to ensure that the paint is compatible with the primer you have chosen. Avoid using paints designed for interior use only, as they will not withstand the rigors of outdoor conditions.
Primer Considerations: As mentioned previously, an etching primer is crucial for aluminum. Ensure that the primer is specifically designed for use on aluminum surfaces. Some primers are self-etching, meaning they contain chemicals that etch the aluminum surface, promoting adhesion. Others require a separate etching agent. Follow the manufacturer's instructions carefully when applying the primer. A good primer will not only improve adhesion but also provide a uniform base color, helping the topcoat to achieve its true color without being influenced by variations in the original furniture's surface.
Necessary Tools and Equipment: In addition to the paint and primer, several other tools and equipment are necessary for a successful spray painting project. These include: sandpaper (medium-grit), tack cloth, drop cloths or plastic sheeting to protect the surrounding area, painter's tape for masking off areas that should not be painted, gloves to protect your hands, a respirator or mask to protect against inhaling paint fumes, safety glasses to protect your eyes, and a well-ventilated workspace. If you are spray painting intricate furniture with hard-to-reach areas, consider using a paint sprayer for a more even application.
Key Point 3: Applying the Paint for a Professional Finish
The application technique is critical for achieving a smooth, even, and durable finish. Rushing the process or applying the paint too thickly can lead to runs, drips, and an uneven texture. Patience and attention to detail are key to a professional-looking result.
Setting Up the Workspace: Before beginning the painting process, prepare the workspace. Choose a well-ventilated area, preferably outdoors, away from direct sunlight and wind. Lay down drop cloths or plastic sheeting to protect the ground or surrounding surfaces from overspray. If painting indoors, ensure adequate ventilation by opening windows and using fans to circulate the air. Mask off any areas of the furniture that you do not want to paint using painter's tape. This is particularly important for intricate designs or areas where different colors are to be used.
Spray Painting Technique: Shake the spray paint can vigorously for at least one minute before use to ensure that the paint is thoroughly mixed. Hold the can approximately 8-10 inches away from the surface of the furniture and apply the paint in thin, even coats. Use a smooth, sweeping motion, overlapping each pass slightly to avoid gaps or streaks. Avoid holding the can in one place for too long, as this will result in runs and drips. Multiple thin coats are preferable to one thick coat. Allow each coat to dry completely before applying the next. Follow the manufacturer's instructions regarding drying time. Typically, two or three coats of paint are sufficient to achieve full coverage and a uniform color.
Addressing Runs and Drips: Despite best efforts, runs and drips can sometimes occur. If you notice a run or drip while the paint is still wet, immediately wipe it away with a clean cloth and re-spray the area with a thin coat. If the paint has already dried, allow it to cure completely, then lightly sand the affected area with fine-grit sandpaper to smooth it out. Clean away the sanding dust with a tack cloth and re-spray the area with a thin coat of paint.
Curing and Maintenance: After applying the final coat of paint, allow the furniture to cure completely before using it. Curing time varies depending on the type of paint and the ambient temperature and humidity. Consult the manufacturer's instructions for specific curing recommendations. Typically, it takes several days for the paint to fully harden and reach its maximum durability. Once the furniture is fully cured, it can be cleaned with a mild detergent and water. Avoid using abrasive cleaners or harsh chemicals, as these can damage the painted finish. To prolong the life of the painted finish, consider storing the furniture indoors or covering it when not in use, particularly during periods of inclement weather.

How To Paint Metal Patio Furniture With Spray Joyful Derivatives

How To Spray Paint Metal Outdoor Furniture Last A Long Time H2obungalow

How To Spray Paint Metal Outdoor Furniture Last A Long Time H2obungalow

How To Paint Metal Patio Furniture

How To Paint Metal Patio Furniture

Spray Paint Mesh Metal Outdoor Patio Furniture Petticoat Junktion

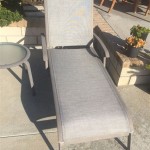
How To Paint Metal Patio Chairs Step By

How To Paint Metal Patio Furniture So It Looks Like A Million Bucks

How To Paint Metal Patio Furniture So It Looks Like A Million Bucks

Spray Paint Mesh Metal Outdoor Patio Furniture Petticoat Junktion
Related Posts