How To Make An Outdoor Basketball Court
Building an outdoor basketball court is a great way to improve your home's recreational value and provide a space for fun and fitness. Whether you're a seasoned player or a casual enthusiast, having a dedicated court can enhance your basketball experience. This guide will walk you through the process of creating your own outdoor basketball court, covering essential considerations and steps to ensure a successful outcome.
1. Planning and Design
Before you start digging, meticulous planning is crucial. This phase involves defining your court's size, location, and desired features.
A. Determining the Size and Shape
The standard basketball court is 94 feet long and 50 feet wide. However, you can adjust the dimensions according to your available space and needs. For residential courts, smaller sizes are common, such as 60 feet long and 30 feet wide. Consider the space needed for players to move freely and for comfortable sidelines.
B. Choosing a Location
Select a level, well-drained area with ample sunlight. Consider factors like proximity to your home, noise impact on neighbors, and potential obstructions. Ensure the chosen location is free from trees, utility lines, and other potential hazards.
C. Deciding on Features
Consider adding features that enhance the court's functionality and aesthetics. These can include:
- Backboards and hoops: Choose regulation-sized backboards and hoops, and ensure they are securely anchored.
- Lighting: If you plan to play at night, install adequate lighting for visibility and safety.
- Fencing: Enclose the court with fencing to prevent balls from leaving the playing area and to create a defined space.
- Seating: Add benches or chairs for spectators or players to rest.
- Landscaping: Plant trees around the perimeter for shade and visual appeal.
2. Preparing the Ground
Once you've determined the court's size and location, it's time to prepare the ground. This step involves grading, leveling, and compacting the soil to create a stable foundation.
A. Clearing and Grading
Remove any existing vegetation, debris, or obstacles from the chosen area. Use a shovel or a grading machine to excavate the soil, ensuring a level surface with a slight slope for drainage.
B. Compacting the Soil
After grading, compact the soil using a roller or a plate compactor. This process eliminates air pockets and creates a dense and stable base, preventing settling and unevenness.
C. Laying a Base Layer
For optimal performance and durability, consider adding a base layer of gravel, crushed stone, or decomposed granite. This layer provides additional drainage and stability for the court surface.
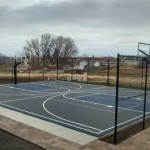
3. Installing the Surface
The court surface is the final layer that determines the playing experience. Choose a material that meets your budget, expectations, and usage frequency.
A. Asphalt
Asphalt is a durable and affordable option, suitable for high-traffic courts. It offers excellent traction and is relatively easy to maintain. However, asphalt can get hot under direct sunlight.
B. Concrete
Concrete provides superior durability and longevity, making it suitable for long-term use. It offers a smoother surface and is less susceptible to wear and tear. However, concrete can be more expensive than asphalt.
C. Artificial Turf
Artificial turf is a softer and more forgiving surface, ideal for reducing injuries. It offers excellent drainage and requires minimal maintenance. However, it might not provide the same level of traction as asphalt or concrete.
D. Other Options
Other options include poured-in-place rubber, modular tiles, and recycled materials. Research these options to find the best fit for your needs and budget.
4. Final Touches
After installing the surface, finalize the court by adding the finishing touches that complete the project.
A. Installing Equipment
Install the backboards and hoops, ensuring they are securely anchored to the ground. Choose high-quality equipment that meets safety standards.
B. Adding Lighting
If you plan to play at night, install lighting fixtures around the court perimeter. Choose bright and energy-efficient lights for optimal visibility.
C. Landscaping
Enhance the court's aesthetic appeal by adding landscaping elements. Plant trees for shade and shrubs for privacy, maintaining a balance between functionality and visual appeal.
Building an outdoor basketball court is a rewarding endeavor that can transform your home into a haven for fitness and fun. By following these steps, you can create a space that meets your specific needs and enhances your basketball experience for years to come. Remember to prioritize safety, choose durable materials, and enjoy the process of building your dream basketball court.

How To Diy Build A Basketball Court 8 Step Guide

Versacourt Easy To Install Diy Basketball Court Kits

Part 1 How To Build An Outdoor Wooden Diy Backyard Basketball Court

How To Make A Basketball Court With S Wikihow

A Guide For How To Build Backyard Basketball Court Family Handyman

Outdoor Basketball Court Flooring Ultrabasesystems

Backyard Basketball Court Builders Sports Construction Group

20 X 25 Basketball Court Dunkstar Diy Courts Backyard Playground

How To Make A Basketball Court With S Wikihow

How To Build An Outdoor Basketball Court In Your Yard
Related Posts