How To Install Outdoor Motion Detector Lights
Installing outdoor motion detector lights can significantly enhance a property’s security and provide added convenience. These lights automatically illuminate when movement is detected, deterring potential intruders and providing safe passage in the dark. This article offers a comprehensive guide on how to install outdoor motion detector lights effectively and safely.
Before commencing the installation process, it is vital to understand the basic components and functionality of motion detector lights. A typical unit comprises a light fixture, a motion sensor, and a power source. The motion sensor detects changes in infrared radiation emitted by moving objects, such as people or animals. Upon detecting motion, the sensor triggers the light to turn on for a pre-set duration. The duration and sensitivity of the sensor are often adjustable, allowing customization based on specific needs and environmental conditions.
A well-planned installation ensures optimal performance and longevity of the motion detector lights. Consider the desired coverage area, power source availability, and potential obstructions before beginning the installation. Proper wiring and secure mounting are crucial for safety and functionality.
Planning and Preparation
The initial stage involves careful planning and preparation. This ensures a smooth and safe installation process. Key aspects to consider include choosing the right location for the lights, selecting the appropriate type of motion detector light, and gathering the necessary tools and safety equipment.
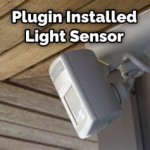
Selecting the Location: The ideal location for motion detector lights depends on the desired coverage area and security objectives. Common locations include entryways, driveways, backyards, and areas prone to unauthorized access. Position the lights to maximize visibility and minimize blind spots. Consider the surrounding environment and potential sources of false triggers, such as trees or bushes that may sway in the wind. Avoid aiming the lights directly at roadways or neighboring properties to prevent nuisance illumination.
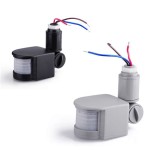
Choosing the Right Type of Light: Motion detector lights are available in various styles and configurations, including floodlights, spotlights, and decorative fixtures. Consider the light output, beam angle, and aesthetic appeal when selecting the appropriate type. LED lights are generally preferred for their energy efficiency, long lifespan, and instant-on capability. Furthermore, there are different types of motion sensors, such as passive infrared (PIR) and microwave sensors. PIR sensors detect changes in heat, while microwave sensors emit microwave radiation and detect changes in the reflected signal. PIR sensors are suitable for most applications, while microwave sensors may be more effective in harsh weather conditions or areas with obstructions.
Gathering Tools and Safety Equipment: Before starting the installation, gather all the necessary tools and safety equipment. This includes a ladder, drill, screwdriver (various types), wire stripper, wire connectors, electrical tape, voltage tester, and safety glasses. A voltage tester is essential for verifying that the power is off before working on any electrical wiring. Always wear safety glasses to protect your eyes from debris. If working at heights, use a sturdy ladder and follow proper ladder safety procedures.
Checking Local Codes and Regulations: It is essential to familiarize yourself with local building codes and electrical regulations before installing outdoor lighting. Some municipalities may require permits for electrical work or have restrictions on the type and placement of outdoor lights. Contact your local building department to ensure compliance with all applicable regulations.
Installation Process
The installation process involves several steps, including disconnecting the power supply, removing the existing light fixture (if applicable), mounting the new motion detector light, wiring the electrical connections, and testing the light. Following these steps carefully ensures a safe and functional installation.
Disconnecting the Power Supply: The most crucial step is to disconnect the power supply at the circuit breaker before working on any electrical wiring. Locate the circuit breaker that controls the existing light fixture or the location where you plan to install the new motion detector light. Switch the breaker to the "OFF" position. To confirm that the power is completely off, use a voltage tester to check the wires at the junction box. If the voltage tester indicates that power is still present, double-check that you have turned off the correct circuit breaker.
Removing the Existing Light Fixture (if applicable): If replacing an existing light fixture, carefully remove it by unscrewing the mounting screws or bolts that hold it in place. Disconnect the wires from the old fixture using a screwdriver. Typically, there will be three wires: a black (hot) wire, a white (neutral) wire, and a green or bare copper (ground) wire. Use electrical tape to individually cap the ends of the wires to prevent accidental contact. Store the old fixture in a safe place if you plan to reuse it in the future.
Mounting the New Motion Detector Light: The mounting process varies depending on the type of light fixture and the mounting surface. Most motion detector lights come with a mounting bracket that attaches to the junction box. Secure the mounting bracket to the junction box using the provided screws. Ensure that the bracket is level and securely fastened. Carefully attach the light fixture to the mounting bracket, following the manufacturer's instructions. Tighten the screws or bolts to secure the fixture in place.
Wiring the Electrical Connections: Connect the wires from the motion detector light to the wires in the junction box. Use wire connectors to make secure and reliable connections. Match the colors of the wires: connect the black wire from the light to the black wire in the junction box, the white wire from the light to the white wire in the junction box, and the green or bare copper wire from the light to the green or bare copper wire in the junction box. Twist the wires together tightly and then screw on the wire connectors. Wrap electrical tape around the wire connectors to further insulate the connections and prevent them from loosening. Carefully tuck the wires back into the junction box and secure the light fixture to the mounting bracket.
Testing the Light: After completing the wiring, restore the power supply by switching the circuit breaker back to the "ON" position. Test the motion detector light by walking in front of the sensor. The light should turn on automatically when motion is detected. Adjust the sensitivity and duration settings of the sensor as needed. Walk around the coverage area to ensure that the sensor is detecting motion effectively. If the light does not turn on, double-check the wiring connections and the sensor settings.
Adjusting Settings and Troubleshooting
Once the motion detector light is installed, adjusting the settings and troubleshooting any issues are important for optimal performance. This includes adjusting the sensor range, sensitivity, and light duration, as well as addressing common problems such as false triggers or the light not turning on.
Adjusting Sensor Range and Sensitivity: Most motion detector lights have adjustable sensor range and sensitivity settings. The range setting determines how far the sensor can detect motion, while the sensitivity setting determines how small of a movement will trigger the light. Adjust these settings based on your specific needs and the surrounding environment. A higher sensitivity setting may be necessary in areas with limited movement, while a lower sensitivity setting may be preferable in areas with frequent activity to avoid false triggers. Experiment with different settings to find the optimal balance for your situation.
Adjusting Light Duration: The light duration setting determines how long the light will stay on after motion is detected. Adjust this setting based on your preferences and the intended use of the light. A shorter duration may be sufficient for providing brief illumination, while a longer duration may be necessary for providing extended security or convenience. Consider the energy consumption implications of longer duration settings.
Addressing False Triggers: False triggers can be a common problem with motion detector lights. Common causes of false triggers include moving trees or bushes, animals, passing cars, and changes in temperature. To minimize false triggers, adjust the sensor sensitivity and range settings. Trim any vegetation that may be triggering the sensor. Consider repositioning the light fixture to avoid direct exposure to roadways or other sources of movement. Some motion detector lights have advanced features, such as dual-technology sensors or pet immunity, that can help reduce false triggers.
Troubleshooting Common Problems: If the motion detector light is not working properly, troubleshoot the problem systematically. First, check the power supply to ensure that the circuit breaker is turned on. Verify that the wiring connections are secure and that there are no loose wires. Test the light with a different light bulb to rule out a faulty bulb. If the light still does not turn on, use a voltage tester to check for power at the light fixture. If there is no power, check the wiring connections in the junction box. If the light turns on but does not turn off, check the duration settings and ensure that the sensor is not being continuously triggered by movement.
Following these steps will ensure a safe and effective installation of outdoor motion detector lights, enhancing the security and convenience of the property. Remember to consult with a qualified electrician if you are unsure about any aspect of the installation process.

How To Install Security Lights Diy Family Handyman

How To Install An Outdoor Motion Sensor Light With S

How To Install An Exterior Motion Sensor Light Security Lights Diy Home

How To Install An Outdoor Motion Sensor Light With S

How To Install Outdoor Motion Activated Lights Tomcomknowshow

How To Wire Motion Sensor Occupancy Sensors

How To Wire Occupancy Sensor And Motion Detectors

How To Wire Motion Sensor Occupancy Sensors Lights Outdoor

Installing A Remote Motion Detector For Lighting Diy

How To Make A Motion Sensor Light Stay On Rayzeek
Related Posts