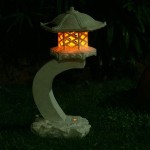
How to Clean Outdoor Solar Light Panels for Optimal Performance
Outdoor solar lights offer an energy-efficient and environmentally conscious way to illuminate gardens, pathways, and other exterior spaces. However, their performance can be significantly impacted by the accumulation of dirt, dust, pollen, and other debris on the solar panels. Regular cleaning is essential to ensure that these lights receive adequate sunlight and maintain their brightness and longevity. This article provides a comprehensive guide on how to properly clean outdoor solar light panels to maximize their efficiency.
Understanding the Importance of Clean Solar Panels
The efficiency of a solar panel is directly correlated to the amount of sunlight it can absorb. When the surface of the panel is covered with dirt, dust, bird droppings, or other obstructions, the amount of light reaching the photovoltaic cells is reduced. This reduction in light absorption results in a decrease in the electrical current generated by the panel, leading to dimmer lights and a shorter runtime. Over time, accumulated debris can also cause the panel to overheat, potentially damaging the cells and shortening the overall lifespan of the light. Therefore, neglecting regular cleaning can negate the benefits of using solar lights, rendering them less effective and requiring more frequent replacements.
Furthermore, the type of debris accumulating on the solar panel can also play a role in how efficiently it is able to absorb light. For example, bird droppings and sap can create a thick coating on the panel, blocking a significant amount of light. Pollen and dust, while seemingly less impactful, can accumulate over time to create a surprisingly thick layer that can reduce light absorption by a noticeable amount. In areas with high pollen counts or significant amounts of industrial pollution, cleaning will need to be more frequent to maintain optimal performance.
In essence, regular cleaning of outdoor solar lights is not merely an aesthetic concern but a critical maintenance practice that directly impacts their performance, longevity, and overall value. Failing to clean these lights regularly can lead to a significant decrease in their effectiveness and ultimately, increase the need to replace them more often. This also means the reduction of the initial investment savings that solar lights offer.
Materials Required for Cleaning Solar Light Panels
Before commencing the cleaning process, it is important to gather the necessary materials. Using the right tools minimizes the risk of damaging the solar panel and ensures a thorough cleaning. The following items are typically required:
Soft-Bristled Brush: A soft-bristled brush, such as a car washing brush or a gentle scrubbing brush, is essential for removing loose dirt and debris without scratching the panel's surface. Avoid using abrasive brushes or scouring pads, as these can damage the protective coating of the solar panel.
Microfiber Cloth: Microfiber cloths are ideal for wiping down the solar panel after washing. They are soft, absorbent, and lint-free, ensuring a streak-free finish. Avoid using paper towels, as they can leave behind lint and potentially scratch the panel.
Mild Soap or Detergent: A mild, non-abrasive soap or detergent is necessary for removing stubborn dirt and grime. Dish soap is generally a suitable option. Avoid using harsh chemicals, solvents, or abrasive cleaners, as these can damage the panel's surface and void the warranty.
Water: Clean, lukewarm water is used for rinsing the solar panel after washing. Distilled or deionized water is preferred, as it minimizes the risk of mineral deposits. However, tap water is generally acceptable as long as it is free from excessive mineral content.
Spray Bottle (Optional): A spray bottle can be used to apply the cleaning solution and rinse the solar panel. This provides a more controlled and even application of the water and soap.
Ladder or Step Stool (If Necessary): If the solar lights are located in hard-to-reach areas, a ladder or step stool may be required to safely access them. Ensure the ladder is stable and positioned on a level surface before climbing.
Safety Glasses (Optional): Safety glasses can be worn to protect the eyes from splashing water or cleaning solution.
Ensuring all materials are gathered beforehand will streamline the cleaning process and prevent the need to interrupt the procedure to search for missing items. Having all necessary materials at hand will also ensure a safer and more efficient cleaning experience.
Step-by-Step Guide to Cleaning Solar Light Panels
Cleaning solar light panels is a relatively simple process that can be completed in a few easy steps:
Step 1: Preparation: Turn off the solar lights before commencing the cleaning process. This prevents any accidental electrical shorts or damage to the lights. Disconnect the solar panel from the light fixture if possible. This provides greater access to the panel and minimizes the risk of water damage to the electrical components.
Step 2: Remove Loose Debris: Use the soft-bristled brush to gently sweep away any loose dirt, dust, leaves, or other debris from the surface of the solar panel. Brush in a downward direction to avoid pushing debris into crevices or scratching the panel.
Step 3: Prepare Cleaning Solution: In a bucket or spray bottle, mix a small amount of mild soap or detergent with lukewarm water. Use a ratio of approximately one tablespoon of soap per gallon of water. Ensure the soap is fully dissolved in the water before proceeding.
Step 4: Apply Cleaning Solution: Using a spray bottle or a soft cloth, apply the cleaning solution to the surface of the solar panel. Ensure the entire panel is evenly coated with the solution. Avoid applying excessive amounts of solution, as this can leave behind residue that is difficult to remove.
Step 5: Gently Scrub the Panel: Using the soft-bristled brush, gently scrub the surface of the solar panel to remove any stubborn dirt or grime. Use a circular motion to ensure that all areas of the panel are thoroughly cleaned. Avoid applying excessive pressure, as this can scratch or damage the panel.
Step 6: Rinse the Panel: Using clean, lukewarm water, rinse the solar panel to remove all traces of soap or detergent. Use a spray bottle or a garden hose with a gentle spray nozzle to rinse the panel thoroughly. Ensure that all soap residue is removed, as this can attract dirt and reduce the panel's efficiency. If possible use distilled water to prevent water spots.
Step 7: Dry the Panel: Using a clean, dry microfiber cloth, wipe down the surface of the solar panel to remove any remaining water. Use a gentle, blotting motion to avoid leaving streaks or lint on the panel. Allow the panel to air dry completely before reconnecting it to the light fixture.
Step 8: Reassemble the Lights: Once the solar panel is completely dry, reconnect it to the light fixture. Turn on the solar lights and observe their performance. If the lights are dimmer than usual, repeat the cleaning process or consider replacing the solar panel.
Following these steps carefully will ensure that the solar light panels are cleaned effectively without causing any damage. Properly cleaned panels will lead to brighter lights and extended lifespan, maximizing the benefits of using solar-powered illumination.
Frequency of Cleaning and Maintenance Tips
The frequency of cleaning solar light panels depends on several factors, including the location of the lights, the level of environmental pollution, and the weather conditions. In general, it is recommended to clean solar light panels at least once every three months. However, in areas with high pollen counts, heavy rainfall, or significant amounts of dust or debris, more frequent cleaning may be necessary.
In addition to regular cleaning, there are several other maintenance tips that can help to extend the lifespan and improve the performance of outdoor solar lights:
Check for Shading: Ensure that the solar panels are not shaded by trees, buildings, or other structures. Shading can significantly reduce the amount of sunlight reaching the panel, leading to dimmer lights and shorter runtime. Trim any overgrown vegetation that is blocking sunlight, or relocate the lights to a sunnier location.
Inspect the Batteries: Regularly inspect the batteries in the solar lights to ensure they are in good condition. Replace the batteries if they are corroded, leaking, or no longer holding a charge. Use rechargeable batteries that are specifically designed for solar lights.
Clean the Light Fixture: Clean the light fixture itself to remove any dirt, dust, or cobwebs that may be obstructing the light output. Use a damp cloth to wipe down the fixture, and avoid using harsh chemicals or abrasive cleaners.
Protect from Extreme Weather: During extreme weather conditions, such as heavy rain, snow, or hail, consider bringing the solar lights indoors to protect them from damage. This is especially important for lights that are made from fragile materials.
Store Properly During Winter: If the solar lights are not being used during the winter months, store them in a dry, protected location. Remove the batteries to prevent corrosion and extend their lifespan.
By following these maintenance tips, owners can ensure that outdoor solar lights continue to provide reliable and energy-efficient illumination for years to come. Proper maintenance also helps to prevent costly repairs or replacements, maximizing the long-term value of the investment in solar lighting.

Quick Easy Way To Clean Renew Re Solar Pathway Lights Wow Looks Brand New

How To Clean Solar Pathway Lights Quick And Easy

How To Clean Re Pathway Solar Lights Garden Yard Patio Tricks Look New

How To Clean Solar Panels Checkatrade

4 Ways To Clean Solar Panels On Garden Lights

How To Clean Solar Panels On Garden Lights Forthlighting

How To Clean Solar Lights Panels Network

Easy Way To Clean Solar Lights

How To Clean Solar Lights In 10 Easy Steps With S House Grail

How To Clean Solar Panels Without Water Mit News Massachusetts Institute Of Technology