How To Change the Sensor on an Outdoor Light
Outdoor lights equipped with sensors offer convenience and increased security by automatically illuminating when motion is detected or when ambient light dims. Over time, these sensors can fail due to various factors such as weather exposure, electrical surges, and general wear and tear. Replacing a faulty sensor is a straightforward process for many homeowners, allowing them to restore the functionality of their outdoor lighting without needing to replace the entire fixture.
Before undertaking any electrical work, it is crucial to prioritize safety. Disconnecting the power supply to the light fixture is paramount. This can be done by switching off the corresponding circuit breaker in the electrical panel. Double-checking that the power is off using a non-contact voltage tester is highly recommended. This safeguards against accidental electrical shock during the replacement procedure. Gather the necessary tools, including a screwdriver (likely Phillips or flathead, depending on the fixture), wire strippers, wire connectors (such as wire nuts), a new sensor compatible with the existing light fixture, and safety glasses.
Identifying the Sensor Type and Compatibility
The initial step involves accurately identifying the type of sensor currently installed. Outdoor lights utilize different sensor technologies, primarily motion sensors and photocell sensors (light sensors). Motion sensors detect movement within a specific range, while photocell sensors react to ambient light levels. Some fixtures may even incorporate both types of sensors for enhanced functionality.
Examine the sensor housing for any markings or model numbers. This information is often printed on the sensor itself or within the light fixture's documentation. If the documentation is unavailable, a careful visual inspection can help determine the sensor type. Motion sensors typically have a lens or dome-shaped cover that allows them to detect movement. Photocell sensors usually feature a small, exposed element that reacts to light. Understanding the sensor type is crucial for selecting a compatible replacement.
Compatibility is paramount. Simply purchasing any sensor will not guarantee proper operation. The replacement sensor must be designed to work with the voltage and wiring configuration of the existing light fixture. Mismatched voltage or improper wiring can result in damage to the sensor, the light fixture, or even the electrical system. Refer to the light fixture's specifications or consult with a qualified electrician to ensure compatibility.
When sourcing a replacement sensor, consider purchasing one from the same manufacturer as the original fixture. This often ensures a greater likelihood of direct compatibility. If a direct replacement is unavailable, carefully compare the specifications of different sensors to find one that matches the voltage, wiring requirements, and sensor technology of the original. Online retailers and hardware stores typically provide detailed product specifications that can aid in the selection process.
Removing the Old Sensor
With the power safely disconnected and the replacement sensor secured, the next step is to remove the old sensor. This process typically involves removing screws or clips that secure the sensor housing to the light fixture. The location and type of fasteners will vary depending on the design of the fixture. Carefully examine the sensor housing to identify the appropriate removal method.
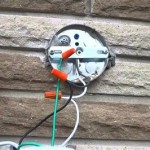
Before completely detaching the old sensor, it is crucial to take note of the wiring connections. Most sensors will be connected to the light fixture's wiring using wire connectors (wire nuts). These connectors securely join the wires together, ensuring a reliable electrical connection. Note the color of the wires and their corresponding connections to the sensor. Documenting these connections, either through a photograph or a written diagram, will greatly simplify the installation of the new sensor.
Once the wiring connections are documented, carefully disconnect the wires from the old sensor. This can be done by unscrewing the wire connectors or, in some cases, by gently pulling the wires apart. If the wires are corroded or damaged, they may need to be trimmed back to expose fresh wire. Use wire strippers to remove a small amount of insulation from the end of each wire, ensuring a clean and reliable connection.
After disconnecting the wires, the old sensor can be completely removed from the light fixture. Be mindful of any seals or gaskets that may be present between the sensor housing and the fixture. These seals help to prevent moisture from entering the fixture and potentially causing damage. Carefully remove any seals and set them aside for reuse with the new sensor.
Installing the New Sensor
The installation of the new sensor is essentially the reverse of the removal process. Begin by connecting the wires from the new sensor to the corresponding wires in the light fixture. Refer to the wiring diagram or photograph that was created during the removal process to ensure accurate connections. Use new wire connectors to securely join the wires together. Ensure that the wire connectors are properly tightened to prevent loose connections, which can lead to electrical problems.
If the old sensor had any seals or gaskets, reinstall them around the new sensor housing to prevent moisture from entering the fixture. Position the sensor securely within the light fixture and fasten it in place using the screws or clips that were removed earlier. Tighten the fasteners securely, but avoid over-tightening, which could damage the sensor housing or the light fixture.
After the new sensor is installed and the wiring connections are secure, carefully inspect the entire installation to ensure that everything is properly connected and secured. Double-check the wiring connections to verify that they match the original configuration. Ensure that the sensor housing is properly sealed to prevent moisture intrusion. Once the inspection is complete, the power can be safely restored to the light fixture by switching the circuit breaker back on.
Test the new sensor to ensure that it is functioning correctly. For motion sensors, walk within the sensor's detection range to verify that the light turns on. For photocell sensors, wait until dusk or darken the sensor to simulate nighttime conditions and verify that the light turns on automatically. If the sensor does not function as expected, double-check the wiring connections and the sensor settings. If problems persist, consult with a qualified electrician.
Some sensors may require adjustments to their sensitivity or detection range. These adjustments are typically made using small dials or switches located on the sensor housing. Refer to the sensor's documentation for instructions on how to adjust these settings to achieve the desired performance.
Properly dispose of the old sensor according to local regulations. Some electronic components may contain hazardous materials that require special handling. Check with local recycling centers or waste disposal services for information on how to properly dispose of the old sensor.

How To Install Replace Outdoor Light Easy Simple

Motion Sensor Lights Tips To Reset Detector

How To Adjust Your Sensor Light Metro Electrical 24 Hour Electricians

How To Replace A Motion Sensor Light

Motion Light Sensor Replacement

How To Replace An Exterior Flood Light With Motion Sensor

Installing A Remote Motion Detector For Lighting Diy

How To Replace Repair Of A Lamppost Sensor Simple 15 Diy

Understanding Motion Lighting

How To Make And Install A Motion Sensor Light 3 Diy Methods
Related Posts