How to Build Outdoor Jenga
Constructing a giant outdoor Jenga game provides an engaging and enjoyable activity for gatherings and outdoor events. This project requires basic woodworking skills and access to lumber and tools. The following outlines the process for creating a durable and entertaining outdoor Jenga set.
The primary material for an outdoor Jenga game is wood. Dimensional lumber, such as 2x4s or 2x6s, is commonly used. The choice of wood species impacts the game's appearance, weight, and resistance to weathering. Softwoods like pine are generally less expensive but may require more frequent sealing or staining. Hardwoods like oak or cedar offer greater durability and natural resistance to decay but come at a higher cost.
Beyond lumber, essential tools include a saw (circular saw, miter saw, or hand saw), a measuring tape, a level, sandpaper (or a sander), wood glue, clamps, and a sealant or stain. Safety glasses and hearing protection are also crucial when operating power tools.
Planning and Material Acquisition
The first step involves determining the desired size of the Jenga blocks. Standard dimensions often involve cutting the lumber into lengths that are 10.5 inches long. The width and thickness are dictated by the dimensions of the lumber chosen (e.g., 2x4 lumber would be 1.5 inches thick and 3.5 inches wide after processing). Larger blocks create a more imposing tower, while smaller blocks are easier to handle and transport.
The number of blocks required depends on the desired height of the starting tower. A typical Jenga game consists of 54 blocks, arranged in 18 layers of three blocks each. Calculate the total lumber needed based on the block dimensions and the quantity required. It's prudent to purchase slightly more lumber than calculated to account for potential errors or imperfections.
Careful selection of lumber is paramount. Choose boards that are straight, free of significant knots, and without warping or twisting. Warped boards make it difficult to create a stable and even tower. Inspect each piece of lumber thoroughly before purchase.
After acquiring the lumber, allow it to acclimate to the surrounding environment for a few days. This helps to minimize warping or cracking after the blocks are cut. Storing the lumber in a dry, well-ventilated area is recommended.
Cutting and Preparing the Blocks
Measure and mark each piece of lumber according to the chosen block length. Precise measurements are critical for ensuring uniform blocks, which contribute to a stable tower. Use a sharp pencil and a reliable measuring tape for accuracy.
Utilize a saw to cut the lumber into individual blocks. A miter saw provides the most accurate and consistent cuts, particularly for a large number of blocks. When using a circular saw, exercise caution and use a guide to maintain a straight cut line. A hand saw can be used, but it requires more effort and precision.
After cutting, each block should be sanded to remove sharp edges and splinters. This is important for safety and also improves the overall feel of the game. Use medium-grit sandpaper initially, followed by fine-grit sandpaper for a smoother finish. A power sander significantly reduces the sanding time, especially for a large set.
Inspect each block for imperfections, such as splinters or rough edges, and address them as necessary. Consistency in the blocks’ shape and smoothness is crucial for the game's playability.
Some builders choose to slightly bevel the edges of each block. This subtle rounding can make it easier to remove blocks from the tower during gameplay and reduces the risk of chipping. This step is optional but can enhance the overall quality of the game.
Assembling and Finishing
While Jenga blocks are not typically glued together within a single layer, applying a small amount of wood glue to the ends of each block can improve the blocks’ structural integrity and longevity, especially if they are likely to be handled roughly. This is also an optional step and depends upon the desired robustness of the blocks.
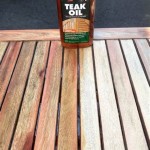
After sanding and gluing (if used), consider applying a sealant, stain, or paint to the blocks. This protects the wood from moisture and the elements, extending the life of the game. Choose a finish that is suitable for outdoor use and follow the manufacturer's instructions for application.
If using a sealant or stain, apply multiple coats for optimal protection. Allow each coat to dry completely before applying the next. Lightly sand the blocks between coats to ensure a smooth finish. If painting, consider using multiple thin coats to avoid drips and runs.
The choice of finish also affects the aesthetic appeal of the game. A clear sealant preserves the natural wood grain, while a stain can add color and depth. Paint offers the widest range of color options and can be used to create a personalized design.
Once the finish is dry, inspect the blocks one last time to ensure they are smooth, even, and free of any imperfections. Any remaining rough spots can be addressed with light sanding. The objective is to create a set of blocks that are comfortable to handle and visually appealing.
Enhancements and Storage
Consider constructing a carrying case or bag for the Jenga blocks. This simplifies transportation and protects the blocks from damage during storage. A simple wooden crate or a heavy-duty canvas bag can serve as an effective storage solution.
Adding personalized touches can enhance the game. This could involve engraving initials or designs onto the blocks, using different colored stains or paints, or adding decorative hardware. These details make the game unique and add to its overall appeal.
To further enhance the playability of the game, consider creating a level playing surface. This could involve building a small platform or using a pre-existing surface that is known to be level. A level surface ensures that the tower starts straight and reduces the risk of premature collapse.
Proper storage is crucial for maintaining the condition of the Jenga blocks. Store the blocks in a dry, sheltered location when not in use. This prevents moisture damage and minimizes the risk of warping or cracking. If stored outdoors, cover the blocks with a waterproof tarp or container.
Regular maintenance can prolong the life of the game. Inspect the blocks periodically for signs of damage, such as cracks or splinters, and address them promptly. Reapply sealant or stain as needed to maintain the protective finish. With proper care, an outdoor Jenga game can provide years of enjoyment.
Variations on the classic Jenga theme can also be implemented. Some builders create Jenga sets with different shapes or sizes of blocks, while others add rules to the game, such as requiring players to perform a task after removing a block. These modifications can add variety and excitement to the game.
The construction of an outdoor Jenga game provides a challenging and rewarding project. By following these guidelines and paying attention to detail, one can create a durable and entertaining game that will be enjoyed for years to come.

How To Make A Giant Jenga Game Outdoor

How To Make A Giant Jenga Yard Game Creative Green Living

How To Make A Giant Jenga Yard Game Creative Green Living

Diy Giant Jenga Yard Game

How To Make A Colorful Outdoor Giant Jenga Game Garden Sanity By Pet Scribbles

How To Make A Diy Giant Jenga Game Pete

How To Make A Diy Giant Jenga Game The Idea Room

How To Build A Diy Giant Jenga Yard Game In Two Hours And Twenty Dollars

How To Build A Giant Jenga Game Built By Kids

How To Make Your Own Giant Jenga A Beautiful Mess