```html
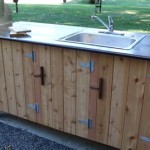
How to Build Outdoor Cabinet Doors
Constructing cabinet doors for outdoor use requires a meticulous approach, considering the challenges posed by weather exposure. Factors such as moisture, sunlight, and temperature fluctuations can significantly impact the longevity and appearance of the doors. Therefore, material selection, construction techniques, and proper finishing are paramount.
This article provides a comprehensive guide to building outdoor cabinet doors, outlining the necessary steps, materials, and techniques to create durable and aesthetically pleasing doors that will withstand the elements. The focus is on clarity and practicality, ensuring that individuals with a basic understanding of woodworking can successfully complete this project.
Choosing Weather-Resistant Materials
The selection of appropriate materials is arguably the most critical aspect of building outdoor cabinet doors. Certain wood species are naturally more resistant to decay and insect infestation, making them ideal for exterior applications. In addition to wood, alternative materials may be considered, depending on the desired aesthetic and performance characteristics.
Wood Options: Several wood species are well-suited for outdoor use due to their inherent durability. Redwood and cedar are popular choices, known for their natural oils that resist rot and insect damage. These woods offer a warm, attractive appearance and are relatively easy to work with. Teak is another excellent option, prized for its exceptional durability and resistance to moisture. However, teak is generally more expensive than redwood or cedar. Cypress is also a viable choice, exhibiting good water resistance and durability.
Alternative Materials: While wood remains a popular choice, alternative materials such as PVC and composite lumber offer excellent resistance to moisture and insects. PVC is a completely waterproof material, making it ideal for areas with heavy rainfall. Composite lumber, typically made from a blend of wood fibers and plastic, offers a similar level of weather resistance and requires minimal maintenance. However, these materials may not have the same aesthetic appeal as natural wood. Metal, particularly aluminum, can be used for cabinet doors, offering superior durability and resistance to the elements. Aluminum doors often require professional fabrication and may not be suitable for all design styles.
Considerations for Material Selection: When selecting materials, consider the overall design of the outdoor space and the desired aesthetic. Factors such as budget, maintenance requirements, and ease of workability should also be taken into account. For instance, if the goal is to achieve a natural wood look, then redwood, cedar, or cypress would be the preferred choices. If low maintenance and maximum weather resistance are the primary concerns, then PVC or composite lumber might be more appropriate. Proper sealing and finishing are essential, regardless of the material chosen, to further enhance its durability and protect it from the elements.
Constructing the Cabinet Door Frame
The frame is the structural foundation of the cabinet door, providing support and stability. A well-constructed frame will resist warping and sagging, ensuring that the door functions properly for years to come. There are several methods for constructing cabinet door frames, but the mortise-and-tenon joint is widely regarded as the strongest and most durable.
Mortise-and-Tenon Joints: A mortise-and-tenon joint involves creating a projecting tenon on one piece of wood that fits snugly into a corresponding mortise (a hole or recess) on the other piece. This type of joint provides a large gluing surface and excellent mechanical strength. Constructing mortise-and-tenon joints requires precision and accuracy. The mortise can be cut using a mortising machine, a router with a mortising jig, or hand tools such as chisels. The tenon can be cut using a table saw or a tenoning jig. After cutting the mortise and tenon, dry-fit the pieces to ensure a proper fit. If necessary, make adjustments to achieve a tight, flush joint. Once satisfied with the fit, apply a waterproof wood glue to the mating surfaces and clamp the joint securely until the glue has cured.
Alternative Frame Construction Methods: While mortise-and-tenon joints are preferred for their strength, alternative methods such as rabbet joints or dowel joints can also be used. Rabbet joints involve creating a recess along the edge of one piece of wood that fits over the edge of the other piece. Dowel joints use cylindrical dowels to reinforce the joint between two pieces of wood. These methods are generally easier to execute than mortise-and-tenon joints, but they may not provide the same level of strength and durability. When using rabbet or dowel joints, it is crucial to use a high-quality waterproof wood glue and to clamp the joints securely during assembly.
Frame Assembly: After the frame pieces have been cut and the joints have been prepared, assemble the frame on a flat surface. Use clamps to hold the frame together while the glue dries. Ensure that the frame is square by measuring the diagonals. The diagonals should be equal in length. If the frame is not square, adjust the clamps until it is. Allow the glue to dry completely before removing the clamps. After the glue has dried, sand the frame smooth, paying particular attention to the joints. Remove any excess glue or imperfections. The frame is now ready for the installation of the center panel.
Installing the Center Panel and Finishing
The center panel adds visual interest and structural support to the cabinet door. It can be made from solid wood, plywood, or other weather-resistant materials. The panel is typically installed in a groove or rabbet cut into the inside edges of the frame. Proper finishing is essential to protect the wood from the elements and to enhance its aesthetic appeal.
Panel Installation: The center panel can be installed as a floating panel or a fixed panel. A floating panel is slightly smaller than the opening in the frame, allowing it to expand and contract with changes in humidity without putting stress on the frame. A fixed panel is glued and secured directly to the frame. For outdoor cabinet doors, a floating panel is generally recommended to prevent cracking or warping due to temperature and humidity fluctuations. To install a floating panel, cut a groove or rabbet into the inside edges of the frame. The groove or rabbet should be slightly wider than the thickness of the panel. Insert the panel into the groove or rabbet, leaving a small gap around the perimeter to allow for expansion and contraction. Secure the panel in place using small wooden blocks or rubber bumpers. A fixed panel can be glued and screwed or nailed securely into the frame.
Sanding and Preparation: Before applying any finish, thoroughly sand the cabinet door to create a smooth, even surface. Start with a coarse grit sandpaper (e.g., 80-grit) to remove any imperfections or rough spots. Gradually progress to finer grits (e.g., 120-grit, 220-grit) to achieve a smooth, polished surface. Remove all sanding dust with a tack cloth or a vacuum cleaner. Ensure that the surface is clean and dry before proceeding with the finishing process.
Finishing Techniques: The choice of finish will depend on the type of wood used and the desired aesthetic. For redwood, cedar, or cypress, a penetrating oil finish or a clear exterior varnish is a good option. These finishes will enhance the natural beauty of the wood while providing protection from moisture and UV rays. For other wood species, a primer and two coats of exterior paint may be necessary. Use a high-quality exterior primer to seal the wood and provide a good base for the paint. Apply two coats of exterior paint, following the manufacturer's instructions. Allow each coat to dry completely before applying the next. For PVC or composite lumber, a specialized paint formulated for plastic may be required. Always follow the manufacturer's instructions for surface preparation and application. Regardless of the finish chosen, apply multiple coats to provide maximum protection and durability. Regular maintenance, such as cleaning and re-applying the finish as needed, will help to extend the life of the cabinet doors.
Hardware Installation: After the finish has dried completely, install the hinges, handles, and other hardware. Use stainless steel or other corrosion-resistant hardware to prevent rust and corrosion. Ensure that the hardware is properly aligned and securely fastened. Test the door to ensure that it opens and closes smoothly. Make any necessary adjustments to the hinges or hardware. With proper construction and finishing, the outdoor cabinet doors will provide years of reliable service and enhance the beauty of the outdoor space.
```
How To Build An Outdoor Kitchen Cabinet Part 2

How To Build An Outdoor Kitchen Cabinet Jon Peters

Diy Outdoor Kitchen Design Built With Redwood Lovely Indeed

Diy Outdoor Kitchen Design Built With Redwood Lovely Indeed

New Dc Handy Homeowner Diy Cabinet Doors Repurposed Outdoor Kitchen Cabinets

Build An Outdoor Tv Cabinet

How To Build Outdoor Kitchen Cabinets

Yellawood Diy Outdoor Tv Cabinet

How To Build Outdoor Kitchen Cabinets

Outdoor Tv Cabinet With Bi Fold Doors Able Building Plan Diy Backyard
Related Posts