How to Build an Outdoor Stacked Stone Fireplace
An outdoor stacked stone fireplace is a beautiful and functional addition to any backyard. It can provide warmth on chilly evenings, create a focal point for outdoor gatherings, and enhance the overall aesthetic appeal of your outdoor space. Building a stacked stone fireplace requires careful planning, proper materials, and some basic construction skills. This article will guide you through the essential steps to create your own stunning outdoor fireplace.
Step 1: Planning and Design
Before you begin construction, it is crucial to plan carefully. Consider these factors:
- Location: Choose a suitable location that meets local building codes and is away from flammable materials and structures. Ensure that the area is level and has adequate drainage to prevent water accumulation.
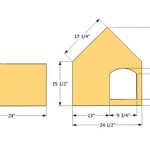
- Size and Shape: Determine the desired size and shape of your fireplace. Consider the available space and the intended use. A smaller fireplace may be suitable for a intimate setting, while a larger one can accommodate a larger gathering.
- Firebox Design: Select the type of firebox that best suits your needs. Pre-made fireboxes provide convenience and ensure proper combustion, while building your own offers greater customization.
- Materials: Choose the type of stone you want to use. There are many options available, each with its own look, durability, and price point. Consider the style of your home and the surrounding environment, such as river rock for a rustic feel or flagstone for a more modern look.
- Budget: Set a realistic budget for materials, labor, and any necessary permits.
Once you have a clear plan in place, obtain any necessary permits and gather the required tools and materials.
Step 2: Preparing the Foundation
A solid foundation is essential for a stable and durable fireplace. Follow these steps:
- Excavate: Dig a hole that is slightly larger than the footprint of your firebox and deep enough to accommodate the foundation and a layer of gravel for drainage.
- Pour Concrete: Place a layer of gravel in the excavated hole, then pour a concrete foundation that is at least 4 inches thick. Use a level to ensure the foundation is level and flat.
- Allow Curing: Allow the concrete to cure for at least 24 hours before proceeding to the next step.
Step 3: Building the Firebox
The firebox is the heart of your fireplace. Here's how to build one:
- Install the Firebox: Position your firebox on the concrete foundation and secure it in place using construction adhesive and screws. Ensure the firebox is level and centered on the foundation.
- Construct the Hearth (if necessary): If you are building your own firebox, you will need to construct the hearth. The hearth is the platform on which the fire will burn. It is typically made of concrete or stone.
- Install the Damper (if necessary): If you are using a pre-made firebox, a damper may already be installed. This device regulates airflow and helps control the fire.
- Install the Smoke Shelf: The smoke shelf is located above the firebox and helps direct smoke up the chimney. It is typically made of concrete or stone.
Step 4: Laying the Stone
This step involves carefully arranging and securing the stone for the fireplace structure. Follow these steps:
- Mortar Mix: Prepare a mortar mix according to the manufacturer's instructions. Use a trowel to spread a layer of mortar on the foundation and around the firebox.
- Laying the First Course: Place the first row of stones on the mortar bed. Use a level to ensure the stones are level and aligned.
- Stacking Stone: Continue stacking the stone, ensuring that the stones are properly mortared and the fireplace remains level.
- Chimney Construction: Construct the chimney by stacking stones in a vertical manner. Make sure the chimney is wide enough to allow for proper smoke flow.
- Grouting: Once the stones are in place, allow the mortar to cure for 24 hours. Then, use a grout bag to fill in any gaps between the stones.
Step 5: Finishing Touches
Add the final touches to enhance the look and functionality of your fireplace.
- Installing a Screen: A screen can help prevent embers from escaping the fireplace.
- Adding a Mantel (optional): A mantel can provide a decorative top for your fireplace and offer a shelf space for displaying items.
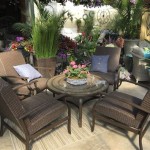
- Landscaping: Enhance the surrounding area with landscaping elements, such as plants, gravel, or paths.
Remember to regularly clean and maintain your stacked stone fireplace to ensure its longevity and safety. Enjoy the warmth and ambiance of your new outdoor fireplace with friends and family.

How To Build An Outdoor Stacked Stone Fireplace

Stonetutorials Living Stone Masonry

How To Build An Outdoor Fireplace Today S Creative Life

Stonetutorials Living Stone Masonry

How To Build An Outdoor Fireplace Today S Creative Life

How To Build An Outdoor Stacked Stone Fireplace

How To Build An Outdoor Stacked Stone Fireplace

Build A Stone Fireplace Resources To Help You Stack It Up Outdoors

How To Build An Outdoor Fireplace Step By Guide Buildwithroman

How To Build An Outdoor Stacked Stone Fireplace
Related Posts