How to Build an Outdoor Kitchen with Wood Studs
An outdoor kitchen enhances outdoor living spaces, providing a functional area for cooking, dining, and entertaining. Constructing an outdoor kitchen using wood studs offers a cost-effective and customizable solution. This article outlines the steps involved in building a durable and aesthetically pleasing outdoor kitchen utilizing wood frame construction.
Prior to beginning construction, thoroughly evaluate the intended location for the outdoor kitchen. Considerations should include proximity to the house, prevailing wind direction, access to utilities (water, gas, electricity), and local building codes. Acquiring necessary permits before starting any construction project is crucial. The selected location should also offer adequate space for movement and accommodate any planned seating or dining areas. Properly assess the ground for levelness and drainage. Any existing slope will need to be addressed during the foundation preparation stage.
Planning and Design Considerations
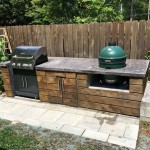
The design phase is critical for ensuring the finished outdoor kitchen meets specific needs and aesthetic preferences. Develop a detailed plan that incorporates desired features, such as a grill, sink, refrigerator, storage cabinets, and countertop space. Consider the dimensions of each appliance and fixture to ensure they fit appropriately within the frame. Plan for adequate countertop overhangs, typically between 1-2 inches, for comfort and aesthetics. Material selection should prioritize weather resistance and durability. Pressure-treated lumber is essential for the framing structure, particularly for any component in contact with the ground. Choose countertops that are resistant to moisture, heat, and staining, such as concrete, granite, or tile. Finally, design the kitchen so it complements the existing landscape and architectural style of the house.
Once the design is finalized, a comprehensive material list is essential. Accurate measurements and quantities prevent wasted materials and unnecessary trips to the hardware store. Items that must be considered include:
- Pressure-treated lumber (2x4s, 2x6s, 4x4s) for the frame
- Exterior-grade plywood or cement board for sheathing
- Concrete mix for the foundation or footings
- Fasteners (screws, nails, lag bolts) suitable for exterior use
- Countertop material
- Stone, brick, or stucco for the exterior cladding (optional)
- Grill, sink, refrigerator, and other appliances
- Plumbing and electrical supplies
- Sealant and caulk
- Paint or stain suitable for exterior use
Gather all necessary tools before starting the building process. The following tools are generally needed to build an outdoor kitchen:
- Tape measure
- Level
- Square
- Circular saw
- Drill/driver
- Hammer
- Concrete mixer (if pouring concrete)
- Safety glasses
- Work gloves
Foundation and Framing Construction
A solid foundation is the basis of a stable and long-lasting outdoor kitchen. Depending on the design and local building codes, the foundation might consist of a concrete slab, concrete footings with a gravel base, or a raised platform supported by concrete piers. For a simple outdoor kitchen, concrete footings are often sufficient. Dig holes for the footings, ensuring they are below the frost line to prevent movement due to freezing and thawing cycles. Fill the holes with concrete, setting in post anchors for securing the wood frame. Ensure the post anchors are level before the concrete sets. For a larger, more elaborate kitchen, consider pouring a concrete slab. This provides a level and durable surface for the entire structure.
Once the foundation is in place, the wood framing can commence. Cut the pressure-treated lumber according to the dimensions specified in the plan. Construct the base frame first, ensuring it is square and level. Use galvanized fasteners to assemble the frame, providing resistance to corrosion. Attach the frame to the post anchors or concrete slab using appropriate hardware. Build the vertical studs, typically spaced 16 inches on center. Secure the studs to the base frame and to a top plate, creating a sturdy and rigid structure. Frame any openings for doors, drawers, appliances, and the sink. Ensure these openings are the correct size and are plumb and square. Add additional support around openings, such as headers and cripple studs, to distribute the load.
After the framing is complete, sheathe the exterior of the kitchen with exterior-grade plywood or cement board. This provides a smooth surface for attaching the final cladding material and adds structural integrity to the frame. Cut the sheathing to fit the frame, leaving a small gap between sheets to allow for expansion and contraction. Attach the sheathing using screws, ensuring they are properly spaced and driven flush. Once the sheathing is installed, apply a moisture barrier to protect the wood from water damage. Overlap the seams of the moisture barrier and tape them securely to prevent water penetration.
Installation of Utilities and Finishing
Before installing the countertop and cladding, run any necessary electrical and plumbing lines. It is highly recommended to consult with licensed electricians and plumbers to ensure all work complies with local codes and safety regulations. Install electrical outlets and wiring for appliances, lighting, and other electrical components. Ensure all wiring is properly grounded and protected by GFCI outlets. Run plumbing lines for the sink and any other water-using appliances. Install shut-off valves for easy access and maintenance. Pressure test all plumbing connections to check for leaks. Cap off any gas lines until the grill or other gas appliances are connected by a qualified professional.
With utilities in place, the countertop can be installed. Options include concrete, granite, tile, and stainless steel. For a concrete countertop, pour the concrete into a mold, reinforcing it with rebar. Allow the concrete to cure completely before removing the mold. Install granite or tile countertops using thin-set mortar. Grout the tile and seal it to prevent staining. Secure the countertop to the frame using construction adhesive and screws. Ensure the countertop is level and has the proper overhang.
The exterior cladding of the outdoor kitchen can be customized to match the style of the surrounding landscape. Popular choices include stone veneer, brick, stucco, and wood siding. Install the cladding according to the manufacturer's instructions. For stone veneer, apply a scratch coat of mortar to the sheathing and then adhere the stones to the mortar. For brick, lay the bricks in a traditional brick pattern, using mortar to bond them together. For stucco, apply multiple coats of stucco to the sheathing, allowing each coat to dry before applying the next. For wood siding, install the siding horizontally or vertically, overlapping each piece to create a weather-resistant barrier.
The final steps involve installing the appliances, doors, drawers, and any remaining hardware. Carefully install the grill, sink, refrigerator, and other appliances, following the manufacturer's instructions. Connect the utilities to the appliances, ensuring all connections are secure and leak-free. Install doors and drawers, ensuring they open and close smoothly. Install handles, knobs, and other hardware to complete the look of the outdoor kitchen. Seal all seams and joints with caulk to prevent water penetration.
Safety Considerations and Maintenance
Safety should always be a priority during construction and operation of the outdoor kitchen. Wear safety glasses and work gloves when cutting and handling materials. Use power tools safely and follow the manufacturer's instructions. Ensure proper ventilation when using gas appliances. Keep the outdoor kitchen clean and free of debris to prevent fire hazards. Regularly inspect the structure for signs of damage or wear. Repair any damaged areas promptly to prevent further deterioration. Inspect and clean the grill regularly to prevent grease build-up. Winterize the outdoor kitchen by disconnecting water lines and covering appliances to protect them from the elements.
Regular maintenance is crucial for extending the lifespan of the outdoor kitchen. Clean the countertops and cladding regularly with mild soap and water. Apply a sealant to the countertops and cladding to protect them from staining and water damage. Inspect the wood frame for signs of rot or insect infestation. Treat any affected areas with wood preservative. Lubricate door hinges and drawer slides to ensure smooth operation. Check the plumbing and electrical systems for leaks or shorts. Repair any issues promptly to prevent further damage. By following these maintenance tips, the outdoor kitchen will provide years of enjoyment.

Diy Outdoor Kitchen Build Part 1 Framing And Layout Vevor 614

Outdoor Kitchen Framing 11 Helpful Facts You Should Know

Outdoor Kitchen Construction Build An Landscaping Network

Outdoor Kitchen Construction Build An Landscaping Network

Outdoor Kitchen Rogue Engineer

How To Build A Diy Outdoor Kitchen Family Handyman

How To Build An Outdoor Kitchen The Home Depot

My New Bbq Island Electrical Rough All Uprights For Overhang Tied In Very Firm And Rigid Build Outdoor Kitchen Plans

How To Build A Diy Outdoor Kitchen Family Handyman

Rolling Outdoor Island Building Plans Pneumatic Addict
Related Posts