How To Build An Outdoor Gas Fire Table
Building an outdoor gas fire table can enhance any outdoor living space, providing warmth, ambiance, and a focal point for gatherings. This project requires careful planning and execution, but with the right tools and materials, it can be a rewarding DIY endeavor.
Gathering Materials and Tools
Before beginning construction, gather all necessary materials and tools. This will streamline the building process and prevent unnecessary delays.
- Fire Pit Kit: This typically includes a burner pan, burner ring, gas valve, and key valve.
- Framing Material: Pressure-treated lumber, concrete blocks, or metal studs can form the fire table's structure.
- Exterior-Grade Plywood or Cement Board: These materials provide a stable base for the fire pit components and tabletop material.
- Tabletop Material: Options include stone, tile, concrete, or metal, chosen for aesthetic preference and weather resistance.
- Gas Piping and Fittings: These connect the fire pit kit to the gas source.
- Safety Shut-Off Valve: Essential for controlling gas flow in case of emergencies.
- Lava Rocks or Fire Glass: These decorative elements enhance the fire's appearance.
- Screws, Nails, and Adhesives: Choose appropriate fasteners for the selected materials.
- Safety Gear: Gloves, eye protection, and a dust mask are crucial for safe construction.
Building the Frame
The frame provides the foundation for the fire table and dictates its overall size and shape. Accurate measurements and sturdy construction are critical in this phase.
- Determine Dimensions: Plan the fire table's size based on available space and desired functionality.
- Cut Framing Material: Cut the chosen framing material to the determined dimensions.
- Assemble the Frame: Construct a rectangular or square frame, ensuring square corners and secure joints.
- Add Support Beams: Internal supports provide stability and prevent sagging, especially for larger tables.
Installing the Fire Pit Kit
Proper installation of the fire pit kit is crucial for safe and efficient operation. Follow the manufacturer's instructions carefully during this process.
- Position the Burner Pan: Place the burner pan centrally within the frame, leaving adequate clearance for ventilation.
- Connect the Gas Piping: Connect the gas piping to the burner, ensuring tight connections and leak-free seals.
- Install the Gas Valve and Key Valve: These components control the gas flow to the burner.
- Test for Leaks: Before proceeding, conduct a thorough leak test using soapy water to identify and address any leaks.
Creating the Tabletop Base
The tabletop base provides a stable platform for the chosen tabletop material. Its construction must consider weight distribution and weather resistance.
- Cut Plywood or Cement Board: Cut the chosen material to fit snugly within the frame, covering the fire pit components.
- Secure the Base: Attach the base material to the frame using appropriate screws or adhesives.
- Seal the Edges: Seal any exposed edges of the base material to prevent moisture infiltration.
Installing the Tabletop
The tabletop is the fire table's most visible element, influencing its overall aesthetic. Careful installation ensures a beautiful and durable finish.
- Choose the Tabletop Material: Consider factors like appearance, durability, and heat resistance when selecting the material.
- Cut the Tabletop: Cut the chosen material to the desired dimensions, allowing for an overhang around the frame.
- Attach the Tabletop: Securely attach the tabletop to the base using appropriate adhesives or fasteners.
- Seal the Tabletop (if applicable): Certain materials, like stone or concrete, may require sealing to enhance their longevity.
Adding Finishing Touches
The final touches complete the fire table's appearance and ensure safe and enjoyable use.
- Add Lava Rocks or Fire Glass: Place these decorative elements around the burner ring, concealing the burner components and enhancing the visual appeal.
- Connect to Gas Supply: Connect the gas piping to the main gas supply, ensuring proper shut-off valve installation.
- Final Safety Check: Conduct a final safety check to ensure all connections are secure and the gas supply is functioning correctly.
Safety Precautions
Safety should be a paramount concern throughout the construction and operation of the gas fire table. Adhering to safety guidelines prevents accidents and ensures long-term enjoyment.
- Consult Local Codes: Check local building codes and regulations regarding gas fire pits before beginning construction.
- Professional Inspection: Consider having a qualified professional inspect the gas connections and installation for safety compliance.
- Ventilation: Ensure adequate ventilation around the fire pit to prevent the buildup of dangerous gases.
- Fire Extinguisher: Keep a fire extinguisher readily accessible near the fire table in case of emergencies.
- Supervision: Never leave the fire table unattended while in operation, and keep children and pets at a safe distance.

How Do I Build A Diy Fire Pit For Natural Gas Starfire Direct

How To Make An Outdoor Gas Fireplace With Diy Pete

Diy Gas Fire Pit Table

I Built A 2000 Diy Outdoor Fire Table For 300 You Can Too

Learn How To Build Your Diy Propane Fire Pit Starfire Direct

Fire Table Pit Diy How To Build An Outdoor Gas

Diy Outdoor Fire Table Hamilton Park Home Inspiration For Garden

How To Install A Diy Fire Pit Burner Pan Firepit Outfitter

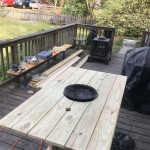
300 26x48 Diy Deck Fire Table Build Diytyler

How To Make An Outdoor Gas Fireplace With Diy Pete
Related Posts