How To Build A Handrail For Outdoor Steps
Building a handrail for outdoor steps significantly enhances safety and accessibility, especially for individuals with mobility issues or during inclement weather. A well-constructed handrail provides a secure grip, preventing falls and increasing confidence while navigating stairs. The process involves careful planning, material selection, and precise execution to ensure structural integrity and adherence to local building codes. This article details the step-by-step procedure for constructing a durable and aesthetically pleasing handrail for outdoor steps.
Before commencing any construction, a thorough assessment of the site is crucial. This involves measuring the total rise and run of the steps, determining the desired height and length of the handrail, and identifying potential obstructions or challenges. Accurate measurements are the foundation of a successful handrail project. It's also essential to consider the aesthetic integration of the handrail with the existing landscape and architectural style of the property. A handrail should not only be functional but also complement the overall visual appeal.
Material selection is a critical decision affecting the longevity, maintenance requirements, and visual impact of the handrail. Common materials include wood, metal (such as aluminum, steel, and wrought iron), and composite materials. Wood offers a natural and warm aesthetic but requires regular sealing or painting to prevent rot and decay. Metal, particularly aluminum, provides excellent durability and resistance to corrosion, making it ideal for outdoor environments. Composite materials offer a low-maintenance alternative with resistance to weathering and insect damage. The choice of material should be based on a balance of cost, aesthetic preferences, and long-term maintenance considerations.
Planning and Preparation
The initial stage involves meticulous planning and preparation. This includes accurately measuring the steps and determining the optimal height and length for the handrail. The handrail height should typically be between 34 and 38 inches, as measured from the front edge of the stair tread. The length should extend at least one foot beyond the top and bottom steps to provide stable support during entry and exit. Consider the slope of the steps and adjust the handrail angle accordingly to ensure a comfortable and ergonomic grip. Furthermore, local building codes often stipulate specific requirements for handrail dimensions, spacing, and load-bearing capacity. Compliance with these codes is paramount to ensure safety and avoid potential legal issues.
Once the measurements are finalized, it is necessary to create a detailed plan or schematic diagram. This diagram should illustrate the dimensions of all components, including posts, rails, and mounting hardware. It should also specify the type and quantity of materials required. A well-defined plan serves as a roadmap throughout the construction process, minimizing errors and ensuring a cohesive outcome. It allows for a clear visualization of the finished product and facilitates accurate material ordering.
Gathering the necessary tools and materials is the next step. Essential tools include a measuring tape, level, circular saw, drill, post hole digger (if required for setting posts in the ground), concrete mix (if using concrete footings), screws or bolts, safety glasses, and work gloves. Acquire the chosen handrail material in the appropriate dimensions, along with any necessary connectors, brackets, or caps. Having all tools and materials readily available streamlines the construction process and promotes efficiency.
Prior to installation, treat the chosen material to protect it from the elements. For wood, apply a sealant, primer, and paint or stain. For metal, consider a rust-resistant coating or powder coating. Proper surface preparation significantly extends the lifespan of the handrail and reduces the need for frequent maintenance. This step is particularly important in regions with harsh weather conditions.
Installing the Handrail Posts
The installation of handrail posts is a critical step that directly affects the stability and structural integrity of the entire handrail system. Several methods exist for securing posts, depending on the type of steps and the surrounding terrain. One common method involves setting the posts directly into the ground using concrete footings. Another method involves attaching the posts to the existing steps using sturdy brackets or anchors.
For posts set in the ground, use a post hole digger to create holes that are at least 24 inches deep and wide enough to accommodate the posts and concrete. Position the posts in the holes, ensuring they are plumb (perfectly vertical) using a level. Temporarily brace the posts to hold them in place while pouring concrete. Mix concrete according to the manufacturer's instructions and carefully pour it into the holes, ensuring it fills all voids around the posts. Use a trowel to smooth the concrete surface and allow it to cure completely before proceeding. Curing typically takes several days, depending on the concrete mix and environmental conditions.
When attaching posts to existing steps, select appropriate brackets or anchors designed for outdoor use. Ensure the brackets are compatible with the chosen material and the existing step structure. Position the brackets on the steps, ensuring they are evenly spaced and aligned. Use screws or bolts to securely fasten the brackets to the steps. Attach the posts to the brackets, ensuring they are plumb and securely fastened. Use shims if necessary to achieve perfect alignment. This method is often used for steps made of concrete or stone.
Regardless of the chosen method, it is crucial to ensure the posts are securely anchored and capable of withstanding significant lateral forces. The spacing between posts should be determined based on the overall length of the handrail and the local building codes. Typically, posts are spaced between 4 and 8 feet apart. Proper post installation is essential for creating a safe and reliable handrail system.
Attaching the Handrail and Finishing Touches
Once the posts are securely installed, the next step is to attach the handrail itself. This involves connecting the handrail to the posts using appropriate fasteners and ensuring it is level and aligned. The specific method for attaching the handrail will depend on the type of material used and the design of the handrail system.
For wooden handrails, use screws or bolts to attach the handrail to the posts. Predrill pilot holes to prevent the wood from splitting. Ensure the screws or bolts are long enough to penetrate deeply into the posts and provide a secure connection. Countersink the screw heads to create a smooth and flush surface. Consider using decorative caps to conceal the screw heads and enhance the overall aesthetic appeal. For metal handrails, welding is often used to create a strong and permanent connection between the handrail and the posts. However, welding requires specialized skills and equipment. Alternatively, metal brackets and fasteners can be used to attach the handrail to the posts.
Ensure the handrail is level and aligned throughout its entire length. Use a level to check the horizontal alignment and make any necessary adjustments. If the handrail is excessively long, consider using intermediate supports to prevent sagging. These supports can be attached to the steps or the ground. The handrail should be securely fastened to the posts at multiple points to ensure stability. Once the handrail is attached, inspect it carefully to identify any loose connections or imperfections.
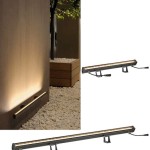
After the handrail is securely attached, add finishing touches to enhance its appearance and durability. Sand down any rough edges or splinters. Apply a final coat of paint, stain, or sealant to protect the handrail from the elements. Install decorative caps or covers to conceal any exposed fasteners or hardware. Consider adding lighting to the handrail to improve visibility at night. Low-voltage LED lighting can be integrated into the handrail design to provide both safety and aesthetic appeal. Clean up the surrounding area and remove any debris. A well-maintained and aesthetically pleasing handrail enhances the overall value and curb appeal of the property.
Regular inspection and maintenance are essential for ensuring the long-term safety and functionality of the handrail. Periodically check for loose connections, rust, or decay. Tighten any loose fasteners and repair any damaged areas. Reapply sealant or paint as needed to protect the handrail from the elements. By following these steps, a durable and aesthetically pleasing handrail can be constructed, providing enhanced safety and accessibility for outdoor steps.

Outdoor Stair Railing How To Build An Diy

How To Add A Railing Stairway Easy Diy Project

Diy Handrails Installation Outdoor Stair Railing Kits

Simple Exterior Handrail For Less Than 100 6 Steps With S Instructables

Stair Railing

How To Build An Outdoor Stair Handrail Bunnings Work Community

Installing Your Own Diy Easy Install Simple Handrail Simplified Building

How To Build A Simple Handrail 7 Steps With S Instructables

Deck Stair Railing Plans Myoutdoorplans

Stair Railing
Related Posts