DIY Outdoor Table with Built-In Cooler: A Comprehensive Guide
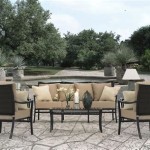
An outdoor table with a built-in cooler offers a functional and aesthetically pleasing addition to any patio, deck, or backyard. This type of furniture provides a convenient surface for dining and socializing while simultaneously keeping beverages and snacks chilled and accessible. Constructing such a table yourself allows for customization to individual needs and preferences, resulting in a unique and practical piece that enhances outdoor living spaces.
This article provides a comprehensive guide to building a DIY outdoor table with a built-in cooler. The process will be broken down into manageable steps, covering material selection, construction techniques, and design considerations. Careful planning and precise execution are crucial for achieving a durable and visually appealing finished product. The information presented will be applicable to individuals with intermediate woodworking skills and access to basic power tools.
Planning and Design Considerations
Before commencing the construction phase, careful planning and design are essential. The dimensions of the table, the size and type of cooler to be integrated, and the overall aesthetic should be determined. These factors will influence material selection and the specific construction techniques employed.
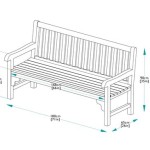
Table Dimensions: Consider the intended use of the table when determining its dimensions. A smaller table may be suitable for a small patio or balcony, while a larger table will be necessary for accommodating larger groups. The height of the table should be comfortable for dining or socializing, typically between 30 and 36 inches. The width and length should be proportioned accordingly, ensuring sufficient surface area for placing food, drinks, and other items.
Cooler Selection: The size and type of cooler will significantly impact the design of the table. A basic plastic cooler is the most common and cost-effective option. Consider the capacity of the cooler, as this will determine the amount of beverages and snacks that can be stored. Also consider the insulation properties of the cooler, as this will affect how long items will stay cold. Measure the cooler precisely, including the height, width, and depth, as these measurements will be critical for constructing the table frame and creating a snug fit.
Material Selection: The choice of materials will impact the durability, aesthetics, and longevity of the table. Pressure-treated lumber is a suitable option for outdoor furniture, as it is resistant to rot, decay, and insect infestation. Cedar and redwood are naturally rot-resistant and offer a more aesthetically pleasing appearance, but they are typically more expensive. Consider using stainless steel or galvanized hardware to prevent rust and corrosion. For the tabletop surface, options include wood planks, composite decking, or even a solid surface material like granite or quartz, depending on budget and desired aesthetic.
Design Aesthetics: The design of the table should complement the existing outdoor décor. Consider the style of your patio furniture and the overall aesthetic of your outdoor space. Options range from rustic and traditional to modern and minimalist. You can incorporate various design elements, such as decorative legs, aprons, and tabletop patterns, to create a unique and personalized look.
Drainage Design: Incorporating a drainage system is crucial for removing melted ice water from the cooler compartment. This will prevent water from accumulating and potentially damaging the table structure. A simple drainage system can be created by drilling a hole in the bottom of the cooler compartment and attaching a pipe or fitting to direct the water away from the table. Consider installing a valve or plug to allow for controlled drainage.
Construction Process: Step-by-Step Guide
The construction process involves building the table frame, creating the cooler compartment, installing the cooler, and finishing the tabletop. Precise measurements, careful cutting, and secure assembly are essential for achieving a structurally sound and visually appealing finished product.
Building the Table Frame: The table frame provides the structural support for the tabletop and the cooler compartment. Begin by cutting the lumber to the desired dimensions for the legs, aprons, and supports. Assemble the frame using screws, nails, or a combination of both. Ensure that the frame is square and level. Reinforce the corners with corner braces for added stability.
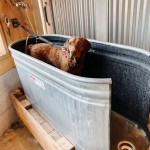
Creating the Cooler Compartment: The cooler compartment should be slightly larger than the cooler itself, allowing for easy insertion and removal. Construct the compartment using the same lumber as the table frame. Ensure that the compartment is sturdy and well-supported. The bottom of the compartment should be sloped slightly towards the drain hole to facilitate water drainage. Consider lining the cooler compartment with a waterproof material, such as plastic sheeting or a sealant, to protect the wood from moisture.
Installing the Cooler: Carefully insert the cooler into the compartment. Ensure that the cooler fits snugly but can be easily removed for cleaning or replacement. Secure the cooler in place using cleats or brackets. Consider adding insulation around the cooler to improve its cooling efficiency. Foam insulation or fiberglass batting can be used for this purpose.
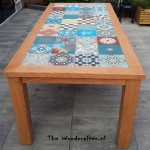
Constructing and Installing the Tabletop: The tabletop can be constructed from a variety of materials, as discussed earlier. Assemble the tabletop sections using glue and screws or nails. Ensure that the tabletop is flat and even. Attach the tabletop to the table frame using screws or bolts. Consider adding a decorative edge to the tabletop to enhance its appearance.
Finishing the Table: Once the table is assembled, it is important to finish it properly to protect it from the elements and enhance its appearance. Sand the entire table to remove any rough edges or imperfections. Apply a stain or paint to the table to achieve the desired color. Apply a sealant or varnish to protect the finish from moisture and UV damage. Allow the finish to dry completely before using the table.
Safety Precautions and Tool Usage
Working with power tools and construction materials requires adherence to strict safety precautions. Always wear safety glasses to protect your eyes from flying debris. Wear hearing protection to reduce noise exposure. Use a dust mask to prevent inhalation of sawdust. Work in a well-ventilated area. Familiarize yourself with the operating instructions for all power tools before using them. Disconnect power tools from the power source when not in use. Keep your work area clean and organized. Avoid wearing loose clothing or jewelry that could get caught in power tools.
Essential Tools: A successful DIY project necessitates the appropriate tools. A circular saw is used for cutting lumber to size. A drill is essential for drilling pilot holes and driving screws. A sander is used for smoothing surfaces and preparing them for finishing. A measuring tape and square are needed for accurate measurements. Safety glasses, hearing protection, and a dust mask are critical for personal safety.
Material Considerations: When working with pressure-treated lumber, it is important to wear gloves to protect your skin from chemicals. Dispose of treated lumber scraps properly, as they may contain harmful substances. When using paints, stains, or sealants, follow the manufacturer's instructions for ventilation and safety precautions. Consider using low-VOC (volatile organic compound) products to minimize environmental impact.
By adhering to these guidelines and exercising care, individuals can safely and effectively construct a DIY outdoor table with a built-in cooler, resulting in a valuable addition to their outdoor living space.
Proper planning, material selection and safe tool usage are key to a successful project.

Diy Patio Table With Built In Ice Box Drink Coolers Matching Benches Woodworking Plan Remodelaholic

Brilliant Diy Cooler Tables For The Patio With Built In Coolers Sinks And Ice Boxes Remodelaholic

Outdoor End Table With Built In Cooler Or Flower Planter Wood Working Diy

Outdoor End Table With Built In Cooler Or Flower Planter Wood Working Diy

Diy Patio Table With Built In Ice Box Drink Coolers Matching Benches Woodworking Plan Remodelaholic

How To Build A Farmhouse Table With Built In Coolers Complete And Easy Plan

Custom Patio Table With Built In Cooler By Backyard Escape Furniture Custommade Com

13 Diy Cooler Table Plans To Build For Outdoor Beer Drinks Or Patio Picnic Free Wood

Diy How To Build A Modern Patio Table With Built In Cooler Realcedar Com

Woodworking Plans Patio Table With Built In Drink Coolers Remodelaholic