Building an Outdoor Kitchen with Metal Studs: A Comprehensive Guide
The allure of an outdoor kitchen is undeniable. It extends living space, provides an ideal setting for entertaining, and enhances the overall value of a property. While traditional outdoor kitchens often utilize wood framing, building with metal studs offers a compelling alternative, boasting durability, resistance to the elements, and ease of construction for a wide range of designs. This article provides a comprehensive guide to constructing an outdoor kitchen using metal studs, covering design considerations, material selection, construction techniques, and essential finishing touches.
Metal stud framing, commonly used in commercial construction and increasingly in residential interior projects, presents several advantages for outdoor applications. Steel doesn't rot, warp, or succumb to termites, making it significantly more resistant to damage from moisture, insects, and the natural elements compared to wood. This inherent durability translates to a longer lifespan for the outdoor kitchen structure and reduced maintenance requirements. Furthermore, metal studs are lighter than wood framing, simplifying handling and installation. The precise manufacturing process ensures consistent dimensions, contributing to a more uniform and professional-looking finished product. While initially perceived as a more complex building material, metal stud framing is accessible to experienced DIYers and contractors alike.
Before embarking on the construction process, careful planning and design are essential. This stage involves determining the size and layout of the outdoor kitchen, selecting the desired appliances and features, and obtaining any necessary permits. A detailed plan not only guides the construction process but also helps to avoid costly mistakes and ensures that the finished kitchen meets the homeowner's specific needs and preferences.
Design Considerations for a Metal Stud Outdoor Kitchen
The design phase should begin with a thorough assessment of the available space. Consider the existing landscaping, proximity to the house, and prevailing wind direction. The size of the kitchen should be proportional to the overall outdoor area, avoiding overcrowding or an awkward fit. The layout should optimize workflow, with designated areas for food preparation, cooking, serving, and cleanup. Common layout options include L-shaped, U-shaped, and island configurations, each offering varying degrees of functionality and visual appeal. The placement of appliances, such as grills, smokers, refrigerators, and sinks, should be carefully considered to maximize efficiency and convenience. Ample countertop space is essential for food preparation and serving, and adequate storage is needed for utensils, cookware, and other accessories.
Beyond spatial considerations, the design must account for the specific environmental conditions. In regions with heavy rainfall, proper drainage is crucial to prevent water damage. Overhangs or roofs can provide protection from rain and sun, extending the lifespan of the kitchen and making it more comfortable to use in inclement weather. In areas prone to strong winds, the structure should be securely anchored to the ground to prevent movement or damage. The orientation of the kitchen relative to the sun should also be considered, minimizing glare and heat exposure during peak cooking hours. The selection of materials should prioritize weather resistance, durability, and compatibility with the local climate. Powder-coated steel studs are a good option for enhanced corrosion protection.
Integration with existing architectural elements is another important design consideration. The style of the outdoor kitchen should complement the design of the house and surrounding landscape. Consider using similar materials and finishes to create a cohesive and visually appealing space. The kitchen should also be seamlessly integrated with other outdoor features, such as patios, decks, and gardens. Lighting is essential for creating a functional and inviting outdoor space. Consider incorporating a combination of task lighting for food preparation, ambient lighting for creating a relaxing atmosphere, and accent lighting to highlight architectural features.
Code compliance is a critical aspect of the design process. Building codes vary by location, so it is essential to consult with local authorities to determine the specific requirements for outdoor kitchens. These requirements may include regulations regarding setbacks, foundations, electrical wiring, plumbing, and gas lines. Obtaining the necessary permits before starting construction is essential to avoid potential fines and delays. A licensed contractor can provide guidance on code compliance and ensure that the project meets all applicable regulations.
Material Selection and Preparation
Choosing the right materials is crucial for the longevity and performance of the metal stud outdoor kitchen. The primary materials include metal studs, track, screws, sheathing, countertops, and exterior cladding. The gauge of the metal studs is a critical consideration, with heavier gauges providing greater strength and stability. For outdoor kitchens, 16-gauge or 18-gauge steel studs are generally recommended. The type of steel also matters, with galvanized steel offering superior corrosion resistance. The track, which forms the top and bottom of the wall frame, should be compatible with the gauge of the studs. Self-drilling screws are used to fasten the studs to the track and to attach sheathing to the frame. These screws should be specifically designed for use with metal studs to ensure a secure and long-lasting connection.
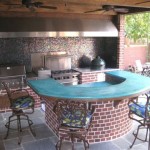
Sheathing provides a smooth surface for attaching exterior cladding and adds structural rigidity to the frame. Cement board is a popular choice for outdoor kitchens due to its excellent resistance to moisture, fire, and insects. Other options include plywood or OSB, but these materials should be treated with a water-resistant sealant to prevent damage from the elements. The selection of countertops is another important decision. Popular options include granite, concrete, stainless steel, and tile. Granite is a durable and heat-resistant option that offers a high-end look. Concrete can be custom-made to create a unique and contemporary countertop. Stainless steel is a hygienic and easy-to-clean option that is well-suited for outdoor kitchens. Tile offers a wide range of design possibilities and can be used to create intricate patterns and textures. The choice of countertop material should be based on factors such as durability, aesthetics, and budget.
Exterior cladding provides the finishing touch to the outdoor kitchen. Options include stucco, stone veneer, brick veneer, and siding. Stucco is a durable and weather-resistant option that can be applied in a variety of textures and colors. Stone veneer provides a natural and elegant look. Brick veneer offers a classic and timeless aesthetic. Siding is a versatile and affordable option that is available in a wide range of materials and styles. The choice of exterior cladding should be based on factors such as aesthetics, durability, and cost. Before starting construction, it is important to gather all of the necessary tools and equipment. These include a metal stud cutter or chop saw, a drill with screw gun attachments, a level, a measuring tape, safety glasses, and gloves. A chalk line is also useful for marking straight lines on the ground or on the sheathing. Proper planning and preparation are essential for a successful metal stud outdoor kitchen project.
Construction Techniques for Metal Stud Framing
The construction process begins with laying out the foundation for the outdoor kitchen. This may involve pouring a concrete slab or building a raised platform. The foundation should be level and stable to ensure that the kitchen structure is properly supported. Once the foundation is in place, the metal stud framing can begin. The process involves cutting the studs and track to the appropriate lengths, assembling the frame, and securing it to the foundation.
The first step is to cut the metal studs and track to the required lengths. A metal stud cutter or chop saw is recommended for making clean and accurate cuts. When cutting metal studs, it is important to wear safety glasses to protect the eyes from flying debris. Once the studs and track are cut, the frame can be assembled. The track is typically attached to the foundation using concrete anchors or screws. The studs are then inserted into the track and fastened with self-drilling screws. It is important to ensure that the studs are plumb and square before tightening the screws.
Once the frame is assembled, sheathing can be attached to the exterior. Cement board is typically screwed to the studs using self-drilling screws. The sheathing should be installed in a staggered pattern to create a strong and rigid surface. The seams between the sheets of sheathing should be taped and mudded to create a smooth and seamless surface. After the sheathing is installed, the exterior cladding can be applied. The specific installation method will vary depending on the type of cladding chosen. For example, stucco is typically applied in several coats, while stone veneer is attached with mortar. It is important to follow the manufacturer's instructions carefully to ensure a proper and long-lasting installation.
Electrical wiring and plumbing should be installed before the exterior cladding is applied. This is best left to licensed professionals. Electrical wiring should be run through the frame and connected to GFCI outlets for safety. Plumbing lines should be properly insulated to prevent freezing in cold weather. Gas lines should be installed by a licensed gas fitter to ensure that they are properly sealed and leak-free.
Finally, the countertops and appliances can be installed. Countertops should be securely attached to the frame using adhesive or screws. Appliances should be connected to the appropriate utilities and tested to ensure that they are working properly. Once the countertops and appliances are in place, the outdoor kitchen is ready to be used.
Throughout the construction process, it is important to prioritize safety. Wear safety glasses, gloves, and other protective gear as needed. Use caution when working with power tools and follow the manufacturer's instructions carefully. If you are not comfortable performing any of the tasks involved in building a metal stud outdoor kitchen, it is best to hire a professional contractor. With careful planning and execution, a metal stud outdoor kitchen can provide years of enjoyment and enhance the value of a property.

Outdoor Kitchen Framing 11 Helpful Facts You Should Know

How To Build An Outdoor Kitchen With Metal Studs 15 Steps Island Plans

How To Build A Bbq Island With Steel Studs Thegrill Com

How To Build A Bbq Island With Steel Studs Thegrill Com

Rolling Outdoor Island Building Plans Pneumatic Addict

My Pas Outdoor Kitchen Build Contractor Talk Professional Construction And Remodeling Forum

Why Choose Sumo Frames Outdoor

How To Build A Bbq Island With Steel Studs East Coast Grill

Outdoor Kitchen Steel Stud Shapes Plans Diy

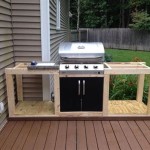
Framing The Outdoor Kitchen Island First Time Using Metal Studs
Related Posts