```html
Building Outdoor Bread Ovens: A Comprehensive Guide
An outdoor bread oven, also known as a wood-fired oven or a brick oven, offers a unique culinary experience. The high, radiant heat produced by burning wood within the oven imparts a distinct flavor and texture to baked goods, particularly bread and pizzas. Constructing such an oven is a significant undertaking, demanding careful planning, material selection, and execution. However, the reward is a durable, efficient cooking appliance capable of producing exceptional results for years to come.
The following article details the essential steps involved in building an outdoor bread oven, from initial planning to the first firing. This guide emphasizes best practices for achieving a structure that is both functional and aesthetically pleasing, while also highlighting potential challenges and providing solutions for overcoming them.
Planning and Design Considerations
Before any physical construction begins, a comprehensive plan is crucial. This stage involves determining the oven's size, location, and design, considering factors such as intended use, available space, and budget. The size of the oven's cooking surface directly impacts the quantity of food that can be baked at one time. A smaller oven is suitable for individual or small family use, while larger ovens cater to larger gatherings or even commercial applications.
The location of the oven is equally important. Considerations include proximity to the house (facilitating easy access), prevailing wind direction (to minimize smoke nuisance), fire safety regulations, and the aesthetic integration with the surrounding landscape. A level and stable foundation is essential, and the chosen location should allow for adequate space around the oven for maneuvering and storage of wood and tools.
Design choices influence both the oven's appearance and its performance. The dome shape is fundamental to the oven's efficiency, directing heat evenly across the cooking surface. Various dome designs exist, ranging from simple hemispherical shapes to more complex catenary curves. The choice of design depends on the desired baking characteristics and the builder's skill level. The oven's exterior finish can be rendered in a variety of materials, including brick, stone, stucco, or a combination thereof, allowing for customization to complement the surrounding environment.
Material Selection and Preparation
The materials used in constructing an outdoor bread oven must withstand high temperatures and repeated thermal cycling. Refractory materials, specifically designed for high-heat applications, are essential for the oven's core components, including the hearth and the dome. Fire bricks, composed of a ceramic material with a high alumina content, are commonly used for these purposes. These bricks are resistant to cracking and spalling, ensuring the oven's structural integrity over time.
Insulating materials are crucial for retaining heat within the oven and maximizing fuel efficiency. Ceramic fiber blankets, vermiculite concrete, and perlite are commonly used for insulation. These materials reduce heat loss through the oven walls and dome, allowing for longer baking times and reduced wood consumption. The thickness of the insulation layer directly impacts the oven's heat retention capabilities; a thicker layer provides better insulation but also increases the overall size and cost of the structure.
Other materials required include mortar, which binds the bricks together, and a structural base, which supports the oven's weight. Refractory mortar, specifically formulated for high-temperature applications, is essential for constructing the oven's core. The base can be constructed from concrete, brick, or stone, depending on the desired aesthetic and the available resources. The base must be strong and stable enough to support the weight of the entire oven structure.
Proper preparation of materials is essential. Fire bricks should be clean and free of debris before being laid. Mortar should be mixed according to the manufacturer's instructions, ensuring proper consistency and bonding strength. The base should be level and properly compacted to prevent settling and cracking.
Step-by-Step Construction Process
The construction process begins with building the foundation and the base. The foundation should be a reinforced concrete slab, extending beyond the footprint of the oven to provide stability and support. The base, built on top of the foundation, can be constructed from concrete blocks, brick, or stone. The base should be level and strong enough to support the weight of the oven.
Next, the hearth, the cooking surface of the oven, is constructed. This is typically made of fire bricks laid in a herringbone or running bond pattern. The hearth should be perfectly level and smooth to ensure even baking. A layer of insulation is placed beneath the hearth to prevent heat loss through the bottom of the oven. Vermiculite concrete or perlite are commonly used for this purpose.
The dome is then constructed using fire bricks and refractory mortar. This is the most challenging part of the oven construction process, requiring careful planning and precision. The dome is built layer by layer, using a form or temporary support structure to maintain the desired shape. The bricks are mortared together, ensuring tight joints and a strong bond. The keystone, the final brick at the top of the dome, locks the entire structure together.
Once the dome is complete, a layer of insulation is applied to the exterior. Ceramic fiber blankets are often used for this purpose, wrapped around the dome and secured with wire mesh. A layer of vermiculite concrete or perlite is then applied over the insulation to provide additional protection and heat retention. The exterior of the oven can then be finished with brick, stone, stucco, or any other desired material.
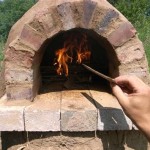
Finally, the oven door is installed. This can be a simple metal door or a more elaborate cast iron door. The door should fit snugly to prevent heat loss. A chimney is also installed to vent smoke and combustion gases. The chimney should be tall enough to create adequate draft and prevent smoke from blowing back into the oven.
Curing and Initial Firing
After the oven is constructed, it must be properly cured before it can be used for baking. Curing involves slowly drying out the mortar and insulation materials to prevent cracking. This is typically done by lighting small fires inside the oven and gradually increasing the size and duration of the fires over several days. The curing process can take several weeks, depending on the weather and the materials used.
The initial firing of the oven is a crucial step. It allows the remaining moisture to evaporate and helps to strengthen the bonds between the bricks and mortar. The initial firing should be done slowly and carefully, using small fires and gradually increasing the temperature. This process helps to prevent thermal shock and cracking. After the initial firing, the oven is ready for baking.
Maintenance and Operation
Proper maintenance is essential for ensuring the longevity and performance of an outdoor bread oven. Regular cleaning helps to remove ash and debris from the hearth and dome. Inspecting the oven for cracks and making necessary repairs prevents further damage. Protecting the oven from the elements with a cover or shelter extends its lifespan.
Operating a wood-fired oven requires practice and skill. The key is to learn how to control the temperature and maintain a consistent heat. This is achieved by controlling the size and type of wood used, the amount of air entering the oven, and the position of the door. Different types of wood burn at different temperatures and produce different flavors. Hardwoods like oak and maple are preferred for baking bread, while softer woods like pine are better for starting fires.
The oven temperature can be monitored using an infrared thermometer. The ideal temperature for baking bread is typically between 450 and 500 degrees Fahrenheit. The oven should be preheated for several hours before baking to allow the bricks to absorb heat. Once the oven is preheated, the fire is pushed to the side or removed completely, and the door is closed to maintain the temperature.
Troubleshooting Common Problems
Despite careful planning and construction, problems can arise with outdoor bread ovens. Cracking is a common issue, particularly during the initial curing and firing process. Minor cracks are usually not a cause for concern, but larger cracks should be repaired to prevent further damage. Refractory mortar can be used to fill cracks and restore the oven's structural integrity.
Poor heat retention is another common problem. This can be caused by inadequate insulation or air leaks around the door or chimney. Adding more insulation or sealing any air leaks can improve heat retention. Using a well-fitting door and a properly sized chimney also helps to maintain a consistent temperature.
Smoke issues can also occur, particularly if the chimney is not properly sized or located. The chimney should be tall enough to create adequate draft and prevent smoke from blowing back into the oven. Adjusting the position of the chimney or adding a chimney extension can help to resolve smoke issues.
```
Building An Outdoor Oven Homestead Honey

How To Build An Outdoor Oven Lowe S

Build An Outdoor Bread Oven Agco Farmlife

Build Your Own Oven The Gardener

Building A Small Scott Style Brick Oven The Fresh Loaf

How To Build An Earthen Oven

Outdoor Bread Oven How To Build An On A Budget Brickwood Llc

How To Build Outdoor Bread Oven Brickwood Llc

Build Your Own Wood Fired Bread Oven With Our Detailed Photo Guide Firewood Diy

Outdoor Brick Ovens Types Uses And Photos Insteading
Related Posts