Building Your Dream Outdoor Kitchen: A DIY Guide to Planning and Construction
Embarking on the construction of an outdoor kitchen is an exciting endeavor that promises to transform your backyard into a culinary haven. The prospect of assembling a space dedicated to outdoor cooking, dining, and entertaining can be both thrilling and daunting. But fear not, as this comprehensive guide will equip you with the knowledge and steps necessary to build a stunning and functional outdoor kitchen from scratch.
Planning and design are the cornerstones of a successful DIY outdoor kitchen project. A well-conceived plan will not only guide the construction process but also ensure your kitchen meets your specific needs and preferences. This involves meticulous consideration of factors such as the size and layout of your space, desired features, budget, and local building codes. With a solid plan in hand, you'll be well-prepared to move forward with confidence.
Essential Considerations for Outdoor Kitchen Design
The design phase is where your vision for the ultimate outdoor kitchen takes shape. It's crucial to think about the functionality you desire, the aesthetic you want to achieve, and the limitations of your space. Here are some key considerations to guide your design decisions:
1. Size and Layout:
The size of your outdoor kitchen will depend on your available space and the features you intend to include. A small kitchen might accommodate a grill and a countertop, while a larger one could incorporate a sink, refrigerator, and even a pizza oven. Consider the flow of traffic and the placement of appliances to create a convenient and inviting layout.
2. Appliances and Features:
Select appliances that align with your culinary preferences and entertaining style. A gas or charcoal grill is a must-have, while other popular features include a smoker, pizza oven, side burner, and a refrigerator. Integrate a sink for easy cleanup and a countertop for food preparation.
3. Materials:
Outdoor kitchens are often built with weather-resistant materials such as brick, stone, concrete, stainless steel, and composite decking. Choose materials that complement your existing landscaping and architecture while ensuring durability against the elements.
4. Budget:
Determine a realistic budget for your project and stick to it. Consider the cost of materials, appliances, labor (if hiring help), and any permits required. It's wise to allocate a contingency fund for unexpected expenses that may arise during construction.
5. Building Codes:
Be sure to comply with local building codes, which often dictate requirements for electrical and plumbing installations. Consult with your local building department to understand the specific regulations in your area.
Construction: Building the Framework
With your design finalized, it's time to embark on the construction phase. This involves building the foundation, framing, and installing utilities. The following steps provide a general outline of the construction process:
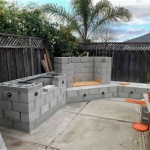
1. Foundation:
A solid foundation is essential for stability and longevity. Depending on your design and soil conditions, you may choose a concrete slab, gravel base, or a combination of both. Prepare the site, excavate to the desired depth, and pour the foundation. Allow ample time for the concrete to cure before proceeding.
2. Framing:
Construct the framing using pressure-treated lumber to withstand moisture. Build the frame for the countertop, cabinets, and any other structures. Ensure that framing is plumb and level for a stable and aesthetically pleasing result.
3. Utilities:
Install electrical and plumbing lines according to local building codes. This may involve running gas lines for the grill, water lines for the sink, and electrical wiring for appliances and lighting. It's crucial to obtain permits for these installations and ensure they meet safety standards.
Finishing touches:
The finishing touches add the final flourish to your outdoor kitchen. This stage involves installing countertops, cabinets, appliances, and any decorative elements. Here are some key aspects of the finishing process:
1. Countertops:
Select countertops that are durable, heat-resistant, and easy to clean. Options include granite, quartz, stainless steel, and composite materials. Install the countertops securely with proper edging and support.
2. Cabinets:
Cabinets provide storage space for cooking tools and supplies. Choose pre-made cabinets or custom-built ones based on your design and budget. Install the cabinets securely and ensure they are level and functional.
3. Appliances:
Install the appliances carefully, ensuring they are properly connected to power and gas lines. This step requires expertise in appliance installation, so consider seeking professional assistance if needed.
Building an outdoor kitchen is a rewarding project that offers immense satisfaction and a space to enjoy your culinary passion. By following these guidelines, you can create a stunning and functional outdoor kitchen that will be the envy of your neighbors and a source of joy for years to come.

Diy Outdoor Kitchen Part 1 It S All About That Base Nor Cal Diyers

How To Build A Diy Outdoor Kitchen Family Handyman

Tips For Building Your Own Outdoor Kitchen

Outdoor Kitchen Building Plans 2025

Building An Out Door Kitchen From Scratch Ep 16 A House By Myself

Outdoor Kitchen Planning Building Process The Watson Family S Build Bbqguys Com

Diy Backyard Builtin Traeger Bbq Kitchen Honey Built Home

Diy Outdoor Kitchen Cedar Supply

Building An Outdoor Kitchen What Information Does Precision Need

How To Build An Outdoor Kitchen With S Wikihow
Related Posts