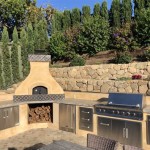
Building an Outdoor Grill with Metal Studs: A Comprehensive Guide
The construction of an outdoor grill area enhances property value and offers a dedicated space for culinary activities. While traditional construction methods often involve wood framing, utilizing metal studs provides a durable, fire-resistant, and dimensionally stable alternative. This article details the process of building an outdoor grill structure using metal studs, covering essential planning, material selection, construction techniques, and safety considerations.
Before commencing any construction project, adherence to local building codes and regulations is paramount. Contact the relevant municipal authorities to obtain necessary permits and ensure the planned structure complies with zoning laws, setback requirements, and fire safety standards. Failure to comply with these regulations can result in costly fines and mandatory alterations. This proactive approach minimizes potential complications and ensures a legally sound and safe structure.
Planning the design of the grill structure is a crucial initial step. Consider the size and layout of the desired cooking area, including space for the grill itself, countertops, storage, and seating. Create detailed blueprints or sketches that outline the dimensions, materials, and construction methods. This visual representation serves as a roadmap throughout the project, minimizing errors and promoting efficient workflows. Consider factors like prevailing winds to optimize the grill's placement and minimize smoke disturbance to neighbors.
Proper site preparation is crucial for the stability and longevity of the grill structure. This involves clearing the area of vegetation, debris, and any existing structures. Ensure the ground is level and compacted to provide a solid foundation. Depending on the design, a concrete slab foundation may be required to provide a stable and level base for the metal stud framing. A well-prepared site minimizes the risk of settling or shifting, preventing structural problems in the future.
Key Point 1: Selecting the Right Materials
The selection of appropriate materials is critical to the structural integrity and aesthetic appeal of the outdoor grill. For the framing, galvanized steel studs are recommended for their corrosion resistance, particularly in outdoor environments. The gauge of the steel studs should be chosen based on the load-bearing requirements of the structure, with thicker gauges providing greater strength and stability. It is essential to consult with a structural engineer or experienced contractor to determine the appropriate gauge for the specific design.
For the exterior cladding, options include cement board, brick veneer, stone veneer, or stucco. Cement board provides a durable and fire-resistant substrate for other finishes. Brick and stone veneer offer a classic and aesthetically pleasing appearance, while stucco provides a smooth and weather-resistant finish. The chosen cladding should be compatible with the metal stud framing and designed to withstand outdoor conditions, including moisture, temperature fluctuations, and UV exposure.
Countertops can be constructed from a variety of materials, including concrete, granite, tile, or stainless steel. Concrete countertops offer a robust and customizable option, while granite provides a durable and elegant surface. Tile countertops are versatile and can be designed to match the overall aesthetic of the grill area. Stainless steel countertops are easy to clean and provide a modern, professional look. The choice of countertop material should be based on the desired appearance, durability, and maintenance requirements.
For fasteners, use self-tapping screws specifically designed for metal stud construction. These screws provide a secure and reliable connection between the metal studs and other components. Consider using treated lumber for any wood components, such as blocking or trim, to prevent rot and insect infestation. Ensure all materials are compatible and designed for outdoor use to maximize the lifespan of the grill structure.
Key Point 2: Constructing the Metal Stud Frame
The construction of the metal stud frame begins with assembling the base and top tracks. These tracks are typically made of the same gauge steel as the studs and are attached to the foundation or floor using concrete anchors or screws. Ensure the tracks are level and square before proceeding with the stud installation. Precise alignment is critical for a structurally sound and aesthetically pleasing frame.
The metal studs are then inserted into the top and bottom tracks, ensuring they are plumb and spaced according to the design specifications. Typical stud spacing is 16 inches on center, but this may vary depending on the load-bearing requirements. Secure the studs to the tracks using self-tapping screws. Pay close attention to the alignment and spacing to ensure a uniform and stable frame. Use a level to verify the plumbness of each stud.
Horizontal bracing, also known as bridging, should be installed between the studs to provide additional stability and prevent bowing. This bracing can be made of metal or wood and should be spaced according to the manufacturer's recommendations. Secure the bracing to the studs using self-tapping screws. Bridging significantly increases the rigidity of the frame, particularly in areas subject to high winds or heavy loads.
Framing around openings for doors, windows, or the grill itself requires additional support. Use headers and king studs to reinforce these areas and ensure proper load distribution. Headers are horizontal members that span the opening, while king studs are vertical members that support the header. The size and spacing of these members should be determined based on the size of the opening and the load-bearing requirements. Accurate framing around openings is essential for the structural integrity and functionality of the grill structure.
Inspect the completed frame thoroughly to ensure all connections are secure and the frame is plumb, level, and square. Make any necessary adjustments before proceeding with the exterior cladding. A well-constructed frame is the foundation of a durable and aesthetically pleasing outdoor grill structure.
Key Point 3: Installing Exterior Cladding and Finishes
Once the metal stud frame is complete, the exterior cladding can be installed. If using cement board, attach it to the studs using self-tapping screws or cement board screws, following the manufacturer's recommendations. Ensure the cement board seams are properly taped and mudded to create a smooth and waterproof surface. Proper seam treatment is critical for preventing moisture penetration and ensuring the longevity of the cladding.
For brick or stone veneer, apply a scratch coat of mortar to the cement board surface. This scratch coat provides a bonding surface for the veneer. Adhere the brick or stone veneer to the scratch coat using mortar, ensuring proper spacing and alignment. Follow the manufacturer's instructions for mortar mixing and application. Proper veneer installation requires meticulous attention to detail and adherence to established best practices.
If using stucco, apply multiple coats of stucco to the cement board surface, allowing each coat to dry completely before applying the next. Typically, a scratch coat, a brown coat, and a finish coat are required. The finish coat can be textured to achieve the desired aesthetic. Proper stucco application requires specialized tools and techniques to ensure a smooth and durable finish.
Install the chosen countertop material, ensuring it is level and securely attached to the frame. For concrete countertops, pour the concrete into a mold and allow it to cure completely. For granite or tile countertops, use thin-set mortar to adhere the materials to a plywood or cement board substrate. Secure the countertop to the frame using construction adhesive or screws. A well-installed countertop provides a functional and aesthetically pleasing workspace for grilling and food preparation.
Apply any desired finishes, such as paint, stain, or sealant, to the exterior surfaces. These finishes protect the cladding from the elements and enhance the overall appearance of the grill structure. Choose finishes specifically designed for outdoor use and follow the manufacturer's instructions for application. Regular maintenance of these finishes is essential for preserving the beauty and durability of the grill structure.
Install any additional features, such as doors, drawers, or shelving, to complete the grill structure. Ensure these features are securely attached and function properly. Consider adding lighting to the grill area to enhance visibility and ambiance. Proper lighting can significantly improve the usability and enjoyment of the outdoor grill.
Proper drainage is critical for preventing water damage to the grill structure. Ensure the foundation is properly sloped to direct water away from the building. Install gutters and downspouts if necessary to manage rainwater runoff. Consider adding a waterproof membrane around the base of the structure to prevent moisture penetration. Effective drainage is essential for preserving the structural integrity and longevity of the outdoor grill.
Throughout the construction process, safety precautions are of utmost importance. Wear appropriate personal protective equipment (PPE), including safety glasses, gloves, and a dust mask. Use power tools safely and follow the manufacturer's instructions. Work in a well-ventilated area to avoid inhaling dust or fumes. Enlist the help of experienced professionals if needed to ensure the project is completed safely and correctly. Prioritizing safety minimizes the risk of accidents and injuries.
The use of metal studs in outdoor grill construction offers significant advantages in terms of durability, fire resistance, and dimensional stability. By carefully planning the design, selecting appropriate materials, and following proper construction techniques, a functional and aesthetically pleasing outdoor grill structure can be built that provides years of enjoyment. Adherence to building codes, safety precautions, and best practices is essential for ensuring a successful and long-lasting project.

How To Build A Bbq Island With Steel Studs Thegrill Com

How To Build An Outdoor Kitchen With Metal Studs 15 Steps Island Plans

Rolling Outdoor Island Building Plans Pneumatic Addict

Outdoor Kitchen Framing 11 Helpful Facts You Should Know

How To Build A Bbq Island With Steel Studs East Coast Grill

Rolling Outdoor Island Building Plans Pneumatic Addict

How To Build A Bbq Island With Steel Studs Thegrill Com

Create Your Dream Outdoor Kitchen With A Sleek Steel Frame Design

Outdoor Kitchens Steel Studs Or Concrete Blocks Yard Ideas Blog Yardshare Com

Outdoor Kitchen Steele Studs Patio Diy