How To Build An Outdoor Kitchen Island
An outdoor kitchen island elevates the outdoor living experience, transforming a simple patio or backyard into a functional cooking and entertainment space. Building an outdoor kitchen island is a significant undertaking, requiring careful planning, proper materials, and precise execution. This article provides a comprehensive guide to constructing a durable and aesthetically pleasing outdoor kitchen island.
Planning and Design
The initial stage of building an outdoor kitchen island involves meticulous planning and design. Neglecting this step can lead to costly mistakes and a less-than-satisfactory finished product. The design phase should encompass the intended use of the island, the desired appliances, the available space, and the overall aesthetic.
First, one must determine the primary purpose of the outdoor kitchen. Will it be used primarily for grilling, food preparation, serving, or a combination of all three? This decision will influence the necessary appliances and countertop space. A grilling-focused island might require a built-in grill, side burner, and ample counter space for preparation, while a serving-oriented island might prioritize a built-in refrigerator, storage for serving dishes, and a bar area.
Next, consider the dimensions of the available space. Carefully measure the area where the island will be located, taking into account any existing structures, walkways, or landscaping features. Ensure that there is sufficient clearance around the island for comfortable movement and access to appliances. A scaled drawing of the proposed island, including the dimensions and placement of appliances, is highly recommended.
The selection of appliances is another crucial aspect of the design phase. Common appliances for outdoor kitchen islands include grills, side burners, refrigerators, sinks, and storage cabinets. Choose appliances that are specifically designed for outdoor use, as they are typically constructed with weather-resistant materials and features. Consider the power requirements of each appliance and plan accordingly for electrical and plumbing connections. If installing a gas grill, determine whether to use propane or natural gas and ensure that the appropriate gas line is available.
The aesthetic design of the island should complement the existing outdoor space. Consider the style of the house, the landscaping, and any other outdoor furniture. Common materials for outdoor kitchen islands include concrete blocks, brick, stone veneer, and wood framing. Choose materials that are durable, weather-resistant, and aesthetically pleasing. The countertop material should also be carefully selected for its durability and appearance. Popular options include granite, concrete, tile, and stainless steel.
Finally, obtain any necessary permits before beginning construction. Local building codes may require permits for outdoor structures, especially those involving gas or electrical connections. Contact the local building department to determine the specific requirements for the project.
Construction
Once the planning and design phase is complete, the construction phase can begin. This process involves several steps, including building the frame, installing the appliances, and finishing the exterior. Safety should be the top priority throughout the construction process. Wear appropriate safety gear, such as safety glasses, gloves, and hearing protection. Use power tools with caution and follow all manufacturer's instructions.
The first step is to build the frame of the island. The frame provides the structural support for the countertop and appliances. The frame can be constructed from concrete blocks, wood framing, or a combination of both. Concrete blocks offer excellent durability and fire resistance, while wood framing is more lightweight and easier to work with. When using wood framing, ensure that the wood is pressure-treated to resist rot and insect infestation.
To construct a concrete block frame, lay a solid foundation of compacted gravel to ensure proper drainage. Mortar the blocks together, ensuring that the walls are level and plumb. Reinforce the walls with rebar for added strength. Leave openings in the frame for appliances and storage cabinets.
To construct a wood frame, build a rectangular frame from pressure-treated lumber. Attach the frame to a concrete slab or a level gravel base. Reinforce the frame with additional supports as needed. Use screws or nails to fasten the lumber together. Leave openings in the frame for appliances and storage cabinets.
After the frame is constructed, install the appliances. Follow the manufacturer's instructions for installing each appliance. Ensure that all gas and electrical connections are made by qualified professionals. Install any necessary plumbing for sinks or other water features. Secure the appliances to the frame using appropriate fasteners.
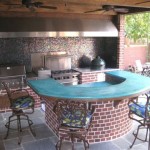
Once the appliances are installed, finish the exterior of the island. This step involves applying a veneer or cladding to the frame to create the desired aesthetic. Common materials for the exterior include stone veneer, brick, stucco, and wood siding. Attach the veneer to the frame using mortar, adhesive, or fasteners, depending on the material. Ensure that the veneer is properly sealed to protect it from the elements.
Finally, install the countertop. Choose a countertop material that is durable, weather-resistant, and aesthetically pleasing. Common options include granite, concrete, tile, and stainless steel. Install the countertop according to the manufacturer's instructions. Seal the countertop to protect it from stains and moisture.
Electrical and Plumbing Considerations
Incorporating electrical and plumbing elements into an outdoor kitchen island requires careful planning and adherence to local codes. Improper installation can lead to safety hazards and costly repairs. It is highly recommended to engage licensed professionals for both electrical and plumbing work.
For electrical wiring, begin by determining the power requirements of each appliance. This will dictate the appropriate wire gauge and circuit breaker size. Run weatherproof electrical conduit from the main electrical panel to the island location. Install ground fault circuit interrupter (GFCI) outlets for all outdoor receptacles. GFCI outlets are designed to protect against electrical shock in wet environments. Ensure that all wiring connections are properly grounded. Protect all electrical components from the elements with weatherproof enclosures.
If the island includes a sink or other water feature, plumbing will be necessary. Run water lines from the main water supply to the island location. Use copper or PEX tubing for the water lines. Install a shut-off valve near the island to allow for easy maintenance and repairs. Connect the water lines to the sink or other water feature, following all plumbing codes and regulations. Install a drain line to carry wastewater away from the island. The drain line should connect to the main sewer line or a septic system. Consider installing a grease trap to prevent grease from clogging the drain line.
Gas lines require special attention due to the inherent risks associated with natural gas or propane. Only a licensed gas fitter should handle gas line installations. Ensure that the gas line is properly sized to accommodate the BTU requirements of the grill or other gas appliances. Use black iron pipe for gas lines, as it is resistant to corrosion and leaks. Pressure test the gas line after installation to ensure that there are no leaks. Install a shut-off valve near the island to allow for easy maintenance and repairs. Protect the gas line from physical damage by burying it underground or encasing it in a protective conduit.
Furthermore, it is essential to consider the placement of electrical outlets, plumbing connections, and gas lines during the initial design phase. Ensure that these connections are easily accessible for maintenance and repairs. Conceal the connections behind access panels or within cabinets to maintain a clean and aesthetically pleasing appearance. Regularly inspect electrical wiring, plumbing connections, and gas lines for any signs of damage or leaks. Promptly address any issues to prevent potential safety hazards or costly repairs.
Building an outdoor kitchen island is a complex project that requires careful planning, attention to detail, and adherence to safety guidelines. By following these steps, one can create a durable and functional outdoor cooking and entertainment space that will enhance the enjoyment of the outdoor living area for years to come. Remember that engaging qualified professionals for electrical, plumbing, and gas line installations is crucial to ensuring a safe and code-compliant project.

Outdoor Kitchen Island Build Plans Houseful Of Handmade

How To Build An Outdoor Kitchen And Bbq Island Barbeque Design

15 Amazing Diy Outdoor Kitchen Plans You Can Build On A Budget Design
:max_bytes(150000):strip_icc()/unexpectedelegance-6d8baddfb3664c3aa2613b2964a2cf05.jpg?strip=all "12 Diy Grill And Bbq Island Plans")
12 Diy Grill And Bbq Island Plans

We Build Luxury Outdoor Kitchen Islands Concord Nc Ibd

How To Build A Grilling Island

Pin By Annie On Terrasse Outdoor Barbeque Build Kitchen Diy

Outdoor Kitchen Island Woodworking Plans Printable Build Houseful Of Handmade

8 Outdoor Kitchen Island Ideas The Family Handyman

How To Build A Bbq Island With Steel Studs Thegrill Com