Build An Outdoor Table From Pallets: A Comprehensive Guide
Constructing an outdoor table from repurposed pallets offers a cost-effective and environmentally conscious approach to furnishing outdoor spaces. Pallets are readily available, often free or obtainable at a minimal cost, and their inherent rustic aesthetic lends a unique character to any backyard, patio, or deck. This article provides a detailed guide to building a durable and attractive outdoor table from pallets, encompassing everything from sourcing materials to the final finishing touches.
Before embarking on the project, careful planning is crucial. This includes determining the desired size and style of the table, assessing the available space, and gathering the necessary tools and materials. Consider the intended use of the table – will it be used for dining, as a coffee table, or simply as a surface for displaying plants and decorations? This will influence the dimensions and overall design. A larger table, suitable for dining, will require more pallets and a more robust support structure than a smaller coffee table.
Once the design is finalized, the next step involves sourcing the pallets. Look for pallets that are in good condition, free from significant damage such as large cracks, rotten wood, or infestations. Pallets are typically made from hardwood or softwood, and the type of wood will affect the table's durability and weather resistance. Hardwood pallets, such as those made from oak, are more resistant to wear and tear and are ideal for outdoor use. Softwood pallets, such as those made from pine or fir, are more susceptible to damage and may require additional treatment to protect them from the elements.
When sourcing pallets, it is imperative to ensure they are safe to use. Avoid pallets marked with “MB,” which indicates they have been treated with methyl bromide, a highly toxic fumigant. Pallets marked with “HT,” signifying heat treatment, are a safer alternative. Always wear gloves and a dust mask when handling pallets to protect against splinters and potential contaminants.
After acquiring the pallets, thorough cleaning is essential. Use a stiff brush, soap, and water to remove dirt, grime, and debris. A pressure washer can be used for more stubborn stains, but exercise caution to avoid damaging the wood. Allow the pallets to dry completely before proceeding to the next step. This is crucial to prevent mold and mildew growth, especially if the table will be used in a humid environment.
Disassembly of the pallets is usually required to create the desired table design. Use a pry bar, hammer, and reciprocating saw to carefully dismantle the pallets, separating the individual boards. The goal is to salvage as much usable wood as possible while minimizing damage. This process may be time-consuming, but it is essential for creating a smooth and even surface for the tabletop and legs. During disassembly, remove any nails or staples that remain in the wood to prevent injury and ensure a clean working surface.
Key Point 1: Preparing the Wood
Once the pallets are disassembled, the individual boards need to be prepared for assembly. This involves sanding, cutting, and potentially planing the wood to achieve a uniform thickness and smooth surface. Start with a coarse-grit sandpaper (e.g., 80-grit) to remove any rough spots, splinters, and imperfections. Progress to finer grits (e.g., 120-grit and 220-grit) to achieve a smooth and polished finish. A power sander can significantly expedite this process. Safety glasses and a dust mask are recommended during sanding to protect against dust and flying debris.
Cutting the wood to the desired dimensions is the next step. Use a circular saw or miter saw to cut the boards to the appropriate lengths for the tabletop and legs. Precise measurements are essential to ensure a square and level table. If a planer is available, use it to achieve a uniform thickness for all the boards, which will result in a smoother and more professional-looking tabletop. This is particularly important if the pallets varied significantly in thickness.
Consider filling any large gaps or imperfections in the wood with wood filler. Allow the wood filler to dry completely before sanding it smooth with fine-grit sandpaper. This will create a more uniform surface and prevent water from accumulating in the gaps, which can lead to rot and decay.
Key Point 2: Assembling the Table
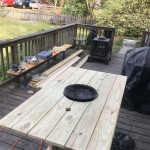
With the wood prepared, assembly can begin. The tabletop is typically constructed by arranging the individual boards side-by-side and securing them together with screws or nails. A sturdy frame, made from additional pallet wood or purchased lumber, should be attached underneath the tabletop to provide support and prevent warping. The frame should be securely fastened to each board with screws, ensuring a strong and rigid structure.
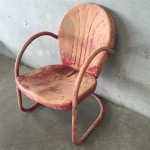
For the legs, various design options are available. Simple straight legs can be constructed from pallet wood and attached to the tabletop frame. Alternatively, sturdier metal legs can be purchased and attached for a more modern and industrial look. The legs should be attached securely to the frame with screws and reinforced with corner brackets for added stability. Ensure all legs are of equal length so that the table sits level.
A critical step in assembly is ensuring the tabletop is flat and level. Use a level to check the surface and make any necessary adjustments. Shims can be used under the legs to compensate for uneven surfaces. Take meticulous measurements and use a square during assembly to ensure the table is as square as possible. A poorly assembled table will be unstable and aesthetically unappealing.
Key Point 3: Finishing and Protecting the Table
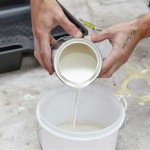
Once the table is assembled, the final step involves applying a protective finish to enhance its appearance and protect it from the elements. A variety of finishes are available, including stains, sealants, and paints. A wood stain can be used to enhance the natural grain of the wood and add color. Choose a stain that is specifically designed for outdoor use and that offers UV protection. Follow the manufacturer's instructions for application and drying times.
After staining, apply a sealant or varnish to protect the wood from moisture, sunlight, and other environmental factors. Polyurethane is a durable and water-resistant sealant that is ideal for outdoor furniture. Apply multiple coats of sealant, allowing each coat to dry completely before applying the next. Sand lightly between coats to achieve a smooth and even finish. This helps to create a stronger protective barrier against the elements.
Alternatively, paint can be used to create a more colorful and decorative finish. Choose a paint that is specifically designed for outdoor use and that is resistant to fading and chipping. Apply multiple coats of paint, allowing each coat to dry completely before applying the next. Consider using a primer before painting to improve adhesion and prevent the paint from peeling.
To further protect the table, consider adding a waterproof cover when it is not in use. This will help to prevent moisture from seeping into the wood and causing rot or decay. Regularly inspect the table for any signs of damage, such as cracks or rot, and repair them promptly. With proper care and maintenance, an outdoor table built from pallets can provide years of enjoyment.
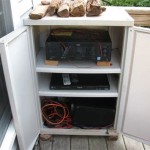
In addition to the basic construction outlined above, there are many ways to customize an outdoor table built from pallets. Consider adding a built-in ice bucket for keeping drinks cold, or incorporating a storage compartment for storing outdoor accessories. Recessed areas can be incorporated to hold potted plants or candles, adding a decorative touch. The possibilities are only limited by your imagination and DIY skills.
Furthermore, explore different joining methods to add visual interest and structural integrity. Dovetail joints or mortise and tenon joints, while more challenging to execute, provide superior strength and a refined aesthetic. The choice of joint will depend on the skill level of the builder and the desired style of the table.
Ultimately, building an outdoor table from pallets is a rewarding project that combines resourcefulness, creativity, and craftsmanship. By following these guidelines and paying attention to detail, anyone can create a functional and stylish piece of furniture that will enhance their outdoor living space.

Modified Outdoor Pallet Patio Table Ana White

Diy Pallet Outdoor Dining Table Taste Of The Frontier

45 Creative Diy Pallet Outdoor Furniture Ideas Plans

Diy Outdoor Furniture Using Pallets Rustic Crafts

Diy Wood Pallet Patio Table

Pallet Table Diy Easy Outdoor Amy Lanham

Over 60 Of The Best Diy Pallet Ideas Garden Furniture Outdoor Projects Backyard Seating

Diy Pallet Outdoor Dining Table Taste Of The Frontier

How To Make Garden Furniture From Pallets

How To Build An Outdoor Dining Table From Pallet Wood Crafted Work