Avoid using external links to specific products or brands. ## DIY: Building Your Own Built-In Outdoor Grill
The allure of outdoor cooking is undeniable. The combination of fresh air, the aroma of grilling food, and the sociability it fosters makes it a popular activity. Moving beyond a portable grill to a built-in outdoor grill elevates the experience, creating a dedicated cooking space that enhances both functionality and aesthetic appeal. While professional installation is an option, undertaking a DIY built-in outdoor grill project offers a cost-effective and customizable solution for homeowners.
A DIY approach to building a built-in outdoor grill requires careful planning, adherence to safety guidelines, and a willingness to learn new skills. The success of the project hinges on a thorough understanding of the necessary steps, materials, and potential challenges. This article provides a comprehensive overview of the key considerations and processes involved in constructing a built-in outdoor grill.
Planning and Design Considerations
The initial phase of any DIY project is critical, and building a built-in outdoor grill is no exception. A well-defined plan ensures that the final structure meets your needs and integrates seamlessly with your outdoor space. This phase encompasses several important aspects:
Location: Selecting the optimal location for your built-in grill is paramount. Consider factors such as proximity to the house, prevailing winds, shade, and accessibility to utilities. A location close to the house simplifies bringing food and supplies while also facilitating social interaction. However, it's vital to position the grill away from flammable materials such as siding or overhanging branches. Understanding the direction of prevailing winds is also important to minimize smoke exposure to the house and your guests. Ideally, the location should also offer some shade to protect from the harsh sun, making the grilling experience more comfortable.
Size and Layout: The size of the grill and the overall layout of the outdoor kitchen area should be proportionate to the available space. Consider the number of people you typically cook for and the types of food you typically grill. A larger grill is ideal for big gatherings, while a smaller grill may suffice for everyday use. The layout should also incorporate adequate counter space for food preparation, storage for grilling tools and accessories, and possibly a sink for easy cleanup. Adequate space surrounding the grill is also crucial for safe maneuverability and preventing overcrowding.
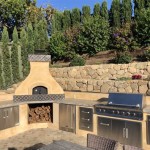
Material Selection: The choice of materials significantly impacts the aesthetics, durability, and cost of the built-in grill structure. Common materials include concrete blocks, brick, stone, and stucco. Concrete blocks are a cost-effective option that provides a solid foundation. Brick offers a classic and timeless look. Stone adds a touch of natural beauty and elegance. Stucco provides a smooth, customizable finish. Regardless of the material chosen, it's essential to ensure that it's weather-resistant and can withstand the high temperatures generated by the grill. Consider using fire-rated materials for areas directly adjacent to the grill to enhance safety.
Permits and Regulations: Before commencing any construction, it is imperative to check with your local authorities regarding building permits and zoning regulations. Many municipalities require permits for outdoor structures, especially those involving gas or electrical connections. Failure to obtain the necessary permits can result in fines or even the requirement to dismantle the structure. Furthermore, be aware of any homeowner's association (HOA) rules that may restrict the design or placement of outdoor kitchens.
Construction Process
Once the planning phase is complete, the construction process can begin. This phase involves several distinct stages, each requiring careful attention to detail. Safety should be the paramount concern throughout the construction process. Wear appropriate safety gear, including eye protection, gloves, and a dust mask, and follow all safety guidelines for using power tools.
Foundation: A solid foundation is crucial for the stability and longevity of the built-in grill. The foundation should be level and capable of supporting the weight of the structure and the grill itself. Depending on the size and complexity of the structure, the foundation may consist of a concrete slab or a compacted gravel base with paving stones. A concrete slab provides a more solid and durable foundation, while a gravel base is a more cost-effective option for smaller structures. Ensure proper drainage around the foundation to prevent water damage.
Framing: The framing provides the skeletal structure of the built-in grill. It can be constructed from wood, metal studs, or concrete blocks. Wood framing is a common option for its ease of construction, but it's essential to use pressure-treated lumber to prevent rot and insect infestation. Metal studs offer greater durability and fire resistance. Concrete blocks provide a robust and stable framework. Regardless of the chosen material, the framing must be level, square, and securely fastened together.
Enclosure: The enclosure provides the exterior cladding of the built-in grill. The material chosen for the enclosure significantly impacts the aesthetics of the outdoor kitchen. Concrete blocks can be covered with stone veneer, brick, or stucco. Wood framing can be covered with siding or shiplap. Ensure the enclosure is properly sealed to prevent water damage. Install any necessary access doors or panels for accessing the grill's gas or electrical connections.
Grill Installation: With the enclosure complete, the grill can be installed. Ensure that the grill fits snugly within the designated space and is properly secured. Follow the manufacturer's instructions for installation, including all gas or electrical connections. Consider installing a vent hood above the grill to help remove smoke and grease.
Countertops: Countertops provide a functional and aesthetically pleasing surface for food preparation and serving. Common countertop materials include granite, concrete, tile, and stainless steel. Granite is a durable and elegant option, but it can be expensive. Concrete offers a customizable and modern look. Tile is a versatile and cost-effective option. Stainless steel is a sanitary and heat-resistant choice. Ensure the countertops are properly sealed to prevent staining and water damage.
Safety and Utility Connections
Prioritizing safety and ensuring proper utility connections (gas and/or electrical) are of utmost importance. Improper connections can lead to hazardous situations, including gas leaks and electrical shocks. It is imperative to consult with qualified professionals for these aspects of the project.
Gas Line Installation: If the grill uses natural gas or propane, a gas line must be installed by a licensed gas fitter. The gas line must be properly sized and pressure-tested to ensure safe operation. Install a shut-off valve near the grill for emergency situations. Never attempt to install a gas line if you are not qualified to do so.
Electrical Connections: If the grill requires electrical power for ignition, lighting, or other features, the electrical connections must be made by a licensed electrician. The wiring must be grounded and protected by a GFCI (Ground Fault Circuit Interrupter) outlet. Ensure the electrical connection is weatherproofed to prevent water damage.
Ventilation: Proper ventilation is essential to prevent the buildup of carbon monoxide, especially in enclosed spaces. A vent hood above the grill helps to remove smoke and grease, improving ventilation and air quality. Ensure the vent hood is properly sized for the grill and vented to the outside. In areas with limited ventilation, consider installing a carbon monoxide detector.
Fire Safety: Maintain a fire extinguisher nearby in case of emergencies. Keep flammable materials away from the grill. Regularly clean the grill to remove grease and debris. Never leave the grill unattended when in use.
Building a built-in outdoor grill through a DIY approach requires meticulous planning, careful execution, and a strong understanding of safety protocols. While the project can be challenging, the reward of a custom-built outdoor cooking space that enhances your lifestyle is well worth the effort. The information and guidance provided here, coupled with thorough research and adherence to local regulations, will enable you to successfully create a functional and aesthetically pleasing outdoor grilling area for years to come.

How We Diyed Our Built In Grill Chris Loves Julia

How We Diyed Our Built In Grill Chris Loves Julia

How To Build A Grill Station The Home Depot

10 Built In Grill Ideas For Outdoor Cooking

Diy Backyard Builtin Traeger Bbq Kitchen Honey Built Home

Barbecue Bbq Quick Built In Ana White

Outdoor Kitchen Rogue Engineer

Simple Outdoor Kitchen Diy How You Can Easily Build Your Own

Top 15 Diy Grill Station Ideas For Easy Grilling

Diy Built In Grill