How To Make Outdoor Cushion Covers With Piping
Outdoor cushions enhance the comfort and aesthetic appeal of patios, decks, and other outdoor living spaces. Creating custom covers allows for personalized design and fabric choices, including the addition of piping, also known as welting, which adds a sophisticated touch. This article provides a comprehensive guide to constructing outdoor cushion covers with piping.
Materials Required:
Several materials are necessary for this project:
- Outdoor fabric: Choose a durable, weather-resistant fabric like Sunbrella, polyester, or solution-dyed acrylic.
- Piping cord:
- Zipper: Select a weather-resistant zipper in a coordinating color.
- Matching thread:
- Measuring tape:
- Scissors:
- Pins:
- Seam ripper:
- Sewing machine:
- Iron and ironing board:
- Cushion form:
Preparing the Fabric and Piping:
Accurate measurements are crucial for a well-fitting cover. Measure the cushion form's length, width, and thickness. Add seam allowances and extra inches for a snug fit. Cut the fabric according to these measurements, accounting for the front, back, and zippered sides of the cover.
To create the piping, cut bias strips of fabric. The width of the strips should be approximately twice the desired finished width of the piping plus seam allowance. Fold the bias strip around the piping cord lengthwise, ensuring the cord is centered. Using a zipper foot on the sewing machine, stitch close to the cord, encasing it within the fabric strip.
Assembling the Cushion Cover:
Begin by pinning the piping to the right side of the front fabric panel, aligning the raw edges. Stitch the piping to the fabric using a zipper foot, ensuring the stitching is close to the cord. Repeat this process for the back panels, attaching piping to the edges where the zipper will be inserted.
Prepare the zipper by attaching the zipper tape to the corresponding fabric edges of the back panels. This can be done using a zipper foot or a regular sewing foot. Ensure the zipper pull is facing downwards when the cushion is viewed from the top.
With the piping and zipper attached to the back panels, pin the front and back panels together, right sides facing. Align the piping and ensure the corners match precisely. Stitch around the perimeter of the cover, leaving a seam allowance of approximately ½ inch. Remember to backstitch at the beginning and end of the seam for added durability.
Finishing Touches:
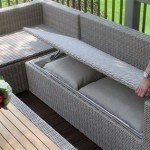
Once the stitching is complete, trim any excess fabric and piping, being careful not to cut the stitching. Clip the corners diagonally to reduce bulk and allow the seams to lie flat. Turn the cushion cover right side out through the zipper opening. Insert the cushion form into the cover. The completed cushion cover should fit snugly around the form.
Tips for Success:
Several tips can improve the quality and ease of construction:
- Pre-wash the fabric to prevent shrinkage after the cover is made.
- Use a Teflon foot on the sewing machine to prevent the fabric from sticking or puckering.
- Press the seams open with an iron for a professional finish.
- Consider using a sewing gauge to ensure consistent seam allowances.
- Test the zipper functionality after installation.
- If making multiple covers, create a template to ensure consistent sizing.
Caring for Outdoor Cushion Covers:
Proper care extends the life of outdoor cushion covers. Regular cleaning with mild soap and water is recommended. For tougher stains, consult the fabric manufacturer’s cleaning instructions. Allow the covers to air dry completely before placing them back on the cushions. Store cushions in a dry, protected location during the off-season.
Variations and Customizations:
The basic construction method outlined above can be adapted to create various cushion styles. Contrasting piping can add visual interest. Double welting, achieved by sewing two rows of piping side-by-side, creates a bolder accent. Consider adding ties or buttons for enhanced closure options.
By following these instructions and incorporating personal design choices, individuals can create durable and stylish outdoor cushion covers that enhance their outdoor living spaces.

How To Make A Cushion With Piping Box Tutorial Thrift Flip Makeover

Sew Easy Outdoor Cushion Covers Confessions Of A Serial Do It Yourselfer

Step By How To Sew A Box Cushion Cover With Zipper Piping No Fancy Machine Required

How To Sew New Outdoor Cushion Covers 6 Simple Steps Gather And Grand

Threading My Way Piped Cushion Covers Easier Than You Think

How To Make Cushion Covers For Outdoor Furniture The Ruffled Purse

How To Make A Cushion With Piping Ofs Maker S Mill

How To Sew A Bench Cushion In 2 Hours

Diy Removable Bench Seat Cushion With Piping

Tips For Making A Box Cushion Cover With Piping Create And Babble
Related Posts