How To Make Outdoor Cushions With Piping
Creating custom outdoor cushions allows for personalized aesthetics and precise fits for patio furniture. Adding piping, also known as welting, elevates the cushion's appearance with a professional touch. This article provides a comprehensive guide to constructing outdoor cushions with piping.
Materials Required:
Essential materials include outdoor fabric, piping cord, zipper, matching thread, sewing machine, measuring tape, scissors, pins, seam ripper, and chalk or fabric marker. Outdoor fabric should be durable, water-resistant, and UV-resistant. Polyester, Sunbrella, and acrylic fabrics are recommended for their resilience to outdoor elements.
Pattern Creation and Cutting:
Accurate measurements of the furniture surface are crucial for a well-fitting cushion. Measure the length and width of the seating area. Add seam allowances, typically 1/2 inch, to each measurement. Transfer these dimensions to the fabric, marking with chalk or a fabric marker. Cut two identical pieces of fabric for the top and bottom of the cushion.
For the piping, measure the perimeter of the cushion and add extra length for joining the ends. Cut bias strips of fabric, wide enough to encase the piping cord and provide a 1/2 inch seam allowance on each side. The angle of the bias cut allows for flexibility and smooth curves around the cushion's edges.
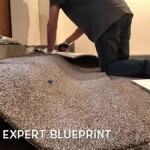
Creating the Piping:
Fold the bias strip lengthwise around the piping cord, with the right side of the fabric facing inward. Using a zipper foot on the sewing machine, stitch close to the cord, encasing it completely within the folded fabric strip. Ensure the stitching is consistent and secure. Trim any excess fabric along the seam to create a neat finish.
Attaching the Piping:
Pin the piping to the right side of one cushion piece, aligning the raw edges of the piping with the raw edge of the fabric. Starting at one corner, stitch the piping to the fabric, using the zipper foot again to sew close to the cord. Ease the piping around curves and corners, clipping the seam allowance if necessary to prevent bunching.
Inserting the Zipper:
Measure and mark the desired zipper length on one side of the cushion. Cut a slit in the fabric along the marked line. Following the zipper manufacturer's instructions, attach the zipper to the opening. The zipper insertion method may vary depending on the zipper type, but typically involves folding back the fabric edges and stitching the zipper tape to the fabric.
Sewing the Cushion:
With the right sides facing each other, place the second cushion piece on top of the first, aligning the edges. Pin the two pieces together, ensuring the piping is sandwiched between the layers. Starting at one end of the zipper, stitch around the perimeter of the cushion, using a 1/2 inch seam allowance. Reinforce the corners with backstitching for added durability. Leave the zipper partially open for turning.
Finishing the Cushion:
Carefully turn the cushion right side out through the zipper opening. Use a pointed object, such as a chopstick or the eraser end of a pencil, to gently push out the corners. Once the cushion is fully turned, insert the cushion filling. Adjust the filling amount for desired firmness. Close the zipper.
Tips for Success:
Pre-wash the fabric to prevent shrinkage and color bleeding after the cushion is constructed. Use high-quality outdoor thread to ensure durability and resistance to weather elements. Test the sewing machine tension on a scrap piece of fabric before sewing the final cushion pieces. Clip corners and curves to reduce bulk and create a smooth, professional finish. Consider adding ties or Velcro closures for securing the cushion to the furniture.
Maintenance:
Regular cleaning helps maintain the appearance and longevity of outdoor cushions. Brush off loose dirt and debris. Spot clean stains with mild soap and water. For more thorough cleaning, follow the fabric manufacturer's instructions. Store cushions in a dry, protected area during the off-season to prevent mildew and damage.

How To Make A Cushion With Piping Ofs Maker S Mill

How To Make A Lumbar Pillow With Piping Do It Yourself Advice Blog

Sew Easy Outdoor Cushion Covers Confessions Of A Serial Do It Yourselfer

How To Sew A Box Cushion With Piping And Zipper From House Home

Threading My Way Piped Cushion Covers Easier Than You Think

Learn To Make An Easy No Sew Outdoor Cushion By Lavender Ons Design

How To Make A Box Cushion

Outdoor Cushions Upcycle Goheen

How To Sew A Box Cushion With Piping And Zipper From House Home

How To Make Cushion Covers For Outdoor Furniture The Ruffled Purse