Building a Robust Outdoor Grill Base: A Comprehensive Guide
An outdoor grill can significantly enhance the enjoyment of outdoor living spaces, providing a focal point for gatherings and alfresco dining. However, the success of an outdoor grilling area often hinges on the stability and durability of the grill base. A well-constructed base not only ensures the safety of the user and the longevity of the grill but also contributes to the overall aesthetic appeal of the outdoor area. This article provides a comprehensive guide to building a robust outdoor grill base, covering essential considerations, materials, and construction techniques.
Planning and Design Considerations
Before commencing construction, careful planning is crucial. This phase involves assessing the intended location, determining the appropriate size and shape of the base, and selecting suitable materials. The location should be chosen based on accessibility, prevailing wind direction, and proximity to seating areas or outdoor kitchens. Furthermore, it is important to check local building codes and regulations to ensure compliance, particularly regarding setback requirements and fire safety standards.
The size of the grill base should be determined by the dimensions of the grill plus a comfortable buffer zone for maneuverability and preparation. This ensures efficient workflow and prevents accidental contact with hot surfaces. Consider the available space and the overall layout of the outdoor area to optimize the base's footprint. Common shapes include rectangular, square, and L-shaped, each offering unique advantages depending on the site conditions and design preferences.
The selection of materials is another critical aspect of the planning phase. Durability, weather resistance, and aesthetic compatibility with the surrounding environment should be prioritized. Common materials include concrete blocks, natural stone, brick, and treated lumber. Each material possesses different strengths and weaknesses in terms of cost, ease of installation, and long-term performance. Concrete blocks offer a cost-effective and readily available option, while natural stone provides a more rustic and visually appealing finish. Brick offers a balance between cost and aesthetics, while treated lumber is often used for framing the base, particularly when combined with other materials to create a more elaborate design.
Once the location, size, shape, and materials have been determined, a detailed plan or sketch should be created. This plan should include precise measurements, material lists, and step-by-step instructions for construction. A well-defined plan minimizes errors and ensures a smoother construction process.
Essential Materials and Tools
The specific materials required for building an outdoor grill base depend on the chosen design and materials. However, some essential materials and tools are common to most projects. These include:
*Base Material: Concrete blocks, natural stone, brick, or treated lumber, as determined by the design.
*Mortar or Construction Adhesive: Used for bonding blocks, stones, or bricks together.
*Gravel or Crushed Stone: Used for creating a stable and well-draining base.
*Sand: Used for leveling and providing a smooth surface for the base material.
*Rebar or Wire Mesh: Used for reinforcing concrete slabs or foundations, if required.
*Level: Essential for ensuring a level and stable surface.
*Shovel and Rake: Used for preparing the ground and spreading gravel and sand.
*Trowel: Used for applying mortar or construction adhesive.
*Rubber Mallet: Used for gently tapping blocks, stones, or bricks into place.
*Wheelbarrow: Used for transporting materials such as gravel, sand, and mortar.
*Measuring Tape: Used for accurate measurements.
*Safety Glasses and Gloves: Essential for protecting eyes and hands during construction.
*Circular Saw or Masonry Saw: Used for cutting lumber, blocks, stones, or bricks as needed.
In addition to these core materials and tools, specialized equipment such as a concrete mixer may be required for larger projects involving concrete slabs. It is important to gather all necessary materials and tools before commencing construction to avoid delays and ensure a smooth workflow.
Step-by-Step Construction Process
The construction process for an outdoor grill base typically involves several key steps, starting with site preparation and culminating in the placement of the grill. The following outlines a general approach, with specific variations depending on the chosen design and materials.
1. Site Preparation: The first step involves clearing the site of any vegetation, debris, or existing structures. Excavate the soil to a depth of at least 6 inches to create a level surface. This depth may need to be increased depending on local frost lines and soil conditions to ensure adequate foundation stability.
2. Base Layer: After excavation, a layer of gravel or crushed stone should be spread evenly across the excavated area. This layer provides drainage and helps prevent the base from settling over time. Compact the gravel using a hand tamper or plate compactor to create a solid foundation. The compacted gravel layer should be at least 4 inches thick.
3. Leveling Layer: Spread a layer of sand over the compacted gravel. Use a level and a straight edge to create a perfectly level surface. This layer provides a smooth and even base for the blocks, stones, or bricks. The sand layer should be approximately 1 inch thick.
4. Laying the Base Material: Begin laying the chosen base material (concrete blocks, natural stone, or brick) on the leveled sand bed. Apply mortar or construction adhesive to each unit, ensuring proper bonding and alignment. Use a level to check for plumb and level as the base is constructed. For concrete blocks, staggering the joints between courses adds strength and stability. For natural stone, choose stones that fit together well and create a visually appealing pattern.
5. Mortaring and Jointing: After laying the base material, fill the joints between the units with mortar. Use a trowel to pack the mortar firmly into the joints and then smooth the surface. For a more rustic look, the mortar can be left slightly recessed. For brick or stone, consider using a brick jointer to create consistent and professional-looking joints. Allow the mortar to cure according to the manufacturer's instructions. This typically takes several days.
6. Reinforcement (If Required): For larger grill bases or those supporting heavy grills, reinforcement may be necessary. This typically involves embedding rebar or wire mesh within the concrete slab or foundation. The specific reinforcement requirements will depend on the load-bearing capacity of the base and local building codes.
7. Capping the Base: Consider adding a cap to the top of the base using pavers, stone slabs, or a custom-poured concrete countertop. This provides a smooth and durable surface for the grill to rest on and can also serve as a work surface for food preparation. Ensure the cap is securely attached to the base using mortar or construction adhesive.
8. Grill Placement: Once the base is complete and the mortar has cured, carefully place the grill on top of the base. Ensure the grill is level and stable. Connect any necessary gas lines or electrical connections according to the manufacturer's instructions and local codes.
Key Considerations for Specific Materials
The construction process detailed above provides a general framework for building an outdoor grill base. However, specific considerations apply to each type of building material:
Concrete Blocks
Concrete blocks are a cost-effective and durable option for building a grill base. They are relatively easy to work with and can be stacked and mortared to create a solid structure. When using concrete blocks, ensure they are properly aligned and leveled. Staggering the joints between courses is essential for adding strength and stability to the base. Consider using decorative blocks or veneers to enhance the aesthetic appeal of the base.
Natural Stone
Natural stone offers a unique and visually appealing option for building a grill base. Each stone is unique, creating a rustic and organic look. However, working with natural stone can be more challenging than working with concrete blocks or brick. Select stones that fit together well and create a stable structure. Use mortar to fill the gaps between the stones and ensure proper bonding. The weight of the stones will require a solid foundation.
Brick
Brick offers a classic and timeless look for an outdoor grill base. It is relatively easy to work with and provides a good balance between cost and aesthetics. There are various brick patterns that can be used to create different visual effects. Ensure the bricks are properly aligned and leveled. Use mortar to fill the joints between the bricks and create a watertight seal. Staggering the joints between courses is essential for adding strength and stability to the base.
Treated Lumber
Treated lumber is often used for framing the base, especially for creating enclosed storage spaces or combining with other materials. It provides a lightweight and versatile option. Ensure the lumber is properly treated for outdoor use to prevent rot and decay. Use screws or nails to securely fasten the lumber frame together. Consider adding a weather-resistant finish to protect the lumber from the elements.
Regardless of the chosen material, adhering to the principles of proper planning, site preparation, and construction techniques is paramount for creating a durable and aesthetically pleasing outdoor grill base.

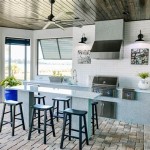
How To Build A Grilling Island

How We Diyed Our Built In Grill Chris Loves Julia

How To Build A Grill Station The Home Depot

Great Plans For The Backyard Diy Grill Station Designs And Ideas

How We Diyed Our Built In Grill Chris Loves Julia

Concrete Base For Brick Grill Outdoor Bbq Kitchen

How To Build A Bbq Grilling Station Or Grill Surround
:max_bytes(150000):strip_icc()/charlestoncrafted-b52d47713ae44d57a8f06697b427b9fe.jpg?strip=all "12 Diy Grill And Bbq Island Plans")
12 Diy Grill And Bbq Island Plans

How To Create An Outdoor Bbq Area Kyal Kara

How To Build An Easy Stone Grill Surround