Building an Outdoor Brick Oven: A Comprehensive Guide
An outdoor brick oven offers a unique culinary experience, allowing for the creation of authentic pizzas, breads, roasted meats, and other dishes with a distinctive smoky flavor. Constructing a brick oven, while potentially challenging, is a rewarding project that adds aesthetic appeal and functional value to any outdoor space. This article provides a detailed overview of the key steps involved in building a traditional brick oven, from planning and material selection to construction and curing.
Planning and Design Considerations
The success of a brick oven project hinges on thorough planning and design. Before commencing construction, it is crucial to consider factors such as location, size, and overall design. The chosen location should be a relatively level area with convenient access to building materials and adequate ventilation. Proximity to existing structures, such as the house or fences, should also be considered to ensure compliance with local building codes and fire safety regulations.
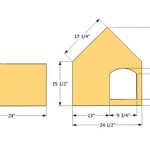
Selecting the appropriate size for the oven is paramount. Smaller ovens are suitable for occasional use and smaller gatherings, while larger ovens are better suited for frequent use and entertaining larger groups. The internal dimensions of the oven directly impact its cooking capacity and heat retention capabilities. A typical internal diameter for a domestic brick oven ranges from 36 to 48 inches. This size allows for the baking of multiple pizzas or a large roast.
The design of the oven will influence its aesthetic appeal and functionality. Traditional brick ovens typically feature a dome-shaped interior, which promotes even heat distribution and efficient heat retention. The design should also incorporate a chimney or flue to effectively vent smoke and ensure proper air circulation during the baking process. Consider the overall aesthetic of the outdoor space and select materials and a design that complements the existing surroundings.
Material Selection and Preparation
The selection of appropriate building materials is critical for the structural integrity and performance of the brick oven. The primary materials include refractory bricks, insulation materials, and mortar. Refractory bricks, also known as fire bricks, are specifically designed to withstand high temperatures without cracking or degrading. These bricks are essential for the oven's cooking surface and dome construction.
Insulation is crucial for retaining heat within the oven and preventing heat loss to the surrounding environment. Common insulation materials include ceramic fiber blankets, perlite, and vermiculite. These materials are typically applied around the oven dome and under the cooking surface to maximize heat retention. The thickness of the insulation layer will directly impact the oven's ability to maintain consistent temperatures.
Mortar plays a crucial role in bonding the bricks together and creating a structurally sound oven. Refractory mortar, specifically designed for high-temperature applications, should be used. This type of mortar is formulated to withstand the extreme heat cycles of a brick oven without cracking or crumbling. It is essential to carefully follow the manufacturer's instructions for mixing and applying the refractory mortar.
In addition to the core materials, consider the materials needed for the oven's foundation. A solid foundation is vital for preventing settling and cracking of the oven structure. Concrete is often used to create a stable platform upon which the brick oven will be built. Reinforcing the concrete foundation with steel rebar will further enhance its structural integrity.
The Construction Process: Foundation, Hearth, and Dome
The construction process involves several distinct stages, beginning with the foundation, followed by the hearth, and culminating in the construction of the dome. Each stage requires careful attention to detail and adherence to proper construction techniques.
The foundation is the base upon which the entire oven rests. Start by excavating the area where the oven will be located. Dig a trench to the required depth, typically around 6-8 inches, and fill it with compacted gravel. Place a layer of reinforcing steel rebar over the gravel base. Pour concrete into the trench, ensuring that it is level and smooth. Allow the concrete to cure for several days before proceeding to the next step.
The hearth is the cooking surface of the oven. Once the foundation has cured, construct a level platform using concrete blocks or bricks. Fill the interior of the platform with compacted gravel or sand. Place a layer of insulation material, such as perlite or vermiculite, over the compacted fill. This insulation layer will help to retain heat within the oven. Finally, lay the refractory bricks for the hearth surface, ensuring that they are level and tightly fitted together. Use refractory mortar to bond the bricks together.
The dome is the defining feature of a brick oven. Constructing the dome requires careful planning and precise bricklaying. Start by creating a wooden form or template to guide the shape of the dome. This form will support the bricks as they are being laid. Begin laying the bricks around the perimeter of the hearth, using refractory mortar to bond them together. Gradually work your way upward, following the curve of the form. Ensure that each brick is securely in place and that the mortar joints are consistent. As you approach the top of the dome, you may need to cut or shape the bricks to fit properly. Once the dome is complete, allow the mortar to cure for several days before removing the wooden form.
After the removal of the form, apply a layer of insulation material around the outside of the dome. This insulation layer will further enhance heat retention. Cover the insulation with a protective layer of stucco or concrete to protect it from the elements. Finally, construct a chimney or flue to vent smoke from the oven. The chimney should be positioned directly above the oven opening and should extend high enough to ensure proper draft.
Creating the oven's opening is a critical step that affects both functionality and aesthetics. The opening should be appropriately sized to allow for easy access to the cooking chamber while minimizing heat loss. An archway is a common design, adding structural support and visual appeal. Construct the arch using refractory bricks and refractory mortar, ensuring a smooth and even curve. Consider adding a metal door or damper to help regulate airflow and temperature within the oven.
The exterior finish of the brick oven can be customized to match the surrounding landscape and personal preferences. Options include applying stucco, plaster, or natural stone veneer. The exterior finish not only enhances the oven's aesthetic appeal but also provides additional protection from the elements. Ensure that the chosen finish is durable and weather-resistant.
Curing and Initial Use
After the construction is complete, the brick oven needs to be properly cured before it can be used for cooking. Curing involves gradually heating the oven over several days to allow the mortar to fully dry and harden. This process is essential to prevent cracking and ensure the long-term durability of the oven.
Begin the curing process by building a small fire inside the oven using dry wood. Allow the fire to burn for several hours, gradually increasing the size of the fire over the next few days. Monitor the oven for any signs of cracking or excessive moisture. If cracks appear, allow the oven to cool down completely and repair the cracks with refractory mortar. As the oven cures, the mortar will become increasingly resistant to heat and stress.
Once the oven is fully cured, it is ready for use. Start by building a small fire in the center of the hearth and allow it to burn for several hours. This will preheat the oven and bring it up to the desired cooking temperature. Use a thermometer to monitor the internal temperature of the oven. Adjust the size of the fire and the airflow to maintain the desired temperature.
When the oven has reached the desired temperature, rake the coals to the side and clean the hearth surface. Place your food directly on the hearth and bake as usual. Monitor the food closely and adjust the cooking time as needed. The unique heat and smoky flavor of a brick oven will transform your cooking into a culinary masterpiece.

Diy Wood Fired Outdoor Brick Ovens Are Not Only Easy To Build They Add Incredible Property Value

10 Amazing Diy Oven Ideas

Diy Brick Oven Instructions Outdoor 41 Off

Oven Brick Build An Outdoor For Your Family With Our Uber Detailed Wood Burning Plans Best Er

What Is The Cost Of Building A Oven

Diy Ovens Wood Burning Oven Kits Plans

How To Build An Outdoor Oven Lowe S

How To Build An Outdoor Oven Citygirl Meets Farmboy

Build Your Own Oven Patio Outdoor Furnishings

How To Build An Outdoor Oven Citygirl Meets Farmboy