How to Build an Outdoor Grill Table: A Comprehensive Guide
An outdoor grill table provides a designated workspace for preparing food, storing grilling tools, and enhancing the overall grilling experience. Building one offers a customizable solution that can be tailored to specific needs and aesthetic preferences. This guide provides a detailed, step-by-step process for constructing a sturdy and functional outdoor grill table.
Planning and Design Considerations
Before commencing the construction phase, thoughtful planning is crucial. This involves determining the table's dimensions, selecting appropriate materials, and accounting for the grill's specific requirements.
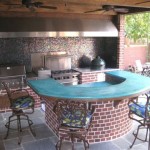
Sizing and Configuration: The dimensions of the grill table should be determined by the size of the grill itself, the amount of workspace desired, and the available space in the outdoor area. Accurately measure the grill's width, depth, and height to ensure a comfortable and secure fit within the table's frame. Consider incorporating additional countertop space for food preparation, serving platters, and condiments. If storage is desired, plan for shelves, drawers, or cabinets within the table's base. A practical height for the table is typically between 36 and 42 inches, corresponding to standard countertop height. The overall size and design should complement the surrounding outdoor environment.
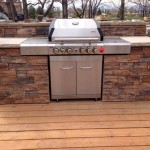
Material Selection: The choice of materials significantly impacts the table's durability, appearance, and cost. Pressure-treated lumber is highly recommended for the framing due to its resistance to rot, insects, and moisture. This is especially critical for outdoor applications. Cedar is a naturally weather-resistant wood that provides an attractive aesthetic for the tabletop and shelving. Other wood options include redwood, teak, and cypress, each offering varying degrees of durability and cost. For the countertop, consider durable and heat-resistant materials like concrete, granite, tile, or stainless steel. These options offer long-lasting performance and are easy to clean. Hardware, such as screws and nails, should be stainless steel or coated to prevent rust and corrosion. Consider a combination of materials to achieve the desired look and functionality. For instance, a pressure-treated frame can be coupled with a cedar top and stainless steel accents.
Grill Integration: The design must accommodate the grill's specific needs. If the grill is a built-in model, accurate cutouts in the countertop are essential for a seamless fit. Ensure adequate ventilation around the grill to prevent overheating and potential fire hazards. Refer to the grill manufacturer's specifications for recommended clearances. If the grill is a portable model, the tabletop should be sturdy enough to support its weight and handle the heat generated during use. Consider adding heat shields or insulating materials beneath the grill to protect the wooden frame. Additionally, plan for convenient access to propane tanks or natural gas lines if applicable.
Materials and Tools Required
Gathering all necessary materials and tools before commencing the project streamlines the construction process and minimizes interruptions.
Lumber and Materials: The specific lumber requirements will vary depending on the table's dimensions and design. Generally, the following lumber is needed: pressure-treated 4x4s for the legs, pressure-treated 2x4s for the frame, cedar or other suitable wood for the tabletop and shelving, and plywood or OSB for reinforcing the frame. Other materials include screws (exterior grade), nails (galvanized), wood glue (exterior grade), sandpaper, wood stain or sealant (optional), and countertop material (concrete, granite, tile, or stainless steel). A detailed cut list, based on the design specifications, will ensure accurate material ordering.
Tools: A well-equipped workshop is essential for efficient and accurate construction. Essential tools include a circular saw or table saw for cutting lumber, a drill with various drill bits and screw driving heads, a measuring tape, a level, a square, a pencil or marker, a sander, clamps, safety glasses, and work gloves. A miter saw can be beneficial for making precise angled cuts. Additional tools, such as a router for creating decorative edges or a concrete mixer for pouring a concrete countertop, may be required depending on the design.
Construction Process: Step-by-Step Instructions
The following steps provide a comprehensive guide to building the outdoor grill table, focusing on accuracy and structural integrity.
Frame Construction: Begin by cutting the 4x4 pressure-treated lumber to the desired leg height. Ensure all four legs are the same length to create a level surface. Next, cut the 2x4 pressure-treated lumber to create the top and bottom frames. The frame dimensions should correspond to the planned tabletop size. Assemble the frames using screws and wood glue, ensuring the corners are square. Attach the legs to the frame using screws and wood glue. Reinforce the joints with metal brackets if desired. Add additional 2x4 supports between the legs for added stability. Ensure that the frame is level and square before proceeding.
Tabletop Construction: Cut the cedar or chosen wood for the tabletop to the desired dimensions. Depending on the table's size, multiple pieces of wood may be required. Join the pieces together using wood glue and clamps, ensuring a tight and seamless fit. Allow the glue to dry completely before proceeding. Sand the tabletop surface smooth, starting with a coarse grit sandpaper and progressing to a finer grit. Apply a wood stain or sealant to protect the wood from the elements. Attach the tabletop to the frame using screws, ensuring the screws are countersunk to prevent them from protruding. If using a concrete or tile countertop, follow the manufacturer's instructions for installation. For concrete, a form must be built, concrete poured, and allowed to cure before removing the form and sanding the edges. For tile, a cement board substrate is typically used, followed by thin-set mortar and grout.
Shelving and Storage (Optional): If storage is desired, cut the lumber to create shelves or cabinets within the table's base. Build the shelves using plywood or OSB, and attach them to the frame with screws and wood glue. Add doors or drawers to the cabinets if desired. Install hinges and drawer slides for smooth operation. Ensure the shelves and cabinets are properly supported to handle the weight of stored items.
Finishing Touches: Inspect the entire table for any sharp edges or rough surfaces. Sand any imperfections and apply a final coat of stain or sealant to protect the wood. Add hardware, such as handles and knobs, to the cabinets or drawers. Consider adding casters to the legs for easy mobility. Clean the tabletop and surrounding area to remove any debris. Ensure the grill is properly positioned and connected to the fuel source. Thoroughly test the table's stability and functionality before use.
Safety Precautions: Throughout the construction process, prioritize safety. Wear safety glasses to protect your eyes from flying debris. Use work gloves to protect your hands. Always follow the manufacturer's instructions for operating power tools. Work in a well-ventilated area to avoid inhaling sawdust or fumes. Securely clamp materials before cutting or drilling. Be mindful of electrical hazards when using power tools near water. If unsure about any aspect of the construction process, consult with a qualified professional.
Maintenance: Regular maintenance is essential to prolong the life of the outdoor grill table. Clean the tabletop regularly with a mild soap and water solution. Apply a fresh coat of stain or sealant every year to protect the wood from the elements. Inspect the frame and hardware for any signs of damage or corrosion. Tighten any loose screws or replace damaged components. Cover the table when not in use to protect it from rain, snow, and sun. Store the table in a sheltered area during the winter months.

Diy Grill Cart Bbq Prep Table Free Build Plans

Diy Grill Cart Bbq Prep Table Free Build Plans

Diy Grill Cart Bbq Prep Table Free Build Plans

Diy Grill Cart Angela Marie Made

Rolling Grill Side Cart With Storage Houseful Of Handmade
:max_bytes(150000):strip_icc()/charlestoncrafted-b52d47713ae44d57a8f06697b427b9fe.jpg?strip=all "12 Diy Grill And Bbq Island Plans")
12 Diy Grill And Bbq Island Plans

Diy Grill Cart How To Build An Outdoor

Diy Do Grill Table

Diy Grill Cart Bbq Prep Table Free Build Plans

Diy Grill Cart How To Build An Outdoor