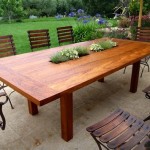
DIY Outdoor Wood Table Top: A Step-by-Step Guide
Creating an outdoor table top is a rewarding DIY project that allows you to personalize your outdoor space. Whether you're building a new table or simply replacing an old top, this guide will walk you through the essential steps to construct a durable and aesthetically pleasing surface. From choosing the right wood to finishing touches, this comprehensive guide will equip you with the knowledge and skills you need to successfully complete your project.
Choosing the Right Wood
The first step in building a DIY outdoor table top is selecting the right wood. Several factors contribute to the suitability of wood for outdoor use, including durability, weather resistance, and aesthetic appeal.
Hardwoods: Hardwoods like oak, maple, and teak are known for their durability and resistance to weathering. They are ideal for outdoor furniture due to their strength and longevity. However, they can be more expensive than softwoods.
Softwoods: Softwoods like cedar and redwood are naturally resistant to decay and insects. They are often used for outdoor projects due to their affordability and ease of working with. However, they are not as dense or durable as hardwoods.
Treated Wood: Pressure-treated lumber is specifically designed for outdoor use. It is impregnated with preservatives that protect it from rot, insects, and moisture. While less visually appealing than natural wood, treated lumber is a practical and cost-effective choice for outdoor projects.
Consider the desired aesthetic and the level of durability you need when choosing the wood for your table top. Remember that the chosen wood will need to be adequately protected with a sealant to ensure longevity and resist the elements.
Constructing the Table Top
Once you have chosen the wood, you need to assemble the table top. The construction process depends on the type of table top you want to build. Here are two common methods:
Plank Construction
This method involves using individual planks of wood arranged side by side to create a flat surface. To build a plank table top, follow these steps:
- Cut the Planks: Cut the planks to the desired length and width, ensuring they are all the same size.
- Joint the Edges: For a smooth and seamless finish, you can consider using a router to create a tongue-and-groove joint between the planks. Alternatively, you can use wood glue and screws to secure the planks together.
- Sand the Top: Sand the surface of the table top, smoothing out any rough edges and imperfections.
- Add a Border: Optional: You can add a border to the table top for a more finished look. Use a router to create a decorative edge.
Sheet Construction
This method involves using a single sheet of plywood or a similar material to create the table top. This method is easier and faster than plank construction. Follow these steps:
- Cut the Sheet: Cut the sheet of plywood or other material to the desired size.
- Add a Laminate Top: For extra durability and moisture resistance, you can add a laminate top to the plywood. This involves gluing and clamping a sheet of laminate to the plywood surface.
- Sand the Top: Sand the surface of the table top, smoothing out any rough edges and imperfections.
- Add a Border: Optional: You can add a border to the table top for a more finished look. Use a router to create a decorative edge.
Finishing Touches
Once the table top is constructed, you can add finishing touches to protect it from the elements and enhance its appearance.
Sanding: Sanding the table top with progressively finer grits of sandpaper smooths the surface and prepares it for staining or painting.
Sealing: Applying a sealant to the table top is essential for protecting it from water damage, UV rays, and stains. There are various types of sealants available, including:
- Water-based sealants: These sealants are low-VOC and easy to apply but may require multiple coats for full protection.
- Oil-based sealants: These sealants offer a durable and long-lasting finish but may take longer to dry and have a stronger odor.
- Polyurethane: A popular sealant that provides excellent protection and a glossy finish.
Staining or Painting: You can stain or paint the table top to personalize the look and protect the wood. Use a high-quality paint specifically designed for outdoor use for best results.
Hardware: Add any necessary hardware to your table top, such as screws, brackets, or hinges.
By following these steps, you can build a beautiful and durable table top that will enhance your outdoor space for years to come. Remember to choose the right wood, construct the table top carefully, and apply appropriate finishing touches to protect it from the elements.

Diy Outdoor Table Angela Marie Made

Diy Outdoor Table Spoonful Of Imagination

Diy Outdoor Dining Table Restoration Hardware Dupe Thrifty Pineapple

Diy Patio Table 15 Easy Ways To Make Your Own Bob Vila

Diy Outdoor Table Free Plans Cherished Bliss

Budget Friendly Diy 8 Foot Outdoor Table Simply Home

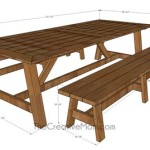
Wood Picnic Table Plans Houseful Of Handmade

How To Build A Simple Diy Wooden Table Top The Way

Outdoor Table With X Leg And Herringbone Top Free Plans

Diy How To Build A Round Outdoor Dining Table Building Strong