How To Build Outdoor Handrails For Stairs
Building outdoor handrails for stairs significantly enhances safety and accessibility, especially in areas prone to inclement weather or where mobility is a concern. A well-constructed handrail provides essential support and reduces the risk of falls. This article details the process of constructing durable and code-compliant outdoor handrails, covering material selection, planning, construction techniques, and adherence to safety regulations.
Planning and Preparation
Before commencing the physical construction, meticulous planning is crucial. The first step involves assessing the staircase itself. Measure the total rise (vertical height) and run (horizontal distance) of the stairs. This information is critical for determining the proper height and length of the handrail. Local building codes often dictate specific requirements regarding handrail height, spacing between vertical supports (balusters), and the overall strength of the structure. Failing to adhere to these codes can result in costly rework and potential safety hazards.
Consulting local building codes is an indispensable step. Requirements frequently specify a handrail height between 34 and 38 inches measured vertically from the stair nosing (the protruding edge of the stair tread). The spacing between balusters typically cannot exceed 4 inches to prevent small children from squeezing through. Furthermore, the handrail must be graspable and continuous along the entire length of the staircase. Codes may also stipulate the material types permitted for outdoor use and the necessary structural integrity to withstand specific load requirements.
Once the measurements and code requirements are obtained, create a detailed plan or blueprint. This plan should outline the dimensions of all components, including posts, rails, and balusters. It should also specify the type of fasteners and connectors to be used. A well-defined plan minimizes errors and wasted materials. When designing the handrail, consider the aesthetic appeal. The handrail should complement the existing architecture of the house and landscaping. Choose a style that aligns with the overall design of the property.
Material selection is a crucial decision. Pressure-treated lumber is a common and cost-effective option for outdoor handrails. It is treated with chemicals to resist rot, decay, and insect infestation. However, it is essential to use lumber specifically rated for ground contact, especially for posts that will be buried in the ground. Other durable options include cedar, redwood, and composite materials. Cedar and redwood are naturally resistant to decay but are generally more expensive than pressure-treated lumber. Composite materials, made from a combination of wood fibers and plastic, offer excellent durability and low maintenance but often carry the highest price tag.
Gather all necessary tools and materials before starting the construction process. Essential tools include a circular saw, miter saw, drill, level, measuring tape, post-hole digger, concrete mix, safety glasses, and work gloves. The quantity of materials will depend on the length of the staircase and the design of the handrail. It is advisable to purchase slightly more material than required to account for errors or waste. Safety is paramount. Always wear safety glasses to protect eyes from flying debris and work gloves to protect hands from splinters and sharp edges.
Construction Process
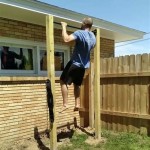
The first step in the construction process is installing the support posts. The posts provide the primary structural support for the handrail and must be securely anchored. Typically, posts are spaced no more than 6 to 8 feet apart, depending on local code requirements and the overall design. The most common method for securing posts is to set them in concrete footings below the frost line. The frost line is the depth to which the ground freezes in winter. Setting the posts below the frost line prevents them from heaving due to freeze-thaw cycles.
Dig post holes using a post-hole digger or auger. The holes should be at least twice the diameter of the post and deep enough to extend below the frost line. Place the posts in the holes and ensure they are plumb (perfectly vertical) using a level. Add concrete mix around the posts, following the manufacturer's instructions. It is essential to use a proper concrete mix designed for setting posts. Some mixes require adding water, while others are pre-mixed. Tamp the concrete firmly around the posts to ensure it is compacted and free of air pockets. Use temporary bracing to keep the posts plumb while the concrete cures. Allow the concrete to cure for at least 24 to 48 hours before proceeding with the next step.
Once the posts are securely set, the next step is to install the top and bottom rails. The rails provide the horizontal support for the handrail and connect the posts. Measure and cut the rails to the appropriate length, ensuring they extend between the posts and are level. Attach the rails to the posts using screws, bolts, or specialized connectors. Predrill pilot holes before driving screws or bolts to prevent the wood from splitting. Use galvanized or stainless-steel fasteners to resist corrosion in outdoor environments. Ensure the rails are securely fastened to the posts and are level along their entire length.
The installation of balusters is the next stage. Balusters are the vertical supports that fill the space between the top and bottom rails. They provide additional support and prevent people from falling through the gaps. The spacing between balusters is typically dictated by local building codes and should not exceed 4 inches. Measure and cut the balusters to the appropriate length, ensuring they fit snugly between the top and bottom rails. Attach the balusters to the rails using screws or nails. Use a jig or spacer to ensure consistent spacing between the balusters. Predrill pilot holes before driving screws or nails to prevent the wood from splitting.
With the structural framework complete, the final step is to install the handrail itself. The handrail is the component that people will grip for support. It should be smooth, comfortable to hold, and continuous along the entire length of the staircase. The handrail can be made from a variety of materials, including wood, metal, or composite. Secure the handrail to the top rail using screws, bolts, or specialized connectors. Ensure the handrail is firmly attached and can withstand repeated use. Consider adding a decorative cap or molding to the top of the handrail for a more finished look. A well-designed and properly installed handrail adds both safety and aesthetic appeal to the staircase.
Safety Considerations and Code Compliance
Safety should always be the top priority during the construction process. Always wear appropriate safety gear, including safety glasses, work gloves, and hearing protection. Use caution when operating power tools and follow the manufacturer's instructions. Be aware of potential hazards, such as uneven surfaces, slippery conditions, and overhead obstructions. If working at heights, use a stable ladder or scaffolding and take precautions to prevent falls. If using power tools, ensure they are properly grounded and in good working condition. Never work under the influence of drugs or alcohol.
Adhering to local building codes is essential. Before commencing construction, obtain the necessary permits from the local building department. This ensures the project complies with all applicable regulations and safety standards. Building codes are designed to protect the public from hazards and ensure the structural integrity of buildings and structures. Failure to comply with building codes can result in fines, delays, and even forced demolition of the project. Consult with a building inspector or qualified professional if there are any questions or uncertainties about code requirements.
Regular maintenance is crucial for ensuring the long-term durability and safety of the handrail. Inspect the handrail periodically for signs of wear, damage, or deterioration. Check for loose connections, cracked wood, and corroded fasteners. Repair any damage promptly to prevent further deterioration and potential safety hazards. Apply a fresh coat of paint or sealant every few years to protect the wood from the elements. Clear debris, such as leaves and snow, from the handrail to prevent slippery conditions. Regular maintenance will extend the lifespan of the handrail and ensure it remains safe and functional for years to come.
Accessibility considerations are important, particularly for individuals with limited mobility. The handrail should be designed and installed to meet the needs of all users, regardless of their physical abilities. Ensure the handrail is graspable and continuous along the entire length of the staircase. The handrail should be at a consistent height and free of obstructions. Consider adding tactile warnings or contrasting colors to the handrail to assist individuals with visual impairments. Consult with an accessibility expert or building code official for specific requirements and recommendations.
Proper drainage around the posts is critical for preventing water damage and extending the lifespan of the handrail. Ensure the ground around the posts slopes away from the structure to allow water to drain away. Consider installing drainage systems, such as French drains, to divert water away from the posts. Use gravel or other permeable materials around the base of the posts to improve drainage. Water damage is a common cause of deterioration in wood structures, so proper drainage is essential for long-term durability.

How To Build A Simple Handrail 7 Steps With S Instructables

Mel And I Made A Hand Rail For My Porch Outdoor Stair Railing Stairs Handrail

13 Diy Outdoor Stair Railing Ideas Handrail Railings Stairs

Installing Your Own Diy Easy Install Simple Handrail Simplified Building

Simple Exterior Handrail For Less Than 100 6 Steps With S Instructables

10 Easy Outdoor Handrails Ideas That You Can Build Yourself Simplified Building

10 Easy Outdoor Handrails Ideas That You Can Build Yourself Simplified Building

5 Low Cost Exterior Handrail Ideas Tinktube

Outdoor Stair Railing For Garage Steps

Outdoor Stair Railing Diy Family Handyman